
A Miss Molly - Sports aerobatic model, 4 function, 1137mm span, Saito FA-40a. I decided to build this model, because I’d finished building / repairing everything else, the winter weather was keeping me away from the flying field and I wanted something to keep me busy. I’d just re-engined my Piper Cub (more power needed) and so had a virtually new Saito 40 available for a new project.
Because there’s plenty of work in building from scratch, I scouted around for plans of a suitable design to take this engine, which I found at Aero Fred .com. They keep a library of old plans, which they’ll print and post to you at a very reasonable cost. Miss Molly was designed by Peter Miller and 1st published as a free plan in Model World in 2001. I also downloaded the original article. Peter says ‘aerobatics are smooth, positive and easy, spin recovery is instant and flick rolls are quite fast enough. Low speed handling is impeccable’. Let’s hope so.
The Plans


He chose an OS 40 4 stoke but doesn’t explain why, in preference to say a cheaper, smaller 2 stroke but since that’s what he designed it for, it suited me. The fuselage, wings, tailplane, rudder and cowl are all from balsa, with occasional plywood components, such as the fire wall, certain fuselage formers and doublers.
Cutting Out Ribs "On Mass"


The wing has parallel leading and trailing edges, so it was easiest to shape the ribs using the sandwich method and since it had a symmetrical section, I left temporary spacers on each rib to enable it to be built on a flat board. Though Peter says it’s a ‘remarkably strong wing’, tested in a ‘crash’, I didn’t feel comfortable with neither upper or lower sheeting to form a ‘D’ box, trailing edge sheeting or cap strips and so incorporated them anyway.
Wings Layout


Also I wasn’t too convinced that the dihedral brace connection between the 2 wing halves would be strong enough for some of my antics, so I beefed up the joint with glass fibre tape across the top and bottom surfaces. Back in 2001 I guess it was common, for economy reasons, to install just 1 central servo with control rods via bell cranks in each wing to activate the ailerons but nowadays they’re comparatively cheap so I installed servos to each wing instead.
Fuselage Assembly


Peter says ‘Miss Molly is easy to build, I’m lazy and I design them that way’ and to an extent this philosophy is apparent in the fuselage, fin and tailplane. The fuselage is essentially formed in 3mm balsa sheet, with balsa and ply formers and the tail feathers are from 6mm balsa sheet, none of which have any lightening holes. Well I have no need to be lazy and so I built them in or should that be – cut them out. He wrote that he added an ounce of lead to the tail to balance it, so I moved the servo tray further back than shown but in the event, I also still needed to add the same amount of lead. In a few instances, there were disparities between the shape / dimensions of components in different views on the drawings and it occurred to me that the plans had been amended maybe hurriedly after the original model built and its review for the magazine, so you need to check before cutting things out.
Balsa Bashing & Shaping


The cowl was formed with planks of thick balsa sheet, sanded to shape. It took a bit of work but I was in no rush. On the plans, the main undercarriage is shown as bent wire affixed to the face of former No 2. It occurred to me that with a heavy landing, the former might get ripped out and in any event, the fuel tank needed to be bigger than the 4oz version shown and therefore would have to pass through the former, which wasn’t possible with the undercarriage fixing in the way. I therefore used a preformed aluminum undercarriage, which I bolted to a 6mm ply plate on the underside – much better. In the conclusion of his article Peter implores ‘please do make an effort to do a fancy colour scheme’; so I did!.
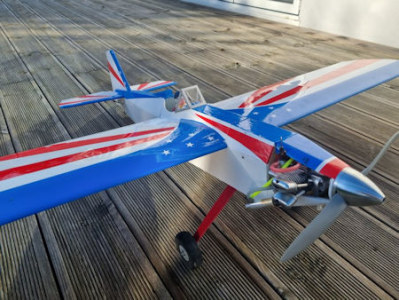
Finished Molly


Now it’s finished, I’m hoping the incessant rain will stop so I can get up to the flying field and try it out

