- Posts: 3170
- Thank you received: 903
Chuck Mustang
- Phil Ford
-
 Topic Author
- Offline
- Administrator
-

Less
More
4 years 7 months ago - 4 years 7 months ago #24259
by Phil Ford
Chuck Mustang was created by Phil Ford
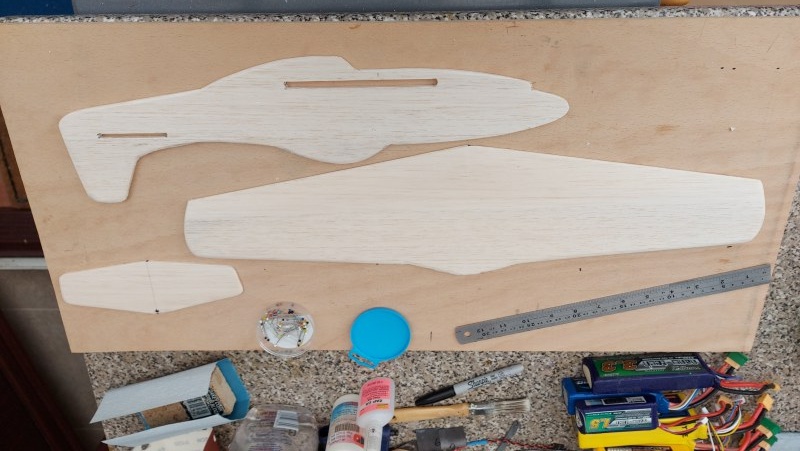
Chuck or Elastic Band launch. Ideal back garden fun fly. Original plans were for a foam board version but I don't have any foam board but some 1/8th sheet balsa. So the latter I will utilise.
Glued two sheets together to make wider sheets. Then using my wing template I carefully cut out the wing. Sanded to template outline. Then created another wing cutout. These will be glued together to make up 1/4 thick wing. Yes I am going to profile it. The fuselage was cut out using the same method as the wing and will be doubled up. The fuselage profiles and wings were glued together with Aliphatic resin, then placed on a smooth rigid surface and then compressed down using heavy batteries.
Tomorrow if DIY does not interfere I will cut out a stabiliser and start profiling the wing. Hopefully by evening have a kit of parts ready for gluing and resembling a Mustang.
Last edit: 4 years 7 months ago by Phil Ford.
The following user(s) said Thank You: Brian
Please Log in or Create an account to join the conversation.
- 4Pedalsfly
-

- Offline
- Platinum Member
-

Less
More
- Posts: 803
- Thank you received: 202
4 years 7 months ago #24261
by 4Pedalsfly
Replied by 4Pedalsfly on topic Chuck Mustang
Good progress Phil - At 22 in wing span you will probably find the garden space too limiting.
If you search "Catapult Glider Trimming " a few good videos come up, mainly American.
Colin.
If you search "Catapult Glider Trimming " a few good videos come up, mainly American.
Colin.
Please Log in or Create an account to join the conversation.
- Brian
-
- Offline
- Platinum Member
-

Less
More
- Posts: 1045
- Thank you received: 415
4 years 7 months ago #24264
by Brian
Replied by Brian on topic Chuck Mustang
Interesting build Phil, takes me back to the early days of control line flying when you could get kits for "whip" control models, the construction was similar to your Mustang. I had a Typhoon for whip control, it "flew" on a length of button thread tied to a thin garden cane. The Tiffy was flown in the road, the only thing limiting the line length was the proximity of front garden walls, apart from grinding off the bottom of the model on the road, it was a lot of fun. My final whip controlled model was based on a KK F9-F designed for Jetex power, slightly different from the Typhoon, the F9-F was controlled with two lengths of button thread and a conventional bellcrank and pushrod for a tiny trim tab/elevator on one half of the tail plane. Same type of construction, just sanded and doped profiles and a few lines drawn on with the (then) newly invented ballpen called "Biro", to represent control surfaces etc. Couldn't do it now, thinking about it makes me feel dizzy.
The following user(s) said Thank You: Phil Ford
Please Log in or Create an account to join the conversation.
- Phil Ford
-
 Topic Author
- Offline
- Administrator
-

Less
More
- Posts: 3170
- Thank you received: 903
4 years 7 months ago - 4 years 7 months ago #24266
by Phil Ford
Replied by Phil Ford on topic Chuck Mustang
I vaguely remember some model planes I bought with Saturday morning pocket money (earned may I add by doin' early morn paper round down High Howe Lane, Shapland Ave, etc.). Making minute "adjustments" to the stabiliser for level flight trim, I think by bending it slightly, the model was attached to a piece of long string. Nose weight was round fishing weights prised open and squeezed on to the nose or wherever for ballast.
You now start flight by swinging it round and round yourself gradually letting the string play out. Of course anyone knows that as the string plays out you have to go faster and faster to keep the plane flying. When finally it was unable to fly and stalled into the ground, I or my mates would momentarily teeter upright before also crashing to the ground, the world seeming to whirl around above in a haze. Oh what fun! Later I added a handle (a piece of bamboo cane) to the string as a few times I was unable to grip the string and the flying object would shoot off at a tangent in an uncontrolled death spiral.
You now start flight by swinging it round and round yourself gradually letting the string play out. Of course anyone knows that as the string plays out you have to go faster and faster to keep the plane flying. When finally it was unable to fly and stalled into the ground, I or my mates would momentarily teeter upright before also crashing to the ground, the world seeming to whirl around above in a haze. Oh what fun! Later I added a handle (a piece of bamboo cane) to the string as a few times I was unable to grip the string and the flying object would shoot off at a tangent in an uncontrolled death spiral.
Last edit: 4 years 7 months ago by Phil Ford.
Please Log in or Create an account to join the conversation.
- Phil Ford
-
 Topic Author
- Offline
- Administrator
-

Less
More
- Posts: 3170
- Thank you received: 903
4 years 7 months ago - 4 years 7 months ago #24267
by Phil Ford
Replied by Phil Ford on topic Chuck Mustang
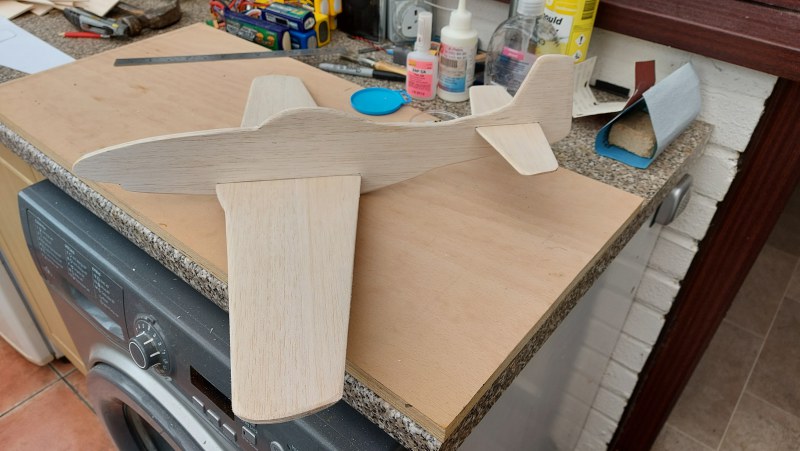
A complete kit of parts now made. The doubling up gluing of the fuselage sides and wing sheets is done and set. Profiled the wing edges and then a dry fit check of the wing in the fuselage slot. Fits really nice and fuselage virtually square, maybe just a bit of fettling. Dry fit check the horizontal stabiliser in the fuselage slot. All good! Now did some partial sanding and profiling of the fuselage edges mainly aft of the cockpit area, the forward end left alone for now. Aligned wing and glued it in with thin CA. Now I can align the stabiliser too using the wing tips as a reference point. Glued in with CA.
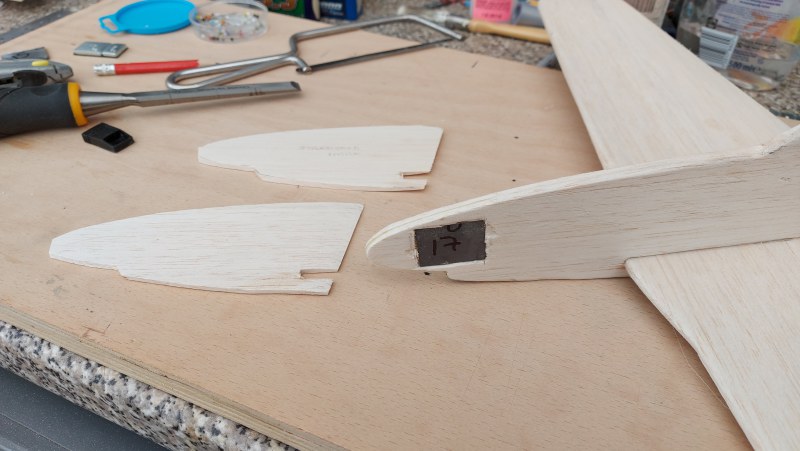
Now on to the front. Cutout a slot for the 15 gms ballast first. Those extra pieces of nose (I will call them the cowling) will be glued on either side to retain the ballast and add extra strength to front end. These cowling pieces were feathered at the back edge for effect. A kebab stick was inserted on the underside between the ballast and the leading edge of the wing for the launching elastic. Prior to gluing the cowling I used pins to hold the cowling on and took it outside on the grass for an initial chuck. Wings stayed level but I think it may need some trim tabs on the stabiliser. Although as it is a warbird it might want more speed, ie; elastic band launch into a decent breeze. Wondering what I can use to seal the balsa if needed at all.
Now on to the front. Cutout a slot for the 15 gms ballast first. Those extra pieces of nose (I will call them the cowling) will be glued on either side to retain the ballast and add extra strength to front end. These cowling pieces were feathered at the back edge for effect. A kebab stick was inserted on the underside between the ballast and the leading edge of the wing for the launching elastic. Prior to gluing the cowling I used pins to hold the cowling on and took it outside on the grass for an initial chuck. Wings stayed level but I think it may need some trim tabs on the stabiliser. Although as it is a warbird it might want more speed, ie; elastic band launch into a decent breeze.
Last edit: 4 years 7 months ago by Phil Ford.
Please Log in or Create an account to join the conversation.
- MikeSeale
-
- Offline
- Platinum Member
-

Less
More
- Posts: 1258
- Thank you received: 428
4 years 7 months ago #24270
by MikeSeale
Replied by MikeSeale on topic Chuck Mustang
dihedral?
Please Log in or Create an account to join the conversation.
Moderators: DaveBright
Time to create page: 0.309 seconds
Latest Posts
-
-

- Ray Ivey's Models
- In WimborneMac Members / For Sale - Exchange - Wanted
- by Brian
- 5 days 12 hours ago
-
-
-

- Various Gliders from Dave Ambrose ex W.M.A.C Membe...
- In WimborneMac Members / For Sale - Exchange - Wanted
- by 4Pedalsfly
- 2 weeks 19 hours ago
-
©
2009 - 2025
WMAC PCF Design


