- Posts: 1045
- Thank you received: 415

OSFS 1.20 Surpass Mklll
- Brian
-
 Topic Author
- Offline
- Platinum Member
-

Less
More
4 years 3 months ago #25238
by Brian
Replied by Brian on topic OSFS 1.20 Surpass Mklll
The tapping would be done with a 3.5 X 0.6 plug tap held in a pin vice Kevin, minimises the risk of damaging the existing thread.
Please Log in or Create an account to join the conversation.
- 4Pedalsfly
-

- Offline
- Platinum Member
-
Less
More
- Posts: 803
- Thank you received: 202
4 years 3 months ago #25240
by 4Pedalsfly
Replied by 4Pedalsfly on topic OSFS 1.20 Surpass Mklll
Brian - In my I.C days I use to get bearings from ARB Bearings on the Ferndown Industrial Estate - Tel 01202 862730.
Very helpful people & good prices.
Laser engines used to use B.A Socket Head cylinder head screws - even rarer than hens teeth - thankfully they eventually
went Metric.
Colin
Very helpful people & good prices.
Laser engines used to use B.A Socket Head cylinder head screws - even rarer than hens teeth - thankfully they eventually
went Metric.
Colin
The following user(s) said Thank You: Brian
Please Log in or Create an account to join the conversation.
- Brian
-
Topic Author
- Offline
- Platinum Member
-
Less
More
- Posts: 1045
- Thank you received: 415
4 years 3 months ago #25253
by Brian
Replied by Brian on topic OSFS 1.20 Surpass Mklll
Apart from the cylinder head complete with newly installed valves, the OS is now completely dismantled. The lack of oil around the cam shaft and cam followers seems to be caused by a blocked oil hole. Not surprised when I saw the amount of gunk from the rusty bearings. Satisfying task ahead, prepping the parts for re-assembly, nice job for a rainy day.
The following user(s) said Thank You: 4Pedalsfly
Please Log in or Create an account to join the conversation.
- Brian
-
Topic Author
- Offline
- Platinum Member
-
Less
More
- Posts: 1045
- Thank you received: 415
4 years 2 months ago - 4 years 2 months ago #25260
by Brian
Replied by Brian on topic OSFS 1.20 Surpass Mklll
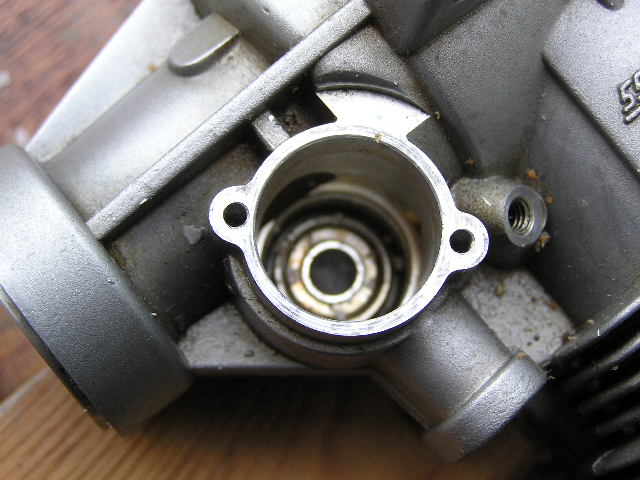
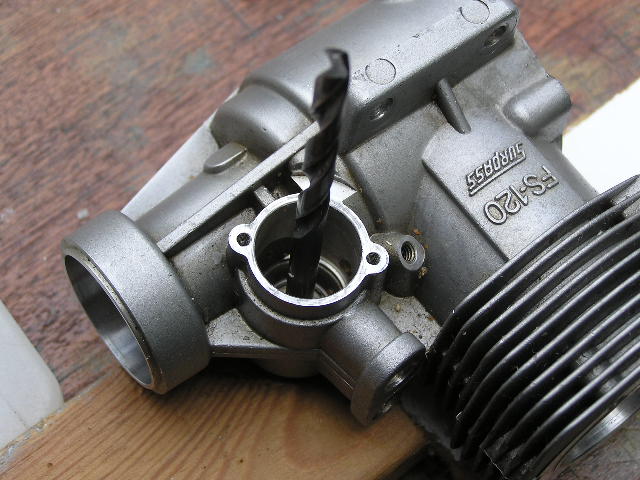
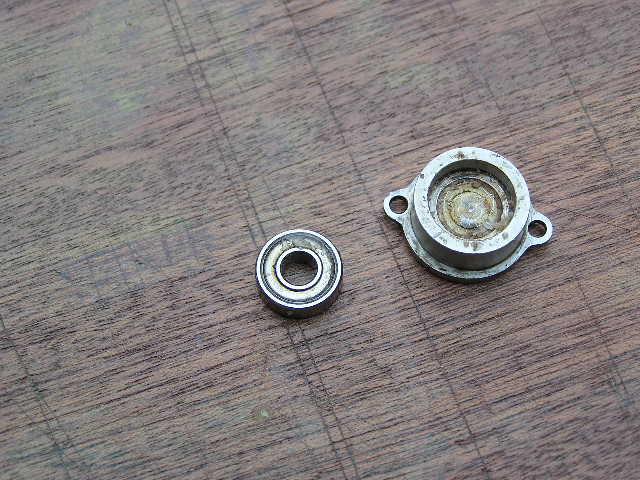
The engine parts have cleaned up nicely, the vent nipple from the cam gear has been cleaned out, the last task was to remove the camshaft bearings. Access to these bearings is from one side only, bit tricky to remove, they didn't loosen when the crankcase was heated and lacking a bearing puller, I resorted to the method I learned long ago when working on aileron bearings for the DH Vampire. I didn't have any suitable grease, so I used candle wax.
The wax was shaved into small bits that could be poked into the bearing bore, the wax was tamped down using the shank of a 5mm drill bit, banged in with a plastic faced mallet. Sounds drastic but isn't damaging at all. After several additions of wax shavings and a few whacks with the mallet, both bearings were removed from their housings.
The debris on the crankcase is bits of plastic from the mallet, tends to happen when beating a drill bit on its sharp end.
Last edit: 4 years 2 months ago by Brian. Reason: Additional information.
The following user(s) said Thank You: 4Pedalsfly, kevinross
Please Log in or Create an account to join the conversation.
- Brian
-
Topic Author
- Offline
- Platinum Member
-
Less
More
- Posts: 1045
- Thank you received: 415
4 years 2 months ago #25283
by Brian
Replied by Brian on topic OSFS 1.20 Surpass Mklll
Today I was looking forward to a day flying at Cashmoor, unfortunately events turned out otherwise and I found myself confined to barracks for the day instead.
To ease my disappointment, I decided to rebuild the OS FS 1.20 Surpass. All the parts were now squeaky clean and lightly oiled, I'd even bought a new set of screws for the cylinder head. The rebuild went without any dramas, with a heated crankcase the four bearings settled in nicely, in fact everything was going so well that I thought I might be able to fit the engine to the WOT 4XL and fly it tomorrow. I got as far as trying to fit the cylinder head. The new screws are no use at all, they look very nice, but the 2.5mm hex socket heads are slightly oversize and its impossible to tighten them. Fortunately I found this before even trying to use them. Now I was left with a set of useless screws, and five original screws that were usable and one with a damaged socket. Seemed a pity to give up, I dug out every hex key I could find. Naturally nothing apart from a 2.5mm key went anywhere near. While drinking my second cup of coffee, I remembered that I have a tiny kit of "come in handy" screwdriver bits, hex keys and a few tiny sockets. Just to see if anything would work, I offered up a small Torx driver to the damaged screw socket, it almost but not quite went in. I drilled a 3.6mm hole in a piece of scrap alloy, put the alloy bar in a vice, popped the ailing screw into the hole and gently tapped the Torx bit into the screw head. I didn't think it would, but it actually did work, and now the engine is assembled and needs only a final check on valve clearances which I'm sure must have been affected by the dismantling etc.
To ease my disappointment, I decided to rebuild the OS FS 1.20 Surpass. All the parts were now squeaky clean and lightly oiled, I'd even bought a new set of screws for the cylinder head. The rebuild went without any dramas, with a heated crankcase the four bearings settled in nicely, in fact everything was going so well that I thought I might be able to fit the engine to the WOT 4XL and fly it tomorrow. I got as far as trying to fit the cylinder head. The new screws are no use at all, they look very nice, but the 2.5mm hex socket heads are slightly oversize and its impossible to tighten them. Fortunately I found this before even trying to use them. Now I was left with a set of useless screws, and five original screws that were usable and one with a damaged socket. Seemed a pity to give up, I dug out every hex key I could find. Naturally nothing apart from a 2.5mm key went anywhere near. While drinking my second cup of coffee, I remembered that I have a tiny kit of "come in handy" screwdriver bits, hex keys and a few tiny sockets. Just to see if anything would work, I offered up a small Torx driver to the damaged screw socket, it almost but not quite went in. I drilled a 3.6mm hole in a piece of scrap alloy, put the alloy bar in a vice, popped the ailing screw into the hole and gently tapped the Torx bit into the screw head. I didn't think it would, but it actually did work, and now the engine is assembled and needs only a final check on valve clearances which I'm sure must have been affected by the dismantling etc.
Please Log in or Create an account to join the conversation.
- Brian
-
Topic Author
- Offline
- Platinum Member
-
Less
More
- Posts: 1045
- Thank you received: 415
4 years 2 months ago #25284
by Brian
Replied by Brian on topic OSFS 1.20 Surpass Mklll
Well I never! I wrote to Modelfixings about my problem and surprisingly received an immediate answer. Its all my fault for not reading the spec of the screws they supply. Seems they are made in good old US of A. The jolly Americans are OK with the 3.5mm thread but draw the line at a 2.5mm hex socket. What they do is make the socket close to 2.5mm, this is 2.8mm otherwise know in "proper" dimensions as "7/64in". My school reports frequently noted that I should try harder. I'm beginning to believe they were right.
The following user(s) said Thank You: kevinross
Please Log in or Create an account to join the conversation.
Moderators: DaveBright
Time to create page: 0.255 seconds
Latest Posts
- No posts to display.
©
2009 - 2026
WMAC PCF Design