- Posts: 3156
- Thank you received: 903

Back to Basics
- Phil Ford
-

- Offline
- Moderator
-

Less
More
19 Apr 2020 10:30 #22160
by Phil Ford
Replied by Phil Ford on topic Back to Basics
Thumbs up to progress . Nice "man shed" by the way.
Please Log in or Create an account to join the conversation.
- MikeSeale
-

- New Member
-

Less
More
- Thank you received: 0
19 Apr 2020 11:24 #22161
by MikeSeale
Replied by MikeSeale on topic Back to Basics
Looking good. Keep posting your progress. I find that it spurs me on to complete things when others know what I'm building. The opposite is that if I do not post a build log I can (and do) take big breaks and it takes a lot longer to complete.
Please Log in or Create an account to join the conversation.
- Brian
-
Topic Author
- New Member
-
Less
More
- Thank you received: 0
19 Apr 2020 18:05 #22175
by Brian
Replied by Brian on topic Back to Basics
Thanks for the encouragement Mike and Phil, I've nearly reached the stage where I really must stop and tidy up a bit, however, the habit of a lifetime is hard to break and I just can't bring myself to tidy as I go. Today was quite eventful, it was so nice to be able to have the shed door open and not have a frisky breeze re-arranging the shed contents, however there was a short drama when a queen wasp decided to make a takeover bid and use the shed as a nice safe place to build a new nest.
Waving a rolled up newspaper persuaded the wasp that things weren't quite as tranquil as she thought, and it flew out, but stayed around that part of the garden for the best part of an hour before finally giving up and literally buzzing off. The only casualty from the encounter was the neat pile of shavings and balsa dust that I'd roughly scraped together with a view to getting serious with dustpan and brush at the break for lunch, the bits were all over the bench, perhaps I'll have a quick whizz round with the vacuum cleaner before tea.
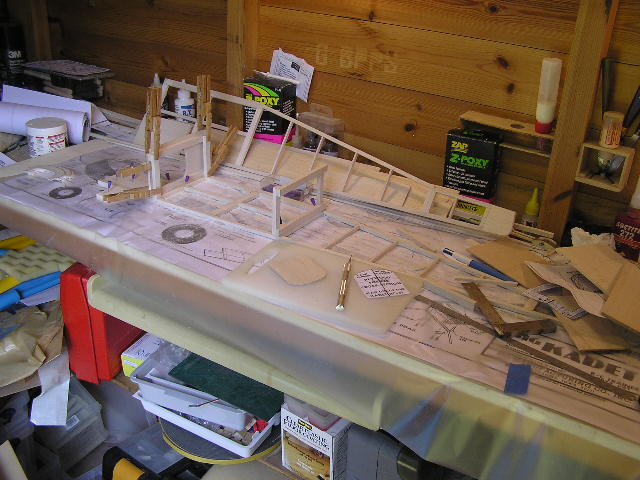
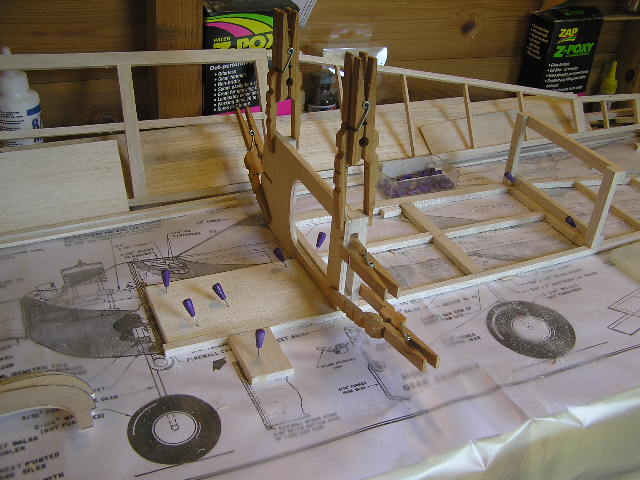
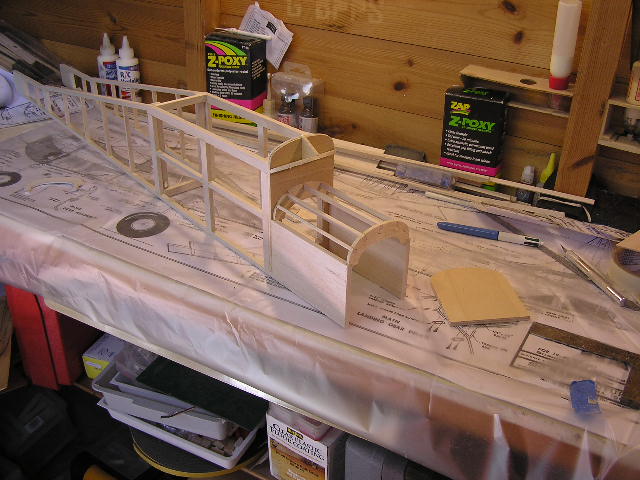
The fuselage sides have now been introduced to the two main formers which are made from 1/4" X 1/2" hard balsa.The original Kadet had a 3/32" ply front former, I didn't have anything that size so I laminated a piece of hard 1/16" sheet and 1mm ply, cut and sanded the laminated former, and glued it to the front face of the front main former. With the formers in place, I was able to glue the front 1/4" balsa sheet sides for the fuselage front end/tank bay. Once again, I should have sat down with the drawing and revamped the structure to make it easier to build, as it is I'm having to draw up parts that would have been printed sheet when the model was first introduced. The first job for tomorrow will be to cut and shape the firewall, then I'll have to decide what to use to power the model. SIG recommend a .19 to .40 two stroke, my original thoughts were electric, but subsequent rummaging didn't turn up a motor that would be powerful enough, but it did unearth an OS FS.52 fourstroke that somehow avoided being sold off during last year's monster clear-out. I do have an Irvine .46(NIB) but I think that wouldn't be in the spirit of the Kadet, which was designed as a slow and gentle flying trainer for three channels, the drawing for adding ailerons looks like an afterthought, and I'm not sure whether to build those, or modify the wing as the more modern ARTF Kadet Senior. Anyway, I'll concentrate on the fuselage for the time being.
Waving a rolled up newspaper persuaded the wasp that things weren't quite as tranquil as she thought, and it flew out, but stayed around that part of the garden for the best part of an hour before finally giving up and literally buzzing off. The only casualty from the encounter was the neat pile of shavings and balsa dust that I'd roughly scraped together with a view to getting serious with dustpan and brush at the break for lunch, the bits were all over the bench, perhaps I'll have a quick whizz round with the vacuum cleaner before tea.
The fuselage sides have now been introduced to the two main formers which are made from 1/4" X 1/2" hard balsa.The original Kadet had a 3/32" ply front former, I didn't have anything that size so I laminated a piece of hard 1/16" sheet and 1mm ply, cut and sanded the laminated former, and glued it to the front face of the front main former. With the formers in place, I was able to glue the front 1/4" balsa sheet sides for the fuselage front end/tank bay. Once again, I should have sat down with the drawing and revamped the structure to make it easier to build, as it is I'm having to draw up parts that would have been printed sheet when the model was first introduced. The first job for tomorrow will be to cut and shape the firewall, then I'll have to decide what to use to power the model. SIG recommend a .19 to .40 two stroke, my original thoughts were electric, but subsequent rummaging didn't turn up a motor that would be powerful enough, but it did unearth an OS FS.52 fourstroke that somehow avoided being sold off during last year's monster clear-out. I do have an Irvine .46(NIB) but I think that wouldn't be in the spirit of the Kadet, which was designed as a slow and gentle flying trainer for three channels, the drawing for adding ailerons looks like an afterthought, and I'm not sure whether to build those, or modify the wing as the more modern ARTF Kadet Senior. Anyway, I'll concentrate on the fuselage for the time being.
Please Log in or Create an account to join the conversation.
- Brian
-
Topic Author
- New Member
-
Less
More
- Thank you received: 0
20 Apr 2020 17:13 #22190
by Brian
Replied by Brian on topic Back to Basics
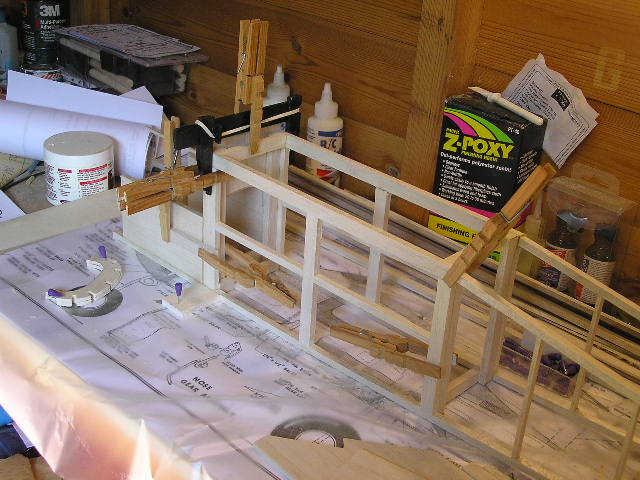
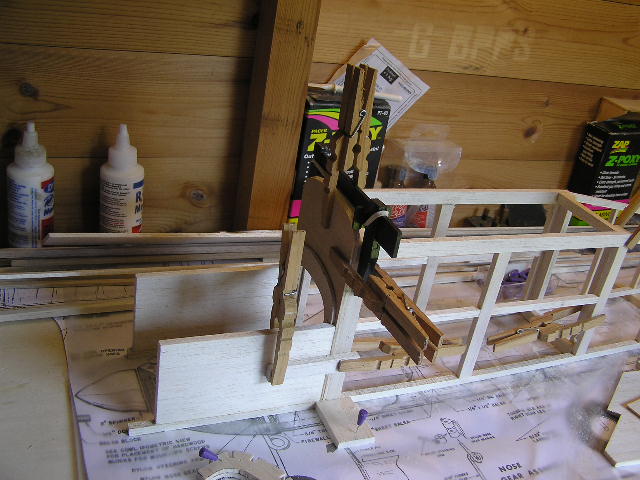
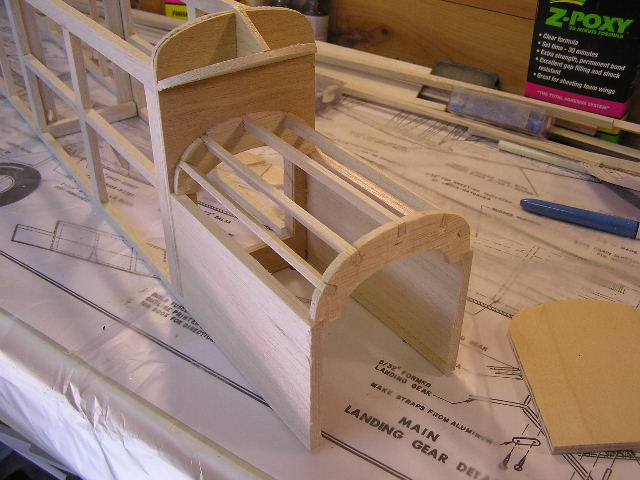
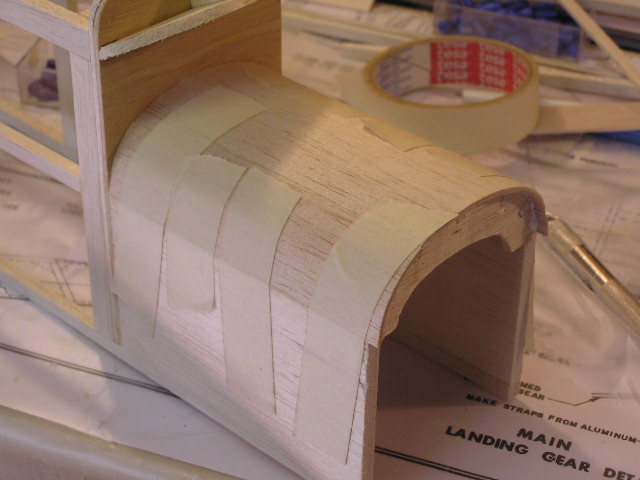
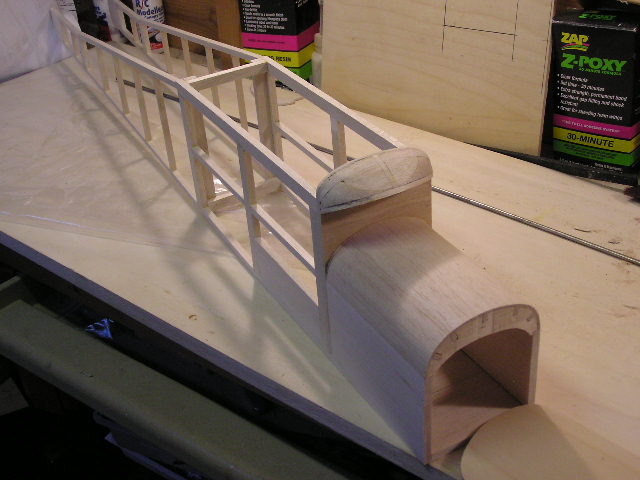
No dramas in the shed today thank goodness, it was a bit windy so I had to keep the door shut, by four this afternoon it was far too warm to carry on. Nose formers and stringers were fitted, top edge of the windscreen mount was added. Made up a piece of sheet for the nose by laminating some pieces of scrap 1/32" sheet. The method I used was to tape the sheets edge to edge, invert and apply glue to the joints*, apply thinned PVA to both mating surfaces and allow to dry. Place the glued surfaces together and press firmly with a very hot iron. Gives a strong piece of sheet which is also very flexible. This made sheeting the front end quite an easy task. Sheet was held in position with masking tape.
Note *. When making wide sheets for wing skinning etc. I tidy up the sheet edges to give as near an invisible joint as possible, tape the sheets together, invert them, then slide the assembled sheets to the edge of the bench so that the first part is flat on the bench and the rest of the taped sheets hang straight down. Apply a thin film of your favourite PVA or Aliphatic glue to the joint, then slide the first sheet back along the bench and do the same on subsequent joints. I "squeegee" the joints with an old bank card to get excess glue from the sheet surface. Most times the sheets need no further attention, sometimes they need a bit of inviting to stay flat, in which case use a sheet of polythene and something flat to weigh the sheets down while the glue dries.
Note *. When making wide sheets for wing skinning etc. I tidy up the sheet edges to give as near an invisible joint as possible, tape the sheets together, invert them, then slide the assembled sheets to the edge of the bench so that the first part is flat on the bench and the rest of the taped sheets hang straight down. Apply a thin film of your favourite PVA or Aliphatic glue to the joint, then slide the first sheet back along the bench and do the same on subsequent joints. I "squeegee" the joints with an old bank card to get excess glue from the sheet surface. Most times the sheets need no further attention, sometimes they need a bit of inviting to stay flat, in which case use a sheet of polythene and something flat to weigh the sheets down while the glue dries.
Please Log in or Create an account to join the conversation.
- 4Pedalsfly
-

- Offline
- Platinum Member
-

Less
More
- Posts: 800
- Thank you received: 202
20 Apr 2020 23:43 #22194
by 4Pedalsfly
Replied by 4Pedalsfly on topic Back to Basics
Looking good Brian, your method of laminating balsa sheets is interesting,allowing the
glue to dry and then taking the iron to them is a new one on me.
I.C or Electric ? that O.S four stroke would sound good.
Colin.
glue to dry and then taking the iron to them is a new one on me.
I.C or Electric ? that O.S four stroke would sound good.
Colin.
Please Log in or Create an account to join the conversation.
- Brian
-
Topic Author
- New Member
-
Less
More
- Thank you received: 0
21 Apr 2020 08:33 #22198
by Brian
Replied by Brian on topic Back to Basics
I used thin PVA glue and a hot iron to laminate formers for lightweight free flight rubber models back in the '90s. I did it because I wanted to find a way of making formers that had those irritating notches for stringers. You know what happens, it doesn't matter how sharp the balsa knife is, or how carefully you cut the notches, the balsa grain is always "wrong" at some point and the corner of the notch drops off. My wife was doing some renovations to a dress I think, or perhaps it was a curtain, anyway she was using some white thready looking tape which when placed between layers of fabric and ironed with a hot iron, bonded the fabric enabling it to be held firmly while being sewn together. I scrounged some tape and made a couple of trial formers from 1/32" sheet. I was surprised to find how effective the tape was. The formers were successfully notched with no damage at all.Then I read somewhere that the tape was PVA based, so I bought some PVA glue and experimented, finally coming up with the thinned glue and very hot iron. This method worked very well on tubular fuselages laminated from two thin sheets of balsa, these were formed hot around a piece of copper water pipe. As the years went by, I found as so many others before me, that for a free flight enthusiast, the trees got higher and the gorse much denser and retrieving became an exhausting process. R.C. flying looked to be a promising alternative, so I gave it a try and became hooked. At first I floundered quite badly, I couldn't get to grips with building models from hugely thick sections of balsa, and as for the size of the engines! When you've been flying models made from light thin sections, and using tiny engines of .049 size, everything seemed disproportionately robust! Finally I became more comfortable with 1/4" ply formers and 1/8" balsa sheet clad fuselages, but I found it really hard to use heat shrink film for covering. The day came that I needed some Balsaloc, fortunately I had a new jar of it, unfortunately it was over a year old and had solidified. In desperation I brushed thinned PVA on the edges, and after it had dried, gave it a light sanding and another coat. The film went on alright, and I've never used Balsaloc since. There is a covering material called "Polyspan" its a strange polyester fabric that looks like vintage Modelspan, when doped its extremely tough and isn't all that heavy, goes on quite easily with PVA and heat, also goes round compound curves if taken gently.Another material from SIG called Koverall is a woven fabric which can be stuck using PVA and heat.
When ironing on the previous two coverings which are porous until doped, to prevent the iron from becoming all "gooey", I place a strip of woven teflon baking sheet along the edge to be ironed, this also works well if laminating very thin balsa sheet which tends to let the glue migrate.
When ironing on the previous two coverings which are porous until doped, to prevent the iron from becoming all "gooey", I place a strip of woven teflon baking sheet along the edge to be ironed, this also works well if laminating very thin balsa sheet which tends to let the glue migrate.
Please Log in or Create an account to join the conversation.
- Brian
-
Topic Author
- New Member
-
Less
More
- Thank you received: 0
22 Apr 2020 13:24 #22219
by Brian
Replied by Brian on topic Back to Basics
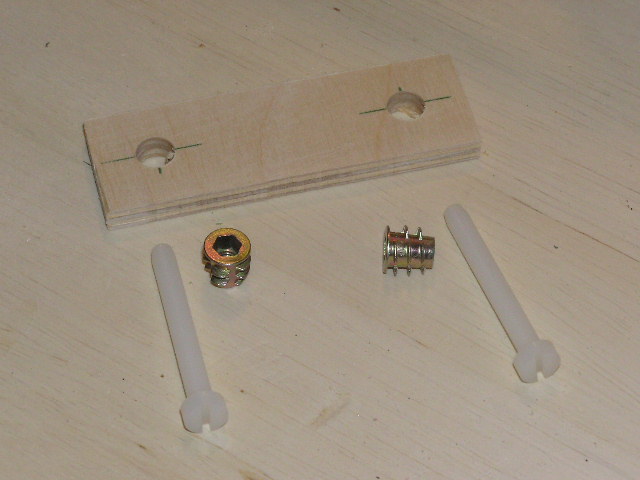
Getting down to the fiddly bits this morning, one thing I tend to forget is to drill the wing bolt positions before fixing the attachment plate. The threaded inserts are a lot easier to fit than standard "wind 'em in or whack 'em" spiky T nuts. One advantage of threaded inserts is that the hex driver holes make it easy to locate the wing fixing screws when attaching the wing. The attachment plate is angled using a slice of TE section as a guide, hopefully this will be parallel to the top surface of the wing and will allow the use of flat nylon washers under the wing screw heads
I looked on the SIG USA website to see if I could get some info on the Kadet. The model I'm currently building isn't available, but the Kadet lives in various sizes in kit form or ARTF. The redesigned Kadet is now the Kadet Senior, and is a bit bigger.I was interested to see that the power requirements are quite modest, so My original thoughts of using an OS FS .52 made me realise that the model would be overpowered. I have an OS FS .30 that I think might be a better choice, and being less powerful, perhaps I can get away with a three channel set-up. The original Kadet was three channel, and although I have the official plan for the aileron conversion, it does look very much like an afterthought.
I looked on the SIG USA website to see if I could get some info on the Kadet. The model I'm currently building isn't available, but the Kadet lives in various sizes in kit form or ARTF. The redesigned Kadet is now the Kadet Senior, and is a bit bigger.I was interested to see that the power requirements are quite modest, so My original thoughts of using an OS FS .52 made me realise that the model would be overpowered. I have an OS FS .30 that I think might be a better choice, and being less powerful, perhaps I can get away with a three channel set-up. The original Kadet was three channel, and although I have the official plan for the aileron conversion, it does look very much like an afterthought.

Please Log in or Create an account to join the conversation.
- Chris73
-
- New Member
-
Less
More
- Thank you received: 0
22 Apr 2020 13:43 #22223
by Chris73
Replied by Chris73 on topic Back to Basics
Looking good Brian, if it is overpowered you can always throttle back, better than being under powered, personally I would see how the C of G works out and then use the biggest engine you can get away with, on the subject of ailerons, if you add them it will give you more control in the wind
Please Log in or Create an account to join the conversation.
- JonTappin
-
- Offline
- Platinum Member
-
Less
More
- Posts: 1178
- Thank you received: 265
22 Apr 2020 17:24 #22228
by JonTappin
Replied by JonTappin on topic Back to Basics
I'm with Chris, it will definately have better control authority with ailerons and be nicer to fly, depends if you want to go full retro or not!
Please Log in or Create an account to join the conversation.
- kevinross
-

- Offline
- Platinum Member
-
Less
More
- Posts: 1023
- Thank you received: 583
22 Apr 2020 19:03 #22229
by kevinross
According to SIG info your FS 30 is below the recommended min power. your 52 is mid range.
re - 2-Stroke .29 - .40 cu. in. (4.8 - 6.5 cc), 4-Stroke .35 - .65 cu. in. (5.7 - 7.4 cc)
Replied by kevinross on topic Back to Basics
Brian wrote: My original thoughts of using an OS FS .52 made me realise that the model would be overpowered. I have an OS FS .30 that I think might be a better choice, and being less powerful, perhaps I can get away with a three channel set-up. The original Kadet was three channel, and although I have the official plan for the aileron conversion, it does look very much like an afterthought.
According to SIG info your FS 30 is below the recommended min power. your 52 is mid range.
re - 2-Stroke .29 - .40 cu. in. (4.8 - 6.5 cc), 4-Stroke .35 - .65 cu. in. (5.7 - 7.4 cc)
Please Log in or Create an account to join the conversation.
Moderators: DaveBright
Time to create page: 0.695 seconds
©
2009 - 2026
WMAC PCF Design