
If you have read the build of this model we can now cover the flight testing and trimming of the Vanquish model and hopefully provide some useful set up tips. There are many different methods for setting up an aerobatic model and some may disagree with mine, but I have found this process to work well for me, I have to admit that I am perhaps not as thorough as others might be but trimming is all about making improvements to the flying qualities of your model. How far you want to take it is up to you: each pilot can decide when they feel they have gone far enough to satisfy themself.
Update: There is now two downloadable files on Setting up and Triming Guide by Jon Tappin which can be found here: Part 1 & Part 2
Of course in this wonderful country of ours the opportunities to fly in flat calm conditrons are few and far between; this is the only time you will really know how true your model flies, You will probably find you think you have your model trimmed very well, and then one day you will fly with no wind and spot something that's not quite perfect. Therefore trimming and model set up is really an ongoing process, Of course, with wooden models like the Vanquish there is also the possibility that something will change slightly over lime and need further adjustment.
Prior to the first flight, I had set up the Vanquish exactly as per the instructions for control movements, centre of gravity and incidence settings as previously described. Test flight day was a grey, windy affair - pretty typical for early
summer this year. Having carried out range checks and a final check over of the model, including conlrol surface directions, it was time to go. The first flight was straight forward, a couple of clicks of up elevator and zero aileron trim were required, but the model flew as expected - very smooth, with little control interaction. Plenty of performance was available from the Hacker 060 with an APC 21' x 14" prop fitted. The rudder on the Vanquish is very powerful; it had
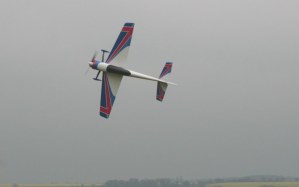
some minor pitch and roll couple on the first flight. which was not enough to worry about at this early stage. I was able to easily fly a clean knife-edge loop on the first flight, the model pulled strongly over the top even in the strong wind and the exit at the bottom was flown with about half of the available rudder movement and a fairly low throttle setting. Impressive!
It was now time to start trimming it to make it even better. There is much more to trimming a model than adjusting the transmitter trims until the model flies straight and level hands off. Unfortunately this only works when the model is straight and level - not very often in aerobatic flying. What we are looking for is an aeroplane that tracks In a straight
line, whatever direction it is pointing. 1\ will loop inside and outside with no tendency to corkscrew out. It will enter and exit snap rolls and spins cleanly and easily. It has controls that do not interact with each other (rudder only yaws. elevator only pitches and ailerons only roll). To achieve this you must start with a well-designed and
straight model. I was already pretty confident that I had this in the Vanquish. Tnmming will improve any model but will not make a bad model good, so please refer to part one of this review where I have outlined my model set up process.
Control Response
Firstly, set the control responses to your taste. My experience of flying other people's models is that the controls very often tend to be unbalanced, for example, sensitive on aileron and soft on elevator. This is a personal taste thing but I would recommend not having the controls too sensitive. I always set up so that at maximum stick deflection I have the maximum response I need: for instance. on ailerons this is likely to be during a roll at the top of a manoeuvre when the airspeed is at its lowest. Having set this maximum deflectton then use exponential to reduce the sensitivity around centre. Trying to make small corrections while flying manoeuvres is impossible with over sensitive controls. I always try to avoid having exponential values of more than 35-40 on precision rates. When you get above this figure you will find that at some point around mid slick position the sensitivity will suddenly increase, making control at partial stick deflections unpredictable. The Vanquish felt pretty good with the settings as per the instruction manual, so I only had to make minor adjustments to get the control feel I wanted.
Balance Point And Thrustllnes
The fundamental things to check on a new model are centre of gravity and thrustlines. Without getting these right first any other adjustments made, such as mixing for control interaction or fine-tuning control response, will be wrong and will change when adjustments to these two factors are made. The normal centre of gravity check I do for a symmetrical winged aerobatic model is to climb on a 45 degree line and half roll to inverted; the nose should
stay on the 45 line or very slowly drop. The Vanquish held the line, indicating that it was close to the right place. However, my initial impression was that it wasn't quite tracking straight and didn't feel as locked in to the straight lines as I would have expected, suggesting the C of G could still be a little rearward. For later flights I moved the main battery pack slightly further forward until I was happy. As mentioned in part one the recommended C of G position was missing from the instructions but I ended up very slightly further forward than the suggested position that I found online.
The next stage is to set the engine thrust line. If the model climbs under power and dives when power is reduced then down thrust is required, and vice versa. Make adjustments and fly until you can see no trim change with throttle position. Unless you are a full throttle merchant. without doing this you will have a model that is only in trim at one power setting. To set side thrust establish the model in a true vertical climb and then centralise the sticks. If the model pulls to the left then add right thrust. If it pulls to the right then reduce right thrust. The down thrust selting appeared to be spot on, however it was clear that the Vanquish was going to need some additional side thrust as I needed
a small amount of right rudder trim to get the vertical lines straight.
Unfortunately with the wind strength on the day it was impossible to get a true indication of how far out it was.
Another factor influencing this is the propeller choice. The amount of side thrust required will vary with different sizes I had a few to try so I wanted to do that to settle on one size before making any changes to the thrust line. After landing and checking that nothing had shaken loose, I plugged in the ESC data box to find that I had been pulling around 100 A with the APC 21" x 14" E prop, which IS a bit higher than I would have liked. The ESC was not getting hot and, at a rating of 125 A. was within its operating capacity. But the motor was quite hot to touch. I had more than enough performance with this prop so I felt I could reduce the load a little to get the current draw down.
To cut a long story short. I finally settled on an APC 20" x 13" E. which gave me a maximum current draw of 85 amps and still gave plenty of performance. I tried some lighter props but found that they gave a very non-linear power delivery across the throttle range. The 20· x 13" E still required some adjustment to the throttle curve via the transmitter to end up with a linear response but this is not unusual for electric systems. With this set up on the 10-cell, 5000 mAh batteries, I have my transmitter timer set to 8 minutes and I am landing with at least 3.7 V per cell even on windy days.
Calm Down
Eventually, after many frustrating weeks of waiting. at last a day of light winds arrived to give me a chance to fine-tune the trim. The
 With a single plain washer behind each of the left-hand motor mounting lugs. The adjustment was so small that the spinner still appeared lined up with the nose ring, so I felt there was no need to adjust the mounting position at the bulkhead. With this alteration, and the adjustment to the C of G. the Vanquish was already starting to feel really good. I still had some minor rudder interaction in roll and pitch, which could be removed with a little mixing. It is possible to cheat a little on side thrust if a small adjuslment is required by enabling a transmitter mix, with throttle as the master and rudder as slave. To do this. trim the rudder so that the model flies a for straight vertical up-line at full power. Land and set the mixer so that as adjustment the throttle stick is moved from full to idle, the rudder trim reduces to zero. This will work pretty well if only a small amount of trim is required, but in my experience will never be as good as actually adjusting the side thrust angle.
The ESC stays very cool. less than 45 deg C according to the Jeti data box. But the motor still felt 100 hot after flight, even with the smaller prop. The supplied spinner has a plastic cone with a lightened aluminium backplate, so I cut the front of the spinner off to leave a 12 mm hole and lined up the holes in the spinner backplate with the cooling holes in the front of the motor. This had the desired effect, the additional cooling air dramatically decreasing the motor
temperature. Another issue, which had now showed itself, was that with the model trimmed for upright level flight, rolling inverted showed that a very slight roll was apparent. This was caused by one wing being slightly heavier than the other. The reason being that when upright a small amount of aileron trim will be required to hotd the heavy wing up. When inverted the trim acts in the same direction as the weight and the model rolls towards the heavy wing. To correcl for this. weight needs to be added to the wing that rises when inverted. If in doubt add weight to one wing, fly again and see if it is better or worse. After experimenting with small bits of lead temporarily stuck to the wingtip, 9 grams in the right wingtip corrected this issue.
Straight Wing
This was a very minor difference between the two wings and more than acceptable I would say. As the Vanquish was set up with an incidence meter I already knew that the wings were very straight. But when trimming any model I use the following procedure to determine any adjustments that may be necessary. Fly a few consecutive inside loops. You will probably find that you have to make aileron corrections one way to keep the model tracking straight Make a mental note of which way you are correcting. Now fly a series of outside loops and do the same. If you find that you are correcting with aileron in the same direction then I'm afraid that you have a warped wing. If you are correcting the opposite way then one wing panel is heavier than the other. The latter is easy to correct as described above. but a warped wing can be more problematic. For correcting a warp. the very best solution is to saw the wing in half at the root and rejoin it. Or with a two-piece wing the individual incidences will have to be adjusted. With a really severe warp the only real solution is to throw it away and start again. However, if the correction required is small, it is practical to correct the problem by setting up a mixer with your elevator as the master and aileron as the slave. You can then mix small amounts of aileron with elevator input in the required direction to correct the fault.
Although this will help a great deal with a wing warp. in the end it is a bit of a compromise.
Of course, in reality, what you will probably experience is a combination of weight and warp. Trial and error time again. Try one at a time as described above and eventually you will find the right
combination. With the small wingtip weight and the benefit of setting up with the incidence meter. I found no other adjustments were required for the Vanquish as it was now looping inside and out without correction.
Control lnteraction
I now moved on to look at correcting for control interaction. Starling with ailerons, when rolling, the model should roll along its axis, with no yawing effect. This is easiest to observe in a vertical climb. If it doesn't roll straight then you must adjust the differential (more up than down movement of each surface). You will need to determine whether to increase or decrease the amount of differential movement The way I do this is to establish the model in a true vertical climb - of course, by now your model will hold that vertical line with no correction! Now perform a half roll. You will probably find that the model has yawed off line. Use the rudder to correct the yaw back to the vertical. Which way did you move the rudder? If you moved it in the same direction as you rolled, then more differential is required i.e, more travel on the up going aileron. If you moved it the opposite way then less is required. So if you roll to the right and correct with
right rudder then increase differential; roll to the right and correct with left rudder, less differential. You will probably find that a few adjustments are necessary before you find the correct setting. A computer radio with the necessary software makes this task a simple one. If you don't have the facility, you will have to do this by altering your control linkage geometry. There should be no interaction from the elevator as we have already dealt with correcting deviations during loops. However, if you find that you still have minor problems and can't face doing anymore trimming to the airframe, it can usually be removed using an elevator to aileron mixer as described earlier.
 Finally we must deal with the rudder. Most aerobatic models exhibit some secondary effects of roll and pitch WIth rudder. The Vanquish has very little, as you would expect from a thoroughbred competition airframe, but it is very rare to find none at all. Rolling with rudder is a result of the wing dihedral angle. If the model rolls in the same direction that rudder is applied then there is excessive dihedral. If it rolls in the opposite otreenon then you do nol have enough. Without the benefit of electronic mixers, the only way to correct this problem is to reset the dihedral angle. It is likely that this would have to be done more than once to find the correct angle. Not very practical, but believe It or not that was how it was done with competition models back in the days of basic radios!
With a computer radio, all that is required is to set a free mixer. this time with rudder as the master channel and aileron as the slave. Adjust the amount and direction of the mix until there is no roll present when the rudder is used. It is useful to have someone standing beside you when you are flying to make a note of what is happening. as it is very easy to forget by the time you have landed. Exactly the same process IS followed to correct unwanted pitch with rudder. although this can be more of a compromise, as the amount of pitch present will vary wilh the altitude of the model. With a well-designed airframe there should be very little pitch with rudder and it will be easily corrected with a mixer. As mentioned before a bad design can be improved with trimming and electronic mixing but will never be made good. If you have the patience, pitch interaction can often be removed by experimentation with a combination of adjustment of centre of gravity posnion and wing incidence. But for the small amounts required for the Vanquish the mixing option gives an acceptable result. After a little experimentation with the Vanquish, I ended up with 2 up elevator mix with both left and right rudder to cure a very slight down pitch with rudder. For roll correction I settled on 4 left aileron with left rudder and 3 right aileron with right rudder as it was rolling very slowly to inverted in knife-edge flight, to both sides. These are very small numbers and more than acceptable for a model of this type, indicating that Extreme Flight have done their homework with the development of this airframe.
One final mix I like to use (assuming you haven't run out of available mixers) is an offset throttle to elevator mix. Even the best aerobatic models, after all trimming has been done, have a tendency to gradually pul! out of a vertical dive. To correct this, if your radio has the facility to do so, set up a mix With throttle as master and elevator as slave and offset the mix point to around two clicks above idle. Above this point there is no mix and below it a small percentage of down elevator is programmed (2 for the Vanquish). This will have the effect of holding the vertical line when the throttle is closed. The mix percentage is so small that you should not really notice the rrux at any other time. After carrying out the above steps. you WII! find a dramatic improvement through all manoeuvres. particularly slow and point rolls. as the model should track much straighter through the roll with no variation in roll rate as the rudder is applied. It may well still
deviate from where you intend it to go, but now it will be more likely that you are the problem and not the model!
Vanquish All Doubts
Having now had a lot of time on the vanquish, I can report that I am extremely happy with it. I have no intention of returning to competition with it but I am certain that it would hold its own at pretty much any level and as a first F3A model it would be very hard to beat. Although it IS a shame many of us are losinq our butldinq skills with all the ready to fly aircraft that are available. it is easy to take for granted the amazing choice of high quality ARTF airframes that
are available to us these days and the Extreme Flight Vanquish must be among the best of them. The price of the kit is comparable to what I paid 13 years ago for my last 2 m F3A kit. which came as a basic epoxy glass fuselage and sheeted foam wings. I would think that I spent in the region of 200 hours to build and finish that model as well. So although the kit price might seem expensive when compared to other similarly sized ARTF kits, for a competitive 2 m model. when you look at other alternatives out there, it is extremely good value.
As an everyday model it is just a pleasure to own. It looks great on the ground and is super smooth and accurate to fly. The control power and purity make manoeuvres such as precision rolls, rolling loops, circles and knife-edge loops straightforward. I haven't flown many models that will do a one roll circle or loop with the ease of the Vanquish. The 10-cell HackerlThunder Power set up I use gives unlimited performance and 8 minute plus duration but there are also many lower cost power options available that would also work well. The Vanquish will happily fly in the less than ideal conditions. when I flew it at Wings & Wheels show and on the Sunday it was so windy that one of the trader's tents actually blew away! Many pilots elected not to fly but I felt completely confident that the Vanquish would be fine in the conditions. which It proved to be.
I have had around 40 flights on the model now and it is holdIng up very well. It has developed a small stress crack in the paint on one side of the canopy but other than that, and the normal covering wrinkles from a very occasional hot sunny day. it has been a zero maintenance airframe. I fly from a grass field and have had no issues with the carbon undercarriage legs; even the wheel spats are still perfect. As for the flying, it is still putting a smile on my face every time I take it out.
I am really struggling to find something negative to talk about with the Vanquish. The lack of C of G position in the instructions was a surprising oversight but thanks to the Internet this info was easy to obtain. All in all. if you are looking to start out In F3A or go from a smaller model to a full-blown 2 m airframe. or even if you just want to own a thoroughbred precision aerobatic model. the Vanquish 2M will give you everything you need.
INFORMATION
Name: Vanquish 2M
Manufacturer: Extreme Flight RC
Distributor: West London Models, www.westlondonmodels.com
Price: £644.99 (as of April 2013)
Model Type: F3A aerobatics Construction: Built up balsa and ply. with epoxy glass canopy and cowl
RC FUNCTIONS
1 Throttle
2 Elevators
3 Ailerons
4 Rudder
LIKES
Appearance, High quality and lightweight construction. High quality hardware and carbon parts
Accessibility for installation and maintenance. Flying qualities
TEST DISLIKES
C of G location missing from manual. Slightly fiddly wing incidence adjusters
SPECIFICATIONS
Wingspan: 1.87 m (73.62')
Length: 1.98 m (77.95')
Wing Area: 980 sq/in
Flying Weight: 4.3 - 4.4 kg
Recommended Setups:
For 6S Lipo: A60-6XS Master Spin 125-opto XOAR 20x13 F3A Thunder Power 4400 6S PLV2 Jeti SBEC
For 10S Lipo: Q60-7M F3A Master Spin 99-opto XOAR 21x13 F3A 2x Thunder Power 4400 5S PLV2 Jeti SBEC
With Thanks to Quiet & Silientflight International c/o Traplet Publications