- Posts: 1023
- Thank you received: 583

Scratch Built Hannibal
- kevinross
-

- Offline
- Platinum Member
-

Less
More
09 Jun 2017 10:27 #13042
by kevinross
Replied by kevinross on topic Scratch Built Hannibal
Me again
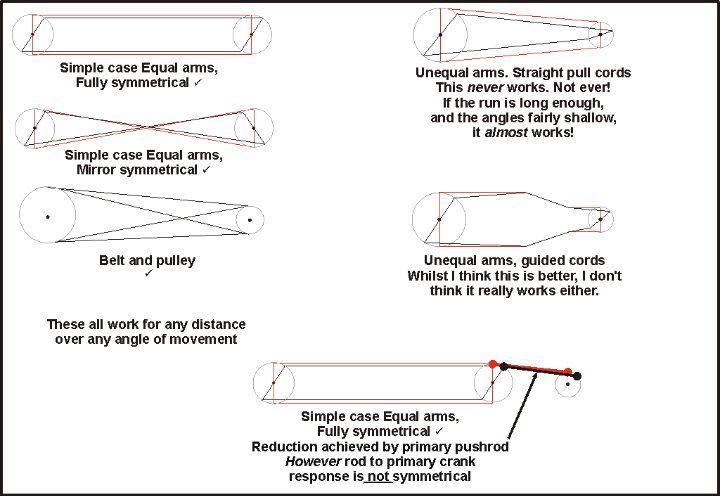
Subsequent to above post, i recalled you had already provisioned for two elevator servos in the vertical plane so using dual standard closed loops for each elevator half is the logical way. If you have searched the internet you may have found something like this attachment. On my large Decathlon (and others) i find that crossing the cables gives a neater installation (especially where the wires pass thru the fuselage) and is better geometrically - minimising slack on full deflection.
Has your radio got the capability to link / mix a 2nd elevator servo - far more preferable to an in line servo reverser
Subsequent to above post, i recalled you had already provisioned for two elevator servos in the vertical plane so using dual standard closed loops for each elevator half is the logical way. If you have searched the internet you may have found something like this attachment. On my large Decathlon (and others) i find that crossing the cables gives a neater installation (especially where the wires pass thru the fuselage) and is better geometrically - minimising slack on full deflection.
Has your radio got the capability to link / mix a 2nd elevator servo - far more preferable to an in line servo reverser
The following user(s) said Thank You: Brian
Please Log in or Create an account to join the conversation.
- Brian
-
 Topic Author
- New Member
-

Less
More
- Thank you received: 0
10 Jun 2017 19:06 #13060
by Brian
Replied by Brian on topic Scratch Built Hannibal
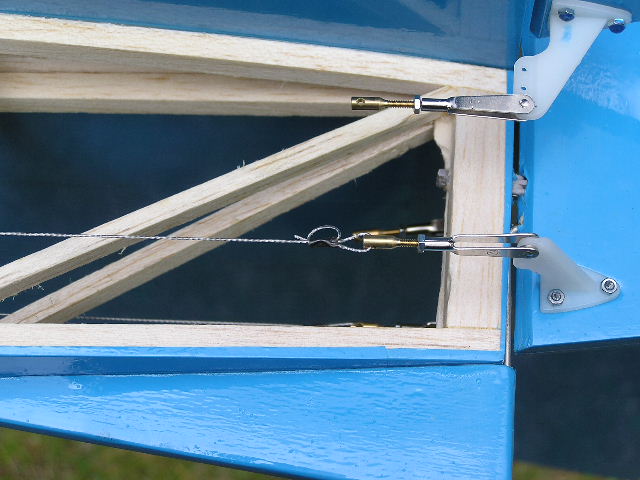
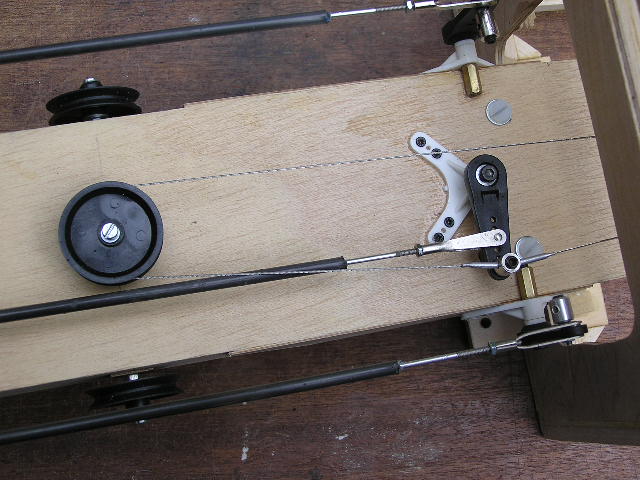
Tail unit and control surfaces fitted. Decided to use the system shown in the video. The servos drive intermediate servo arms via pushrods. The rudder was very easy to set up, a single loop of wire passing from one horn, through the connector on the servo arm and round the pulley and back to to the opposite horn. The rudder was centred as was the rudder servo, the connector was clamped to the wire . A short length of alloy tube crimped to the wire stops the wire being damaged by the clamp screw. On test equal throws each way, and no sign of binding, made it all seem worth while. A bit time consuming to make and assemble the bits, but a doddle to set up. At the moment the wires cross each other at about mid-point in the run. I'll stop them rubbing against each other by running each one through a short length of hard plastic tube where they cross . Each elevator will be fitted up in the same way, The wire runs for the upper elevator horns will be interesting due to the broad chord of the tail plane. Running the wires over small brass pulleys set in the top rear of the fuselage in front of the tail plane might work..

Please Log in or Create an account to join the conversation.
- MikeSeale
-
- New Member
-
Less
More
- Thank you received: 0
10 Jun 2017 20:43 #13063
by MikeSeale
Replied by MikeSeale on topic Scratch Built Hannibal
If the wire is nylon coated there would be no reason for stopping the wires rubbing against each other. And even if not, the metal to metal rubbing would not be an issue over the lifetime of the model. It's not like the old FM days when metal to metal noise was a problem.
In your first photo I cannot see a crimp...how are you securing the wire?
In your first photo I cannot see a crimp...how are you securing the wire?
Please Log in or Create an account to join the conversation.
- Brian
-
Topic Author
- New Member
-
Less
More
- Thank you received: 0
10 Jun 2017 21:48 #13065
by Brian
Replied by Brian on topic Scratch Built Hannibal
Hello Mike, the wire is fed through a piece of alloy tube which is crimped in two places. I'll try to get a better shot of the whole thing.
Please Log in or Create an account to join the conversation.
- kevinross
-
- Offline
- Platinum Member
-
Less
More
- Posts: 1023
- Thank you received: 583
12 Jun 2017 19:48 #13080
by kevinross
Replied by kevinross on topic Scratch Built Hannibal
Hi Brian
I see you have gone for the closed loop design with the turnaround pulley. Very sorry but i can't sit back and see you risk a well built model without offering further advise. I am concerned abut the possibility of failure in this design which has no protection against the closed loop becoming detached from the pulley leading to loss of control.
Full size aircraft make extensive use of closed loop systems but every point is protected against the wires jumping off the pulleys. See the attached pic
When your model buffets around the Cashmoor airways the rear fuselage will be subjected to a multitude of stresses which will cause those control runs to stretch / relax with a strong possibility of whipping off the pulleys. I would recommend that you increase the pulley groove depth (for example - glue additional discs top and bottom ) and /or fix small round pillars / guides close to pulleys provide additional safety retention of the control wires.
I see you have gone for the closed loop design with the turnaround pulley. Very sorry but i can't sit back and see you risk a well built model without offering further advise. I am concerned abut the possibility of failure in this design which has no protection against the closed loop becoming detached from the pulley leading to loss of control.
Full size aircraft make extensive use of closed loop systems but every point is protected against the wires jumping off the pulleys. See the attached pic
When your model buffets around the Cashmoor airways the rear fuselage will be subjected to a multitude of stresses which will cause those control runs to stretch / relax with a strong possibility of whipping off the pulleys. I would recommend that you increase the pulley groove depth (for example - glue additional discs top and bottom ) and /or fix small round pillars / guides close to pulleys provide additional safety retention of the control wires.

The following user(s) said Thank You: Brian
Please Log in or Create an account to join the conversation.
- Brian
-
Topic Author
- New Member
-
Less
More
- Thank you received: 0
12 Jun 2017 21:50 #13081
by Brian
Replied by Brian on topic Scratch Built Hannibal
Hi Kevin, I see what you mean about the depth of the pulley grooves. I'll have another look at the set-up with a view to making it a bit safer. Thank you for pointing out a possible failure.
Please Log in or Create an account to join the conversation.
- kevinross
-
- Offline
- Platinum Member
-
Less
More
- Posts: 1023
- Thank you received: 583
13 Jun 2017 06:23 #13082
by kevinross
Replied by kevinross on topic Scratch Built Hannibal
Brian
A possible improvement would be to screw three suitable small pulleys similar to these in the attached jpg interlocking (but not touching) as per the positions on the pdf pic.
A possible improvement would be to screw three suitable small pulleys similar to these in the attached jpg interlocking (but not touching) as per the positions on the pdf pic.

The following user(s) said Thank You: Brian
Please Log in or Create an account to join the conversation.
- Brian
-
Topic Author
- New Member
-
Less
More
- Thank you received: 0
16 Jun 2017 19:05 #13100
by Brian
Replied by Brian on topic Scratch Built Hannibal
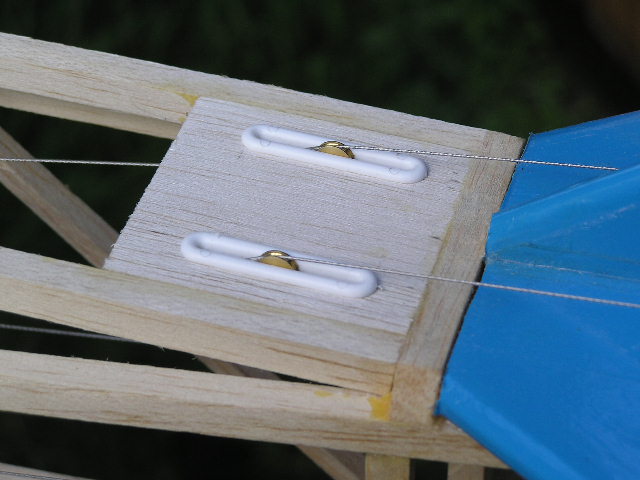
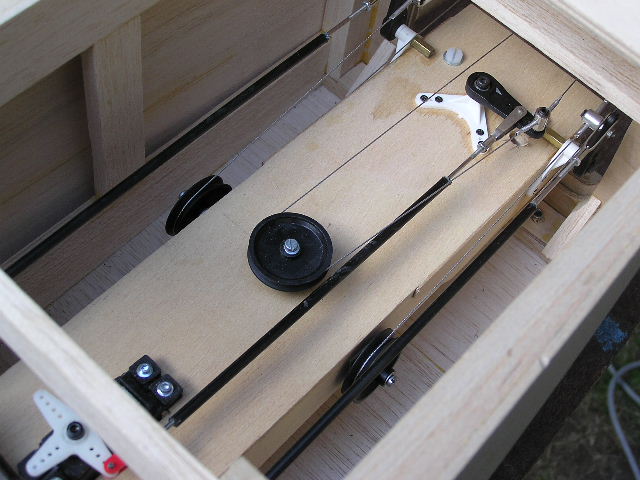
Elevator control wires fitted and tested today, full range of movement and no binding, on elevator and rudder. Decided to run the upper elevator wires through the top rear of the fuselage. Lower elevator wires and rudder wires exit through the fuselages sides under the tail plane, the lead outs will be fitted with brass pulleys., similar to those shown. The servos were left running on a servo tester for a half hour or so. No slop in the control surfaces, and all returned to neutral on switch off. Looks quite promising so far.

Please Log in or Create an account to join the conversation.
- Brian
-
Topic Author
- New Member
-
Less
More
- Thank you received: 0
17 Jun 2017 12:12 #13102
by Brian
Replied by Brian on topic Scratch Built Hannibal
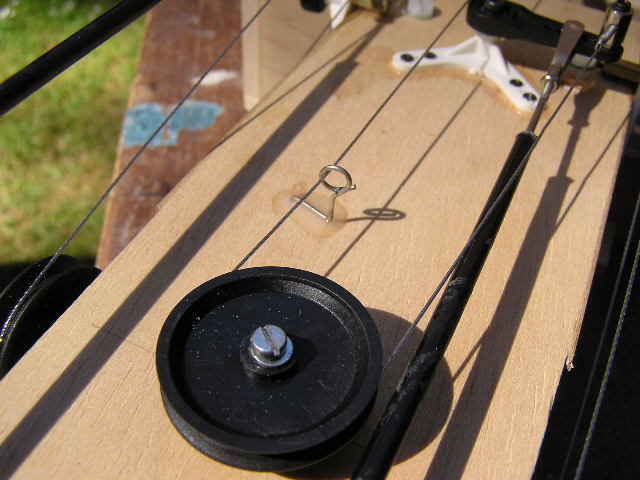
Hi Kevin, since you suggested a method of preventing the control wires from jumping off the pulleys, I've been looking at ways of doing it without adding weight. I don't think that the short wire runs from servo arm to pulley are a problem. Its the possibility that something could interfere with the long wire run from control horn to the pulley. Today I made some cheap and cheerful wire guides, I think they'll work alright.
Please Log in or Create an account to join the conversation.
- Brian
-
Topic Author
- New Member
-
Less
More
- Thank you received: 0
16 Jul 2017 08:04 #13312
by Brian
Replied by Brian on topic Scratch Built Hannibal
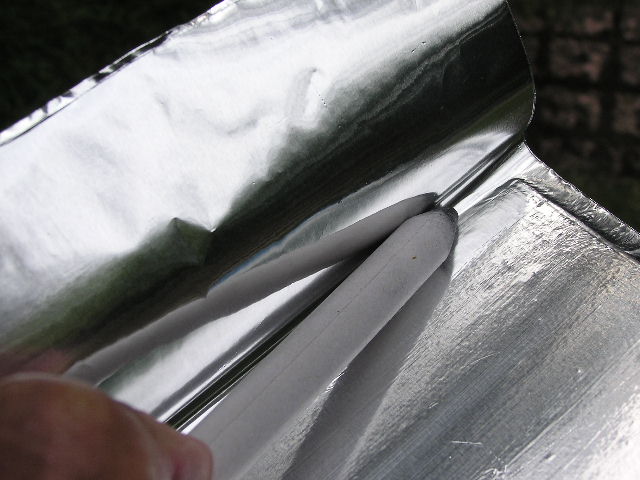
Decided to have a go at finishing the front of the Hannibal fuselage with sticky backed aluminium foil. Made some expensive mistakes. The stuff doesn't work well on sealed balsa, doesn't work on tissue doped onto balsa either. However, I found that spraying cellulose primer/filler over the tissue, and covering with film did give a reasonable base to work with. The main tool for applying the foil is a sort of thick pencil made from rolled paper, I got mine from Hobbycraft, pack of three different sizes for £1. . There are several videos about cladding on YouTube, most seem to concentrate on large warbirds with fibreglass structures, and lots of panel and rivet detail I found that the foil is tricky to get started without wrinkling. I wasted quite a lot trying different methods. The one that worked for me was to stick a piece of masking tape on the foil itself. Holding the tape allows the backing to be peeled away without touching the adhesive on the foil. Once the foil is positioned, its simply(?) a matter of gently "inviting" the foil to come away from the backing while stroking it down with the paper pencil. The pencil itself needs to have a radius sanded on one end, this helps to get the foil to lay down smoothly. The videos of cladding show the alloy being dry sanded with 320 grit W+D, this might be OK for thicker films, it didn't work with my stuff, and bubbles and wrinkles sanded through. Getting the foil off is something else. A process involving an old artists bristle brush, lots of acetone, and a good deal of "language". It took over an hour to strip the front hatch cover.


Please Log in or Create an account to join the conversation.
Moderators: DaveBright
Time to create page: 0.720 seconds
©
2009 - 2026
WMAC PCF Design