- Thank you received: 0

3D Printing
- Decks5712
-

- New Member
-

Less
More
17 Jul 2019 19:14 #20289
by Decks5712
Replied by Decks5712 on topic 3D Printing
If using ABS acetone is good for final finish. Ie place your print in a acetone vapour bath the vapour smooths out your print and gives it a gloss finish. PLA is good for house hold prints but left outside in damp weather or heat will warp. Any way have fun love to see how you get on.
Please Log in or Create an account to join the conversation.
- Decks5712
-
- New Member
-
Less
More
- Thank you received: 0
17 Jul 2019 19:18 #20290
by Decks5712
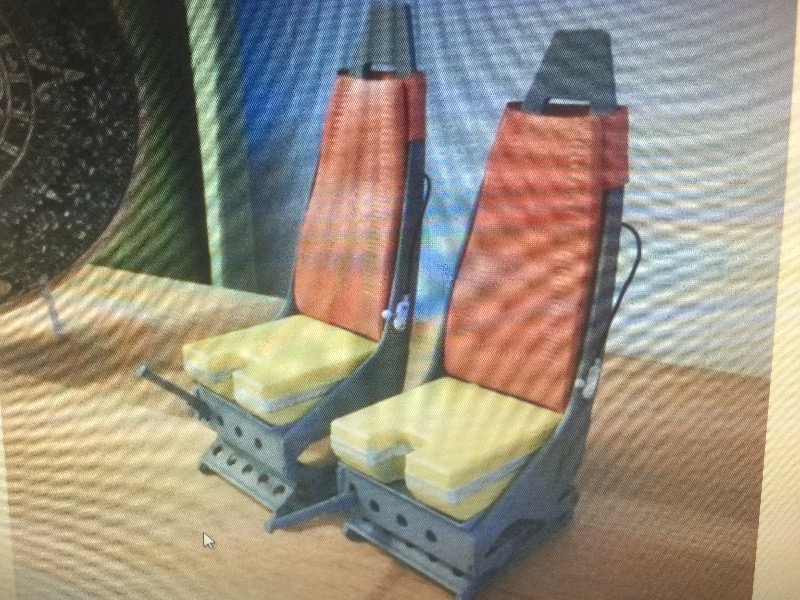
Brian here are a set of seats I printed for a wesssex Helicopter
Replied by Decks5712 on topic 3D Printing
Brian wrote: I can only say that I was a bit worried, but now I've read about the pitfalls for the unwary, I'm a lot more worried than I was!
The PLA filament I intend to use is very strong, for PLA that is. The write up reckons it performs more like ABS. The printed bond is excellent, so no delaminating, and it takes a variety of glues. I'm going to do some test pieces first, I'll try using Acetone as an adhesive to see if the joints are as strong as superglue. I think that this project will be OK. The LabPrint download seems to cover just about everything, and the program has been designed to work straight away with a PRUSA i2 or i3 printer with no modifications other than adjustments to allow for choice of filaments. Whichever way this project turns out, either a pristine "warbird" or a tangled mess, I shall write of the experience so that the members can read, and find some amusement in my jottings. In any case, it'll take minds off the stressful business of taking a model to Cashmoor, and flying it
Brian here are a set of seats I printed for a wesssex Helicopter
Please Log in or Create an account to join the conversation.
- Brian
-
Topic Author
- New Member
-
Less
More
- Thank you received: 0
13 Aug 2019 18:49 #20526
by Brian
Replied by Brian on topic 3D Printing
Its been a while since I wrote of my 3D printing activities. After some initial success, I loaded the printer's SD card with all it needed to print a P-47N. Thunderbolt.
The supplied program was a bit light on information, and I found that it was a hit and miss affair to get the initial layer to stick to the heated bed. Finally I stopped wasting filament and had a good look at the extruder. Unfortunately I'd let my enthusiasm allow me to forget that I'd bought a second hand printer, and there could be some issues with it. I read the printer's manual, something I should have done first. Dismantling and examining the extruder and the rest of the "hot bits" was the way to go. I had to replace a worn PTFE tube as well as a dodgy looking nozzle. As well as the obvious worn/damaged parts, there was a lot of plastic around the head which had solidified. It took quite a while to get all the parts into a fit state to reassemble, then it was a case of re-calibrating the printer and doing some routine test prints from programs supplied by the printer's maker. I bought some ultra cheap PLA filament, reloaded the P-47 and pushed the "start" button. Several hours later I had the tail plane and elevators, rudder and rear fuselage complete with fin. I was relieved to find that the finish was quite good, no more mysterious blobs and missing bits.The designers have done a very good job on the structure, even incorporating slotted pockets for the hinges.This model isn't for flying, the PLA is not ideal regarding strength and durability. This one is to make sure I can cope with the building, there's a lot of joints, and a lot of superglue. The model is literally "built in the hand", that means aligning the parts will have to be extremely accurate. Fortunately the designers have incorporated small edge tabs that help, but they are by no means foolproof. The parts can only be held gently as the outer skin is very thin and very flexible until its stuck to the next section.
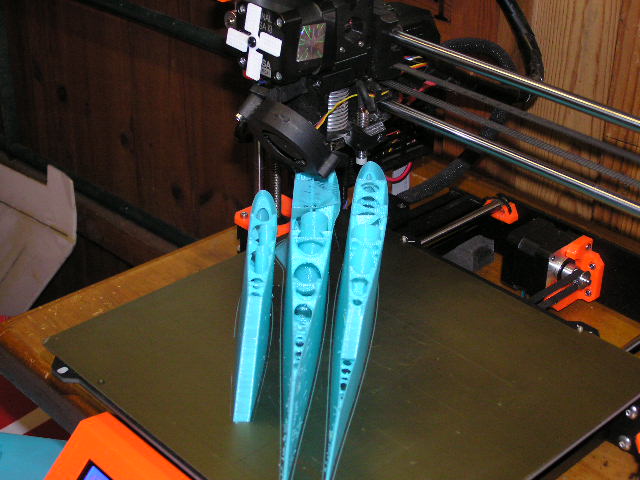
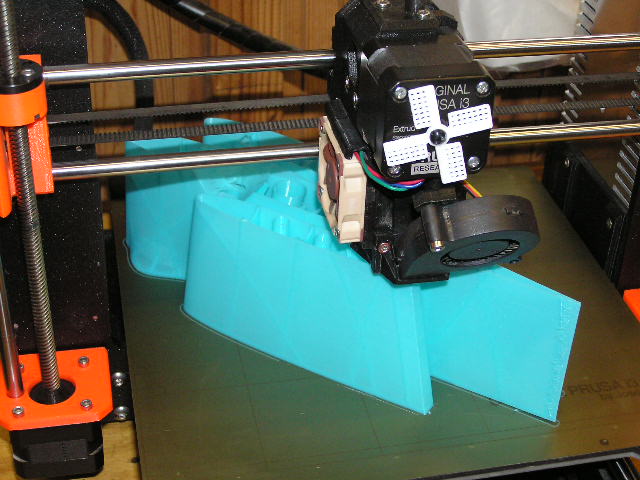
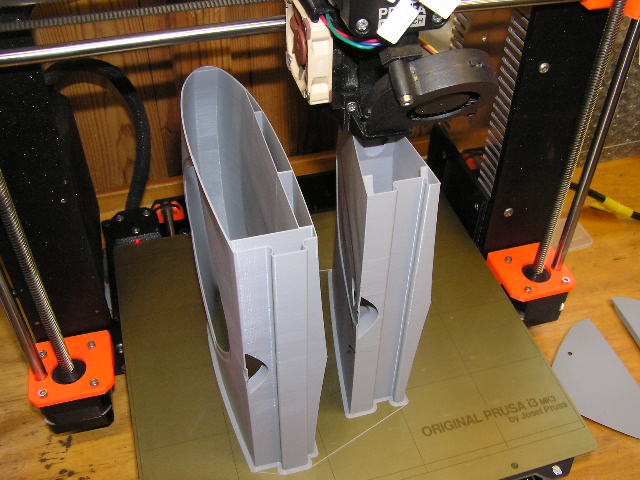
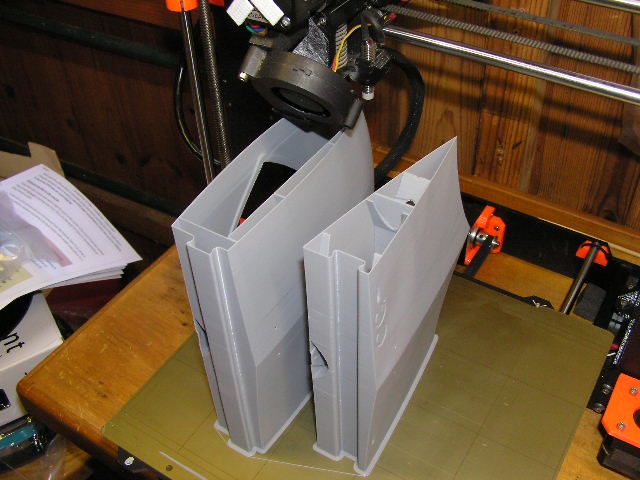
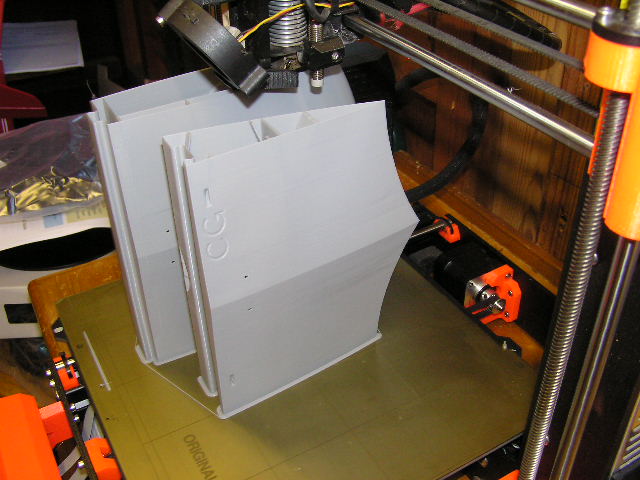
The photos of the parts being printed are of the left wing centre section, and the two parts of the outer wing. The white windmill vanes on the extruder motor casing are just to show that the motor is turning, these are an "add on" from the Prusa community website. The two inner wing parts are on the stool and show the mounting positions of the retractable gear.
The supplied program was a bit light on information, and I found that it was a hit and miss affair to get the initial layer to stick to the heated bed. Finally I stopped wasting filament and had a good look at the extruder. Unfortunately I'd let my enthusiasm allow me to forget that I'd bought a second hand printer, and there could be some issues with it. I read the printer's manual, something I should have done first. Dismantling and examining the extruder and the rest of the "hot bits" was the way to go. I had to replace a worn PTFE tube as well as a dodgy looking nozzle. As well as the obvious worn/damaged parts, there was a lot of plastic around the head which had solidified. It took quite a while to get all the parts into a fit state to reassemble, then it was a case of re-calibrating the printer and doing some routine test prints from programs supplied by the printer's maker. I bought some ultra cheap PLA filament, reloaded the P-47 and pushed the "start" button. Several hours later I had the tail plane and elevators, rudder and rear fuselage complete with fin. I was relieved to find that the finish was quite good, no more mysterious blobs and missing bits.The designers have done a very good job on the structure, even incorporating slotted pockets for the hinges.This model isn't for flying, the PLA is not ideal regarding strength and durability. This one is to make sure I can cope with the building, there's a lot of joints, and a lot of superglue. The model is literally "built in the hand", that means aligning the parts will have to be extremely accurate. Fortunately the designers have incorporated small edge tabs that help, but they are by no means foolproof. The parts can only be held gently as the outer skin is very thin and very flexible until its stuck to the next section.
The photos of the parts being printed are of the left wing centre section, and the two parts of the outer wing. The white windmill vanes on the extruder motor casing are just to show that the motor is turning, these are an "add on" from the Prusa community website. The two inner wing parts are on the stool and show the mounting positions of the retractable gear.
Please Log in or Create an account to join the conversation.
- Decks5712
-
- New Member
-
Less
More
- Thank you received: 0
14 Aug 2019 06:52 #20527
by Decks5712
Replied by Decks5712 on topic 3D Printing
Looking Good Brian. If you using a glass bed I found that using pritt stick glue works best. After levelling your bed smear a layer over your bed let dry. After printing just was off in hot water.
Please Log in or Create an account to join the conversation.
- Brian
-
Topic Author
- New Member
-
Less
More
- Thank you received: 0
14 Aug 2019 17:18 #20528
by Brian
Replied by Brian on topic 3D Printing
Thanks for the tip Alan,my heated bed is steel, held on by magnets and has, what looks like a Kevlar covering. Getting the first layer to stick was a bit of a problem until I used Windolene to clean the bed. For some reason it works better than alcohol (IPA).I have another steel plate that I haven't unwrapped yet. It is made from powder coated steel. The write up on it says that first layers are no longer a problem, and releasing the finished parts has never been so easy. I'm saving it for the printing of the "Real P-47". The present one is to see what sort of finish I can get, and whether I can glue it together properly. The wing sections shown in the previous post took just over eleven hours to print, the next set should be finished by four tomorrow morning, but I'll not be getting up to find out! I had a problem printing the inner elevator parts. The TE of the P-47 elevator is curved, the first print had a straight section, I thought it might have been caused by the component being placed too close to the edge of the printable area. I emailed the 3DLabPrint help section, their reply was that it might have been caused by the Y axis endstops being incorrectly set. I checked the movement, and it wasn't the end stop. Using the "Slicer" program that came with the printer, I loaded the relevant set of parts, and after a bit of head scratching, I managed to move the incorrectly printed elevator parts to a new position on the bed, and copied the info.to the printer's SD card., I was surprised to find that my blundering around on the computer, had somehow produced the right result. I should have made notes of what I did, if I need to do something similar again, I might not be so lucky as to get it right.
Please Log in or Create an account to join the conversation.
- Brian
-
Topic Author
- New Member
-
Less
More
- Thank you received: 0
21 Aug 2019 08:59 #20588
by Brian
Replied by Brian on topic 3D Printing
The set of parts for the P-47 was complete, I made a start on the fuselage. Not as easy as it looked on the 3DLabPrint video. The sections are decidely floppy, and any pressure, like attempting to hold the joints together firmly, results in buckling and misalignment. I used Zap-A-Gap to glue the sections together, after an evening's tinkering, I had five fuselage sections assembled. The following morning, I managed to drop the almost finished fuselage, it broke into three parts. Subsequent flexing the joints effectively re-kitted the fuselage. Not a good start. I read up a bit of superglue info. The opinion is that the use of kicker weakens the bond as well as making the glue more brittle. Not really what is needed for a model that relies on good bonding, especially on highly stressed parts. Loctite make a flexible form of cyanoacrylate, about £3 for a 3g tube. Pity that Hobby King's thick cyano at £1.90 for 50g probably wouldn't be any better than Zap-A-Gap. Perhaps the answer to a stronger joint would be to redesign the sections at the joint lines. If the fuselage had a reinforced area similar to a former, the increased area would improve the stiffness and give a lot more surface area to assist a stronger bond. I tried Acetone welding, but all I got was a fume filled shed and white stains on the moulded parts. No adhesion at all. I tried to copy a video of a printed Mig 15 breaking up in flight. For some reason I can't attach it.The model broke up on its maiden flight, it wasn't flying fast and it wasn't pulling any G, The left wing broke off first, the rest happened almost too quickly to register. Until I can get 100% reliable bonding, I'll not push the making and flying of a 3D printed model any further.
Please Log in or Create an account to join the conversation.
- Decks5712
-
- New Member
-
Less
More
- Thank you received: 0
21 Aug 2019 13:25 #20590
by Decks5712
Replied by Decks5712 on topic 3D Printing
Brian.
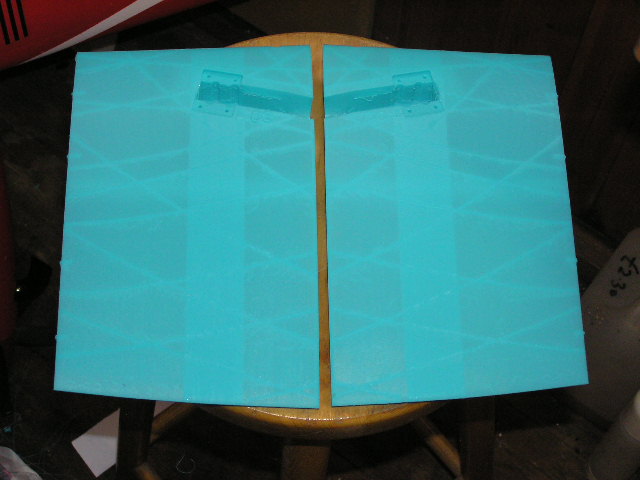
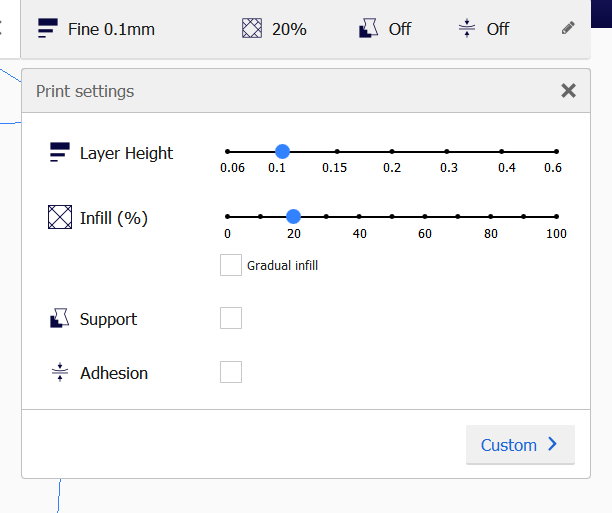
If you want stronger sections try a higher infill setting. In my slicer I can adjust settings to make for example your fuse a solid piece. It will use more filliment and also take longer to print.
See attached
If you want stronger sections try a higher infill setting. In my slicer I can adjust settings to make for example your fuse a solid piece. It will use more filliment and also take longer to print.
See attached

Please Log in or Create an account to join the conversation.
- Brian
-
Topic Author
- New Member
-
Less
More
- Thank you received: 0
22 Aug 2019 06:39 - 22 Aug 2019 06:40 #20596
by Brian
Replied by Brian on topic 3D Printing
Thanks for the tip Alan, increasing the wall thickness would certainly offer more surface area, but the overall increase in weight might be prohibitive. If the wall thickness could be increased just local to the joint line, say something like 4mm to 5mm, that might give a strong enough joint. What I have been trying is to find out how to modify the design of the fuselage local to the joints. What I think would be a lot stronger is a "plug and socket" style of joint, lots of surface area for the glue as well as easier location of the parts. So far I've got a program called Tinker Cad, and I've managed to download a fuselage part into it. Early stages yet, and I have to learn a new discipline which is far different from the Autocad program I used years ago. On the good side, I'll keep going until it stops being fun. At the end of the day, all I want is an aeroplane that only breaks up when it hits something hard, not in flight, is foolproof to glue together, and doesn't weigh too much.
Last edit: 22 Aug 2019 06:40 by Brian.
Please Log in or Create an account to join the conversation.
- Brian
-
Topic Author
- New Member
-
Less
More
- Thank you received: 0
25 Aug 2019 09:08 - 25 Aug 2019 09:10 #20620
by Brian
Replied by Brian on topic 3D Printing
I've ordered some flexible cyano from HobbyKing, perhaps it'll be able to cope with the flexing of the P-47s sections. I saw an advert for an Eclipson Blackwing, a fairly simple electric powered flying wing. The program for the model comes with an assembly drawing and a table of settings for the printer. It took a while to learn the routine for loading the files into the slicer program, but it does become easier. The photos show the centre section of the wing, the two sections are held together by a dovetail joint, and superglue. I don't think it will pull apart in flight.The program for the model is very comprehensive, it gives various propellers and a spinner to print, although it does caution that the prop must be very well balanced.
Last edit: 25 Aug 2019 09:10 by Brian.
Please Log in or Create an account to join the conversation.
- Phil Ford
-

- Offline
- Moderator
-

Less
More
- Posts: 3156
- Thank you received: 903
25 Aug 2019 12:07 #20621
by Phil Ford
Brian, after all this hard work may I suggest "buying" an APC-e prop, approx £2.89 not incl P+P At least you know the prop won't let you down.:lol:
You seem to have really got into this 3D printing malarky. I may have some small projects for you once you've mastered the dark art.")
Replied by Phil Ford on topic 3D Printing
Brian wrote: it gives various propellers and a spinner to print, although it does caution that the prop must be very well balanced.
Brian, after all this hard work may I suggest "buying" an APC-e prop, approx £2.89 not incl P+P At least you know the prop won't let you down.:lol:
You seem to have really got into this 3D printing malarky. I may have some small projects for you once you've mastered the dark art.
The following user(s) said Thank You: Brian
Please Log in or Create an account to join the conversation.
Moderators: DaveBright
Time to create page: 0.529 seconds
©
2009 - 2026
WMAC PCF Design