
When I moved house last year, the old loft needed to be cleared of 32 years of accumulated stuff including of course a hoard of models that had had one too many crashes but at the time seemed too good to throw away and the thought was - who knows, one day I might get round to repairing them. They say you’ve got to be ruthless when a loft is to be cleared and so in short order it all went into the skip. Well I say ‘all’; in amongst the bits I found a tail plane and fin assembly plus a very broken mono wing, two ailerons and the rudiments of a wire undercarriage from a Flair Magnattila.
It must have been put there about 25 odd years ago. I had fond memories of it and it’s a bit different to most of the models we see around nowadays so it was reprieved and I decided to see if it could be rebuilt.
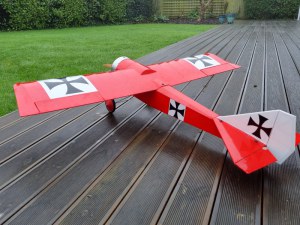
The Magnattila was a 60 inch wing span traditional balsa and ply kit made by Flair, the first in their Scout series. All the aircraft were designed to resemble first world war fighters but with gentler flying characteristics than a precisely scale model would have. The Magnattila had the look of the German Fokker Eindecker. Flair have lamentably long since gone out of business and so the kit isn’t in production anymore but fortunately some of it’s more unique parts are still available.
If you’re repairing a Flair model, one of the great benefits is that they came with full plans and comprehensive building instructions, which I had kept, so I could either copy the shape of various components, such as fuselage formers, or work them out by interpolation. Also the dimensions and thicknesses of balsa sheets and strip wood were given (even with conversions between imperial and metric).


I had to pare back the broken end of the mono wing at about 9 ins from the root on one side, for splicing on new spars, leading and trailing edges and rebuilding from there to the tip complete. The rib template was taken from a broken one, pieced back together and then several were made from blanks sandwiched between two aluminium guides and sanded to shape. Originally the ailerons were controlled by one central servo, piano wire control rods and bell cranks. A reminder that servos back then were much more expensive relatively, than today. I redesigned it to have 1 servo for each aileron.
Building the fuselage was a joy. All traditional construction with lots of shapes and joints. The front end is essentially a sturdy box with a thin curved balsa skin to each side. The boom is a lattice of longerons and bracing, described in the instructions, as looking like a pylon. The firewall is a huge disk of ¼ inch ply. Instead of sheeting in the deck forward of the wing, I formed an access hatch, which came in handy when fitting the battery, it’s switch and the fuel tank, later. The reason why the tail feathers were still intact was because originally, I altered how they were joined to the fuselage, by connecting it with nylon bolts into captive nuts, rather than simply gluing them to it. The rebuilt version had the same.


A particularly notable feature of the Scout series models was that they virtually all used a spun aluminium cowl. The original of course was missing, probably a mangled heap of scrap metal thrown away, when the remnants were ‘stored’ but believe it or not, they’re still available, so I bought a smart new one. The model doesn’t need much power. The instructions suggest a 30 – 40 size two stroke would do. Rooting around I found an old OS 40 FP and the original downward exiting exhaust, which all fitted in perfectly.
The drawings showed ¼ inch square balsa control rods between the servos and the rear control surfaces. We’re all used to using snakes of one sort of another nowadays but I thought why not follow the original idea? So that’s what it’s got.
Though when 1st built, it was covered it with Solartex, this time it was Easycoat. Not perhaps as authentic looking but it’ll do. I managed to get the German cross decal patterns off what was left of the old covering and cut new ones from sticky backed vinyl.


The wire undercarriage has been restored, with a new axle and the original 3 ¾ inch Palmer cord wheels (new ones are still available).
Balancing it according to the centre of gravity shown on the plan, hardly any adjustment seemed to be necessary.
On a lovely calm day at the field, she took to the skies again. Immediately on take off, the plane climbed steeply and needed all the down elevator trim available to achieve level flight. I’ve since moved the centre of gravity forward about ¼ inch by adding some weight in the nose and we’ll see if that’ll cure it. Otherwise she flew fairly gently, landed perfectly and looked absolutely wonderful, just like a historic aircraft in that bright red livery.

