
Length 1120mm, Wingspan 1800mm,Engine – Saito FA-40a, 4 function RC
The full-size Cub was apparently ‘the 1st light plane ever to have been built literally by the thousands’. An interesting snippet – the American military used it as a trainer and in its green livery it was known as the grasshopper.
In selecting a subject to model, I was looking for something a bit different to my usual ‘sport’ models, something interesting, with easy flying characteristics and hopefully it’d keep me occupied on and off for a while. I alighted on the Cub and started looking for a kit or plans. It seems that virtually every major manufacturer makes an ARTF version and there’s quite a few kits as well but I was drawn to building from plans.
There’s a company called Aerofred on the internet who have almost 25,000 model aircraft plans, derived from magazines and kits, often they are accompanied by the contributors building log, which have been sent in by modelers from all over the world. I chose from what I think was from a 1990s kit by a Dutch company, called Svenson. They were printed and sent as 3 rolled up AO size plans and included the building instructions.


The fuselage is framed with ply and balsa formers, 6mm square balsa longerons and bracing, with additional balsa sheeting to the cabin and nose. I moved the engine firewall rearwards in order to accommodate a longer motor than the small 2 stroke shown. Because the wings attach separately to each side of the fuselage (without any sort of joiner), a lot of care is needed to precisely position the wing root dowel locating holes in exactly the same place on both sides. Though not shown, I cut a small hatch in the nose, just behind the firewall to make it easier to fit the plumbing. The tail plane seat is not very well shown and also needs some care to get the correct incidence. To make the windscreen I created a template from cardboard and cut out a thin piece of clear perspex from it.
As mentioned, the wings are in 2 parts – port and starboard. They’re constructed in the traditional manner with their leading and trailing edges parallel which made it convenient to cut the ribs from balsa blanks sandwiched between 2 lithoplate templates. The original model was designed to have a single aileron servo, which given that neither wing root meets the other seems to me to have entailed a rather laborious process to assemble every time it was to be flown. I installed servos in each wing. Whilst on the matter of the wing roots not meeting, it means that the cockpit needs a roof but unfortunately the plans don’t show it, though not a huge problem, because there’s plenty of examples of this plane and it didn’t take too long to find out what it looks like. I built two hatches (to allow access to the radio gear and servos) , contoured to follow the profile of the wing, one to incorporate the characteristic window and each held in place by invisible magnets.


The main undercarriage is formed from piano wire, with soldered gaiters. According to the plans, wire cross bracing is to be soldered diagonally between the inner end of the axle stubs and the top of the opposite leg. A dummy shock absorber is then to be placed on each: all rather unforgiving, so I cut each brace and incorporated springs. This must be such a popular subject to model, because without much effort I was able to buy the correct size wheels incorporating yellow hub caps with ‘Cub’ embossed on them.


I tried something new for the cowl. I got it 3D printed. This was not quite as straightforward as imagined. First of all, I needed to accurately draw and dimension it, then I sent it to be converted to a digital file and then it was printed several times at different thicknesses. Despite this there was still a tendency for the filament joints to separate when manipulated and so the inner surface had to be covered with a thin layer of glass fibre mat to keep it together. The outer surface needed several layers of primer filler and sanding between coats to make it smooth. Though the finished cowl is perhaps heavier than anticipated, as it turned out, it didn’t matter as a small amount of additional weight at the front was still needed to balance the plane.
The servos and tank are all fitted out of sight beneath a removable panel on which the pilot bust is glued.
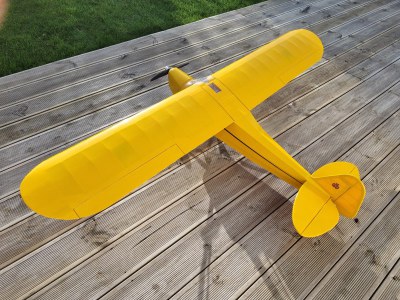
The whole is covered in yellow Easycote. The black flash along the fuselage was cut from sticky back plastic and I was able to buy from the States at hardly any cost, some Piper Cub logo decals, at just the right scale for each side of the fin.
There’ve been some interesting challenges, and it’s taken almost a year but I’ve thoroughly enjoyed building this model and I’m looking forward to flying it soon.

