
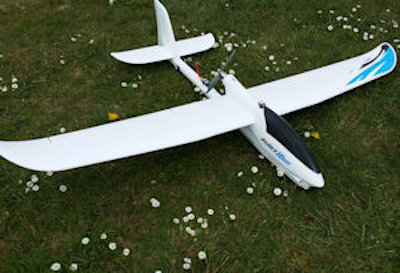
The Ranger 1600 from Hobbyking is another plane from the milk bottle stables, ie; plastic fuselage and very similar stabiliser and tail fin to the Phoenix glider range. The big difference though is the plug in wings so no screw driver required. The Ranger is designed for much easier hand launching and virtually a mid-wing type plane. This model is very similar to the Bixler series except it now has a virtually indestructable fuselage! The front nose has a flat area with a small aperture for a camera if using it as FPV. It is quite capable of powered flight or used for slope soaring, your choice. The plane comes with pre-wired servo connections, 30 amp ESC and a unbranded 2212 1400Kv brushless outrunner and designed to run on 3 cell Lipos in the 1600 to 2200 maH range. These batteries will balance the model perfectly.
The transmitter I used is the Taranis X9D, the receiver is a X6R in 16 channel mode and connected to the FC by serial data.
Assembly is not rocket science and the monochrome manual shows mainly by photos all that is needed to complete. I replaced the motor with a Turnigy 2836/8 1100Kv motor and discarded the bendy plastic prop for a APC-e 8x4 pusher. On a maiden test flight using 2200 4 cell lipo I had 400 watts WOT, however in cruise I was only using about 4.5 amps on average.
As per the title I planned to fit a Matek 405SE Fixed Wing flight controller to it running on INAV with a Matek GPS M8Q module.
More information on INAV fixed Wing can be found here. INAV FIXED WING The modes I favoured were Manual (previously passthro), Horizon (fully stabilised), AltHold, PosHold and RTH. Also adding Servo Trim and AutoTrim. The Max Altitude Warning is set to 400 feet (from point of launch) on the OSD, the legal height for Unmanned Small Aircraft within the UK unless an exemption is in place authorised by the CAA
With a successful maiden completed and the plane now trimmed out mechanically it was time to fit the Flight controller and configured with the flight modes shown above. I launched it in Manual and gained some height and after a circuit to ensure all was well I then engaged Horizon and let the sticks centre. Plane settled and continued in a nice straight line with wings level. I must add here that in the Configurator I added 2 degrees of pitch to the board position which seems to work perfectly as planes don't usually fly dead level. I then banked round and it tends to feel a bit "mushy" on the sticks and needed a bit more input than I would normally need but this is because the FC has some effect due to stability being used. Now flying back towards me in the circuit I then switched to Althold and released the sticks. Yes, maintaining height even when I bank slightly.
Now here is a critical bit, with the plane flying some distance away in front of me I switched to RTH (aslo known as Panic mode!) and let go the sticks completely. The plane instantly started to turn back in a 20 degree bank and descended a little to the pre-configured altitude I had set (125 feet) and continued to come back to me but to the right of my position. I had set the Loiter radius to 200 feet and directiion of circling to RIGHT. As it was nearly over the top of my position but to the right it continued banking with some slight levelling of wings and continued to circle overhead. Be advised under our Club Rules and general safety that as I was standing in the pilot box and therefore a No Fly Zone would be behind me I returned to manual control. So from now on I have to arm the plane some 150 feet away from the pilot box which is on the far side of our runway, return to the pilot box and then launch. This should now keep the aircraft circling in front of me all times on RTL..


Now happy with initial flights I then fitted it out with a RunCamEagle Pro camera in the nose. This was a bit of a fiddle as there no way of fitting the camera bracket. I decided to use some dense white foam packaging usually found protecting electronic equipment. I cut out the foam so it just squeezed into the nose area. Then removed and under cut a section to take the camera body. Now with camera in the cut out I then pushed/squeeezed the foam back in to the nose guiding the lens out through the fuselage. This slight bit of compressing holds the camera securely and for good measure I had used some UHUPOR glue to stick the foam down once in position. The camera is held securely but insulated against vbibration. Earlier I had fitted the VTX on the flat area of the fuselage behind the prop but later moved it to the front so that any wiring is not passing close to the ESC and Motor.
The video transmitter now is "hook n looped" to the side of the fuselage next to the Camera. The VTX antenna is now fitted to the front nose using an extension co-axial lead which entailed modifying the canopy to clear the antenna base fitting. The VTX will get some cooling air from the air intakes in the fuselage nose.


I can see some of the Flight Controller's modes coming in very handy whilst training novices in ther first few sessions allowing them steer but aircraft maintaining height and stability and the big plus is if they lose orientation or too far out the Trainer only has to flick a switch and it will return.
Conclusion:
Pros: As a standard motor glider or slope soarer another excellent low cost addition. Plug In wings make transport easy.
Cons: Nylon hinges now fitted to control surfaces but not up to much after some long term use. Back up with tape, .eg: Blenderm by 3M. To get good flexibility and reduce load on servos also cut through the "foamy" hinge line
Video Clip
More updates and modifications will be here by date:
- 25/05/2019: Mobius Camera replaced with RunCam Eagle Pro
- 26/05/2019: Cruise Mode removed - Not required
- 07/06/2019: Althold Removed
- 07/06/2019: Loiter and AltHold Mixed
- 25/06/2019: INAV 2.2 now auto mixes Althold with Loiter. My Althold Mix is now not needed.

