

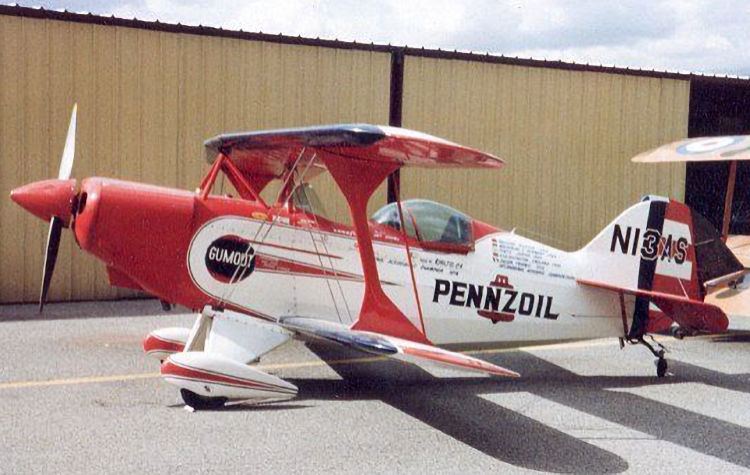
My first Super Chipmunk was Art Scholl's N114V commonly known as Pennzoil after it's main sponsor. Back in 2012 I bought it from a Guy from Stoke who I met at the Granada services on the M6 who had virtually finished it but had to give it up after his club reduced engine and/or aircraft sizes. I powered it with an ASP 180 four stroke glow engine. It did not fly regulary at our field but did fly at some model airshows. Not having flaps and being a rather floaty plane it needed a decent long runway area to land. However, it was dream to fly.
Around 2016 after succesfully fitting an OS 33GT into my Pepsi Super Chipmunk I also removed the SC180 glow four stroke for the more economical and less oily 33 GT. Over the years though the covering film in places had started to delaminate so this Winter 2025/26 I thought I have time now to refurbish it.
A Little History:
Art Scholl
Born in the Milwaukee suburb of Brown Deer, Art learned to fly in 1950 and by 1974 was judged the U.S. National Aerobatics Champion. He was a nine-time member of the U.S. Aerobatics Team and performed his spectacular air show routine all over the U.S. and Canada in his Pennzoil Super Chipmunk. Along with his credentials as a top competition and air show pilot Scholl held an AA, BS, MA and PhD in Aeronautical Engineering and was a professor of aeronautics for 18 years.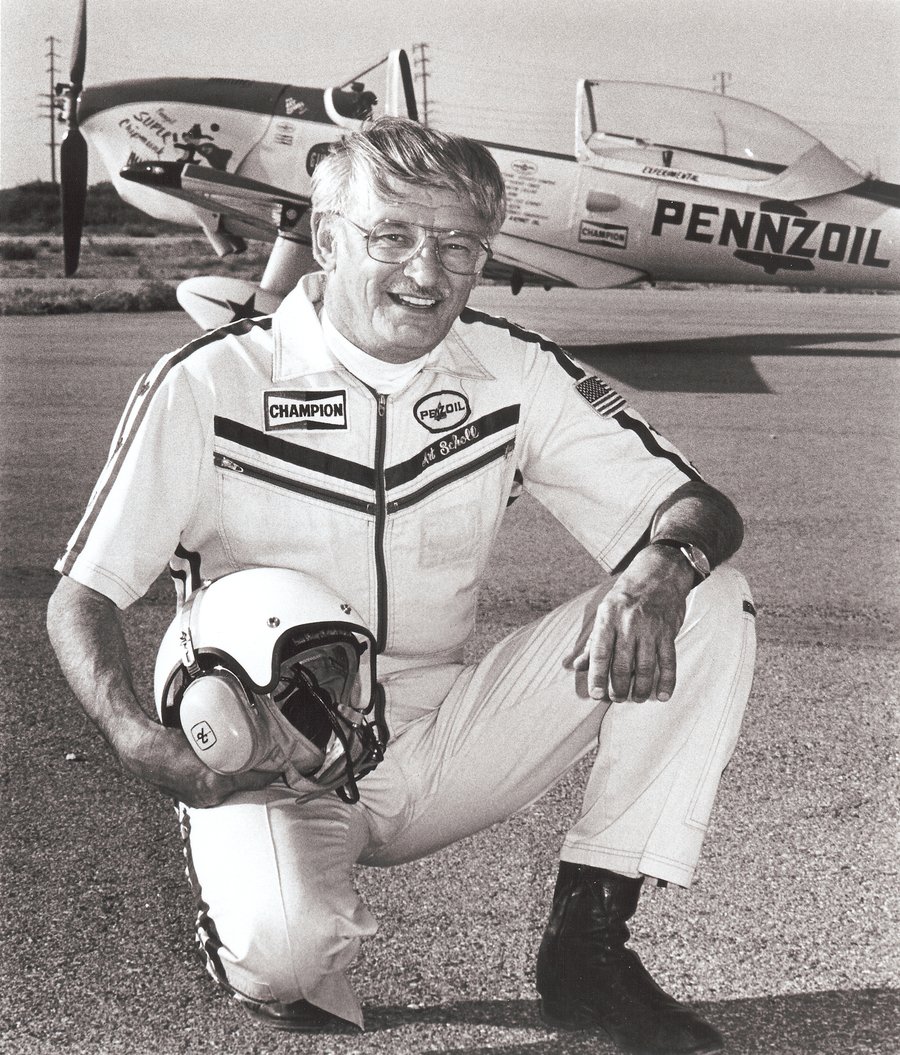
In his first job, at the China Lake Naval Ordinance Test Center, he worked on the redesign of an eight nozzle, spin stabilized rocket. That work increased the rocket's flight distance and payload capability. Many of the principals he proved are still in use today. Art held most of the fixed wing pilot certificates -- ATP and instructor and was also a mechanic holding the A&P Mechanic Certificate and Inspection Authorization.
He became a much sought after pilot by the movie and television industries having flown in more than 100 films and shows including: "The Right Stuff", "The Great Waldo Pepper" and "Baa Baa Black Sheep." With a list of aeronautical credentials encompassing education, aerobatics competition, air shows and motion picture pilot, Art Scholl has become one of aviation's legendary figures. There are not a lot of video available from around those times but below are a few worth watching.
Videos 1985 - Last airshows before his death whilst using his Pitts Camera plane during the making of Top Gun, the aircraft failed to recover from a spin and plunged into the Pacific.
The videos are not quality back then but these are still worth viewing.
https://youtu.be/B06YtngsplE?si=8sFoimbyvUtf0k_z Art Scholl and Skip Volk
https://youtu.be/GZvRsXh9tyc?si=1-ANSyAQnGRCLVU Art Scholl
Back to the Refubishment
First of all you will as you read on you will see that I have to work in a confined space. Not much space especially when working on large wings. It was then after starting to remove the covering that I discovered he had skimped on covering film and used Solarfilm/Monokote. The problem with this stuff is that the pigment is also the adhesive and get lefts behind unlike Oraover/Profilm where the pigment is in a middle layer. Oh no! Now it is a slow process of a heat gun and scraper followed by sanding down to get an acceptable surface for the new Oracover film. Another slight issue is that Oracover (Red 22) will not exactly match Monokote Red and anyway the covering colour has probably changed somewhat over time due to UV and weathering.


To same some time I left the tail, stabiliser and elevator as original (except a small patch here and there where the film had lifted - see last image where the stabilser righthand side has been recovered but not really noticable against the elevators monokote covering). All the fuselage sides that where white was recovered and replaced the upper fuselage red and blue spine. The fuel dot was replaced with a nice new shiny aluminium one.
Back to the fuselage and time to give it the graphics. I had an envelope from Callie Graphics dated 2020. Grreat stuff. Apparently not as I just finished replacing some of the graphics and admiring my work there was something wrong. They are not in the correct scale! These graphics must have been for my Carl Goldberg chippy 60 size that is no longer with us. Oh well, give Callie a call for some more.


The cowl was flatted down with wet n dry 400 then 1200 and the lower half was resprayed with Appliance White (Halfords). Then mask off white to respray the top half with RC Colours Red 22. I have had issues with RC Colours before with spluttering spray patterns and blobbing. As it takes a couple of days to harden before it can be wet n dryed down. So with a brand new can and giving RC Colour the benefit of the doubt I attempted to respray. Ghiant RC colours needs a kick up the proverbial. This can would not even depress the nozzle button. Give up!
So back to the original colour I used which was nearest to the turtle deck colour which was Ford Carnival Red. Which appears a little too orange to me so I looked at other car colours I had in the cupboard. To cut a long story short I plumped for Fiat Red Orange. Once touch dry I double coat of lacquer to give it a glossy finish. Not an exact match but it will have to do.
I also noticed that the bubble canopy had acquired a crack so purchased another one from SLEC, the original kit maker and also a pair of spats just in case I break them some time in the future. After cutting off the excess plastic on the canopy then the not much fun masking up the canopy, a bit fiddly but once happy with mask tape edges, a coat of white primer followed by two light coats of gloss white. Once the paint had dried a few hours later I then demasked and did a test fit on the fuselage. The original canopy was secured by six small screws but I found that over time with the vibration from the engine the screws would losen and wear bigger holes in the plastic. So, as per Pepsi/Ghost Writer I will glue it with a small beads of clear silicon - makes for invisible security and smooth lines. Can always be cut through if necessary with a scalpel.
The Wing
The wing also had some delamination of the covering and some time ago two patches on the surface, repairing holes created by mishandling and two on the underside where some time ago the landing gear got bent backwards enough to allow the spats to pierce the covering. Originally I was just going to recover but thinking whilst stripped get flaps cut out (they should be done along with the ailerons but the original builder decided against flaps so never cut them out. Well, I will and install the servos to operate them. After cutting out the flaps successfully, I later find that there were no hard points installed for control horns and hinges after I removed the top sheeting. Trying to install hard points was not that easy and after making a "pigs ear" of it I decided I will make my own up. A fiddly job though.


Not ideal but functional, the flaps were hinged using Kavan hinges glued and screwed on and then covered in film. They do move with no resistance at all - good for servos! With flaps hinges set I then aligned the flaps to the wing. Recheck and recheck before eopxying the hinges to the wing trailing edge. With that done I can now proceed with the recover.
With three new rolls of Oracover, Red 22, White STD and Blue 52 time to get ironing. starting with the red underside, then the centre white strip follwed by the blue to the leading edge. Then heatshrunk using the iron at 130 degrees C. Next job was to cut out the film where the servo hatches at going to be located. Then check they fit okay.
Wing tips are going to be a pain to cover as I remembered last time I did a repair. Trying to stretch film over the curves without melting it or burning my fingers. So, in case of making a mess of it I decided I would cover the wing tip first so if an issue I do not have to replace the whole strip on the wing. With the tips done I can proceed the probably the easiest part of covering.


But first plug in the nav lights because once the covering is on it will be a real pain to reconnect the leads. With them connected I left them hanging loose until the all the film covering is on the glue them in with UHU Por. Starting from the trailing edge the white covering was ironed down over the sheeting and open ribs. Then heatshrunk the film. The final covering of blue from the white and rolling over the leading edge overlapping the underside blue by 20mm. A light shrink with the iron first then the heatgun to pull the leading edge nice and tight. Now I could fit the aileron servo hatches and also the flap hatches. The top surface of the wing now just needs strips of red 22 at 2.1/4 inches wide to be applied. But for now I will leave that bit of fun and move on to setting up flaps via the radio.
Next day, flaps done but a fair bit of playing around with servo travel range (ATV) and Flap System configuration. For now I have set 12% of elevator compensation to full flap as per Ghost Writers set up. I can adjust this after flights as necessary. While the wing is plugged in temporarily I checked that the installed a step down converter to power the LED nav lights working. Cree strobes blinding when in the garage!


Back to the wing so must crack on with the fiddly bit of cutting strips and tacking them in place for now. I would have to follow the original spacing decided by the red strips on the ailerons. I made a card template of 2/14 inches width to help with positioning. Once I was happy with the layout I then turned up the heat of the iron to activate the adhesive to "stick 'em" down. Next morning still raining so happy to not be in the "hangar" I mean garage and be indoors in the warm. Working on the spats which were still in good order, I removed the incorrect decal flashes I had created with solatrim and after cleaning off the glue residue with methlyated spirits I applied the "correct" graphics to the wheel spats. Again thanks to Callie Graphics for having them part of the decal set.


**

