- Thank you received: 0

Back to Basics
- Brian
-
 Topic Author
- New Member
-

Less
More
24 Jul 2021 19:21 #24941
by Brian
Replied by Brian on topic Back to Basics
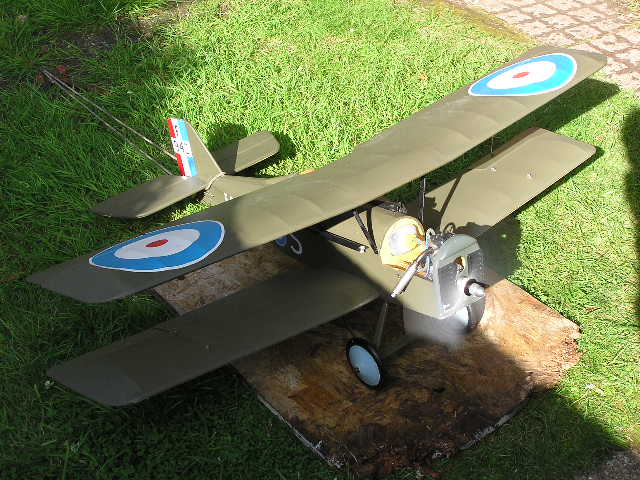
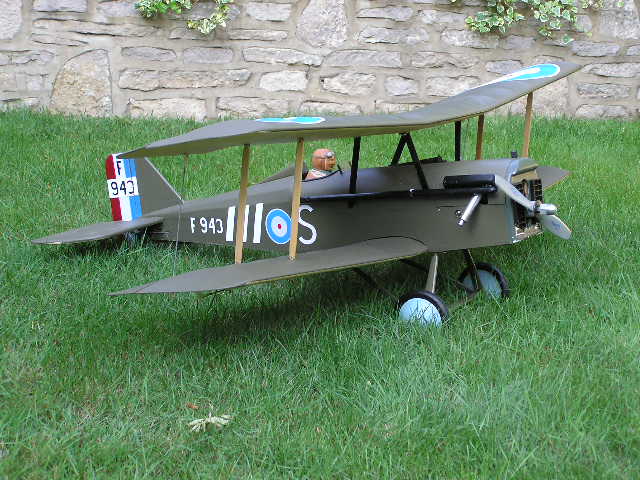
The receiver in the SE5A is a Lemon Rx seven channel with stabiliser. I've set up the model with the stabiliser switched off. Final assembly went along with no real problems at all. Along the way a couple of screws had gone missing, but the junk box yielded up some replacements. After sorting out the reversed throttle, the Saito started vey easily and ran reliably. Fuelling up was a bit of a problem as the model is fitted with a filler that needs a matching nozzle. Fortunately I had one and pumping fuel in was clean, no drips on disconnection either. After sorting out which way round the throttle went, after warming up, the engine settled at 2500/2800 on low throttle. All that's left to do is set the throws and rates, then wait for the wind to be straight up or down the runway. Can't risk a crosswind take-off with all the top hamper and a very narrow undercart.
The next model to get "the treatment" is my Freewing Mig-15. A couple of years ago it made one short flight which ended with the model having a very short nose. I flew it last Tuesday, it was slightly modified from the time of its first flight, originally I'd cut two "cheater" slots in the underside of the fuselage. This time I'd closed off those slots and opened up two more in the top of the fuselage. The improvement in thrust allowed the model to lift off the grass after I stalled it on launching ,didn't think that would be possible, but it did, and there was hardly any wind either.
The next model to get "the treatment" is my Freewing Mig-15. A couple of years ago it made one short flight which ended with the model having a very short nose. I flew it last Tuesday, it was slightly modified from the time of its first flight, originally I'd cut two "cheater" slots in the underside of the fuselage. This time I'd closed off those slots and opened up two more in the top of the fuselage. The improvement in thrust allowed the model to lift off the grass after I stalled it on launching ,didn't think that would be possible, but it did, and there was hardly any wind either.
Please Log in or Create an account to join the conversation.
- Brian
-
Topic Author
- New Member
-
Less
More
- Thank you received: 0
25 Jul 2021 16:46 #24944
by Brian
Replied by Brian on topic Back to Basics
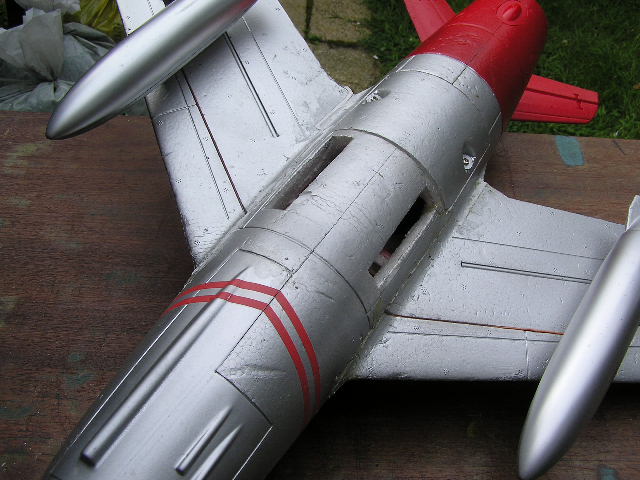
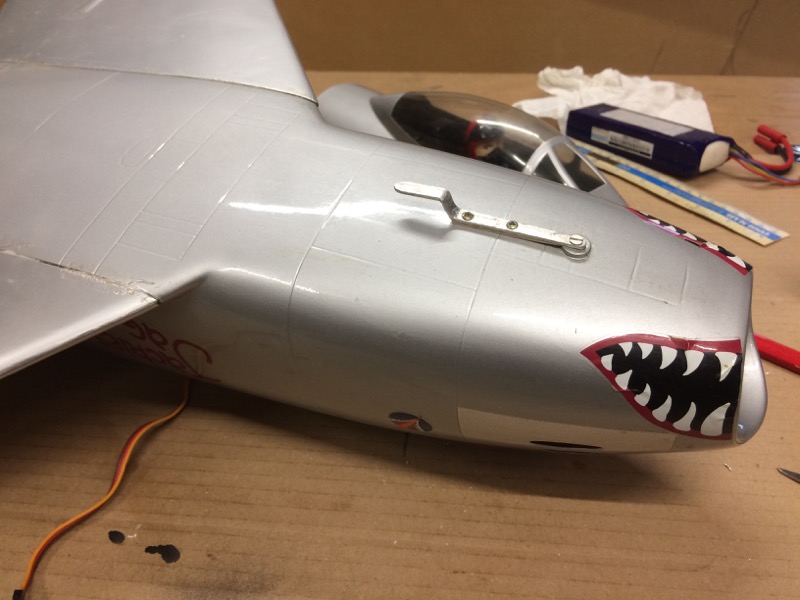
The Freewing MIG-15 wouldn't "get up and go" from a hand launch in its "as supplied" state. I watched a video by the Petrincic brothers, they'd cut a couple of cheater slots in the underside of their MIG-15, and it made quite a difference to the performance. I cut slots in my MIG, never got to know whether they worked properly, I crunched the model on its first flight with cheater slots. Last week I flew the MIG for the second time, I'd repaired most of the damage, couldn't do much with the distorted nose section, apart from glue it back together. I ran the EDF and found that instead of allowing air in, the underside cheater slots were definitely leaking air outwards, this occurred at the end of the slot close to the fan. I expect that somewhere, several pages of obscure calculations will explain the best size and position of cheater slots. Beyond me, I can't even count the number of cells in a flight battery correctly. The MIG's fuselage has a tray with the battery, ESC, lots of wires and a servo, this little lot is all on the topside of the tray and effectively obstructs the airflow. In order to get more air to the fan, I realised that a couple of cheater slots in the top of the fuselage would probably bring a better balanced airflow, than having slots in the lower fuselage which was already providing the bulk of the air. I blocked off the lower slots and opened up two new ones in the top of the fuselage. Bit limited with regard to their position as the canopy hatch gets in the way. The new slots seemed to work alright and the MIG flew quite nicely, even managed to get off the grass after I stalled it on launch. Today I have been treating the newly cut but rather crude slots to some cosmetic treatment. I have used a mix of 3D printed NACA Ducts and a piece of preformed litho plate. The fuselage was cut to accept the ducts, and as much foam as possible was removed between the ducts and the fan. In order to maximise the aperture, I used a piece of litho plate to wrap round the fuselage and form the outer skin of the duct. The litho plate was curved by drawing it under the handle of a balsa knife. This was then cut to length, leaving the ends slightly long to allow a 1/8" tab to be bent up at each end. Slots for the tabs were cut in the fuselage. A trial fit using stiff paper showed that the litho plate strip would fit. Using my favourite R/C glue along the edges of the strip and in the slots, the litho plate was eased into position. While all this was drying, I made a start on the second bit of cosmetic work by knifing on some lightweight filler into the assorted joints and dents, messy but effective. The next step is to find a way of getting the MIG to take off without using a dolly, perhaps some sort of wire skids?

Please Log in or Create an account to join the conversation.
- Brian
-
Topic Author
- New Member
-
Less
More
- Thank you received: 0
25 Jul 2021 16:59 #24945
by Brian
Replied by Brian on topic Back to Basics
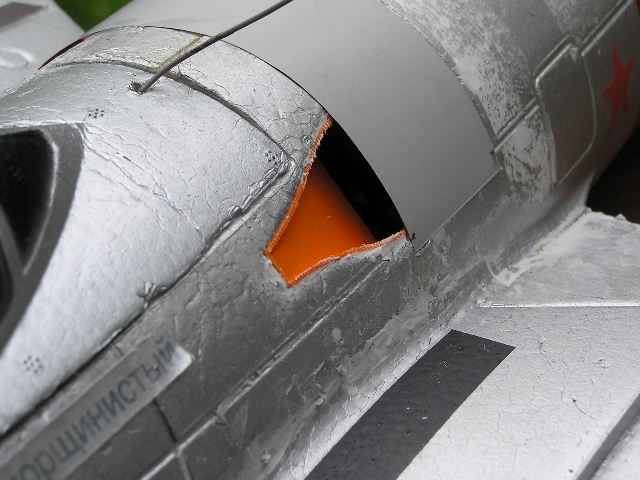
The middle picture of the MIG shows the end of a label which is beginning to peel off. The message on the label says (in phonetic Russian) "Starryy Morschinistyy" It means "Old Wrinkly". Neatly describing the model..and me.
Please Log in or Create an account to join the conversation.
- kevinross
-

- Offline
- Platinum Member
-

Less
More
- Posts: 1023
- Thank you received: 583
25 Jul 2021 19:56 #24946
by kevinross
Replied by kevinross on topic Back to Basics
Just wondered if you've seen Mike Seals new bungee launch system for the Impressivio. Its so effective i'm currently making my own in preference to the Hobbyking launch ramp ive used for several years.
Ive also fitted an bungee UCK to my F86 as this has also proved difficult to hand launch
Ive also fitted an bungee UCK to my F86 as this has also proved difficult to hand launch
Please Log in or Create an account to join the conversation.
- Brian
-
Topic Author
- New Member
-
Less
More
- Thank you received: 0
25 Jul 2021 22:46 #24948
by Brian
Replied by Brian on topic Back to Basics
Haven't seen Mike's launch system Kevin. The only one I was aware of was the one Phil uses. With luck, the MIG won't need a ramp or a launcher.
Please Log in or Create an account to join the conversation.
- Brian
-
Topic Author
- New Member
-
Less
More
- Thank you received: 0
05 Sep 2021 20:15 #25083
by Brian
Replied by Brian on topic Back to Basics
August sort of arrived and then went away quite quickly, the SE5A had a wobbly test flight, it took off and promptly rolled right and ended up in the long grass. Fortunately no real damage, only a pair of aileron horns pulled off. The MIG 15 has finally had a successful flight, on greatly reduced rates and aided by a powerful launch by Jon it flew rather better than I had expected. Now I'm glad I bought a spare one. The "Stik" I collected earlier in the summer was fun to fly, I had it on Spektrum. I don't know why, but I decided to use the model as a means of getting to grips with the mysteries of Taranis and Open TX. I swapped out the Spektrum receiver and replaced it with a tiny FRSKY one, just four channels, very basic, but with a range in excess of two kilometres. I had a "go" with it last Friday. The first attempt was more fright than flight, however, thanks to Colin and his help with modifying the program, the second flight was quite sedate. Unfortunately the model's semi transparent wing covering made me lose orientation, and the Stik ended up in the field at the West end of the strip. Once again, thanks to Colin, it was spotted and recovered. Bit dusty and a broken prop. How lucky is that?
Suitably encouraged by the results with Taranis, OpenTX and the Stik, I thought it would be a good idea to do he same with the SIG Four Star 20 I bought back in the Spring. Today I have been sitting in the garden with the model and the Taranis, bit by bit the programming came together. Finally I attempted to set up the servos. Apparently the way its done in OpenTX is to use the sub-trim facility. This is OK until you have a Y-lead, then it becomes impossible to get both servo arms square to the servo body. (Unless someone knows a tweak that isn't in the book). I removed the pushrods to the ailerons and tried the servo arms in various positions to try to get the "magic" servo arm square to the servo body situation. I was about to give up and re-fit the aileron pushrods when I saw that the pushrods weren't the same length. There was a difference of over 3/4". Strangely until then I hadn't noticed that one aileron horn was back to front, the leading edge of the horn faced the trailing edge of the aileron. No wonder the model was a bit odd in the air. The overly long pushrod was given a new Z bend in the right place, the back to front horn was re-fixed the right way round. All that's left to do is set the rates and designate the switch positions, and re-bind the receiver to the new fail safe settings. Never realised that messing around with a Taranis could be so much fun.
Suitably encouraged by the results with Taranis, OpenTX and the Stik, I thought it would be a good idea to do he same with the SIG Four Star 20 I bought back in the Spring. Today I have been sitting in the garden with the model and the Taranis, bit by bit the programming came together. Finally I attempted to set up the servos. Apparently the way its done in OpenTX is to use the sub-trim facility. This is OK until you have a Y-lead, then it becomes impossible to get both servo arms square to the servo body. (Unless someone knows a tweak that isn't in the book). I removed the pushrods to the ailerons and tried the servo arms in various positions to try to get the "magic" servo arm square to the servo body situation. I was about to give up and re-fit the aileron pushrods when I saw that the pushrods weren't the same length. There was a difference of over 3/4". Strangely until then I hadn't noticed that one aileron horn was back to front, the leading edge of the horn faced the trailing edge of the aileron. No wonder the model was a bit odd in the air. The overly long pushrod was given a new Z bend in the right place, the back to front horn was re-fixed the right way round. All that's left to do is set the rates and designate the switch positions, and re-bind the receiver to the new fail safe settings. Never realised that messing around with a Taranis could be so much fun.
Please Log in or Create an account to join the conversation.
- 4Pedalsfly
-

- Offline
- Platinum Member
-
Less
More
- Posts: 800
- Thank you received: 202
05 Sep 2021 23:01 #25084
by 4Pedalsfly
Replied by 4Pedalsfly on topic Back to Basics
Brian - Re SIG 4 Star - If I may suggest , ditch the "Y" lead & plug each aileron into a separate channel.
You can then easily fine tune each.
Regards
Colin.
You can then easily fine tune each.
Regards
Colin.
Please Log in or Create an account to join the conversation.
- Brian
-
Topic Author
- New Member
-
Less
More
- Thank you received: 0
06 Sep 2021 08:58 #25085
by Brian
Replied by Brian on topic Back to Basics
Thanks Colin, unfortunately due to scrimping on the outlay for a new receiver, using channels 1 and 5 for the ailerons isn't possible. The receiver is an FrSky V8R4-II and has only four outputs. I think I'll have to use it in the MIG15 which needs less channels. The SIG 4 Star is only a knockabout model anyway, although it could be useful for trying out different FrSky receivers. Unfortunately they cost a bit more than the £14 or so I paid for the current one.
Please Log in or Create an account to join the conversation.
- Brian
-
Topic Author
- New Member
-
Less
More
- Thank you received: 0
06 Sep 2021 12:27 #25086
by Brian
Replied by Brian on topic Back to Basics
This morning I finished setting up the SIG 4 Star 20. The only thing left after adding expo and switchable rates was to add the voice warnings on the "Arm" switch. Yesterday I'd completed most of the programming, so without thinking, I refitted the propeller and spinner. We all know that the prop should be removed before fiddling around with the electrics switched on. I assumed (wrongly) that the arming switch was operating correctly. At switch on the transmitter advised that the "engine" was disabled, with the throttle closed I flipped the switch to "engine" enabled. The ESC gave a cheerful beep or two and promptly went to full throttle. The 4 Star shot across the lawn only stopping when it hit the garden wall. The one piece wing is now definitely a two piece arrangement, and the motor needs a new shaft. Order's in to Overlander, hope the replacement won't take too long.
Please Log in or Create an account to join the conversation.
- Phil Ford
-

- Offline
- Moderator
-

Less
More
- Posts: 3156
- Thank you received: 903
06 Sep 2021 15:59 - 06 Sep 2021 16:02 #25087
by Phil Ford
Replied by Phil Ford on topic Back to Basics
Special functions! See my lines using Switch SF on file attached. ") Lucky you were not at the front end Brian. This is the set up for my Stinger EDF.
Lucky you were not at the front end Brian. This is the set up for my Stinger EDF.
Lucky you were not at the front end Brian. This is the set up for my Stinger EDF. 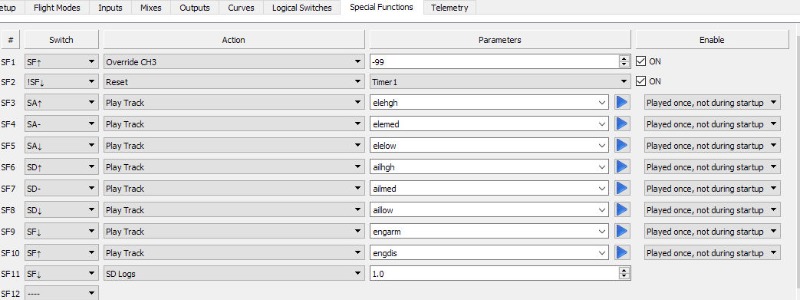
Last edit: 06 Sep 2021 16:02 by Phil Ford.
The following user(s) said Thank You: Brian
Please Log in or Create an account to join the conversation.
Moderators: DaveBright
Time to create page: 0.518 seconds
©
2009 - 2026
WMAC PCF Design