- Thank you received: 0

Back to Basics
- Brian
-
 Topic Author
- New Member
-

Less
More
22 Jun 2021 18:58 #24818
by Brian
Replied by Brian on topic Back to Basics
Studying the plan of the SE5a didn't help at all. Looking at the fuselage from all angles didn't help either. I came to the conclusion that there were only two possibilities, well three in fact if I leave the cabane struts as they are. I think it would be very difficult to drill four holes in the right places so that a screwdriver could be inserted, probably even more difficult to align the screwdriver with the hidden screw heads. The second option would be to remove the decking in the area of the struts. Big job and no guarantee that it would go back together neatly, unless the whole turtle deck in front of the cockpit was removed. This would involve cutting through formers as well as the ply decking. Guess I'll leave the wobbly struts just as they are. In the meantime, I've been having "fun" with a Multiplex Easy Glider. This model has been painted, can't imagine why, but it has been not only painted, but extremely thoroughly painted. I found a way (I thought) of stripping the paint. Screwfix have an excellent paint stripper that does the biz without being overly aggressive. The stripper didn't attack the Elapor foam of the model, and the paint wrinkled in an encouraging manner when I did a small test area. I should have known better! The instructions for using the stripper were to paint it on thickly, leave for an hour, then slop on some more, leave for another hour, then wipe off the paint with a cloth. It worked! Unfortunately, the glider had been painted twice, and only the top coat came off. Even more unfortunately, the first coat seems to be stripper resistant. I tried larding on lots of stripper and covering the area with polythene sheet to prevent the stripper drying out, all to no avail. Whatever the paint is, it aught to be used by our armed forces, as it appears to be bullet proof. The final attempt was to leave the stripper bagged up for 24+ hours. The paint was unaffected. Shame that, I quite fancied a "go" with a glider, especially a free one. No photos, too depressing. Who wants to see wrinkly paint with unstrippable undercoat?
Please Log in or Create an account to join the conversation.
- Brian
-
Topic Author
- New Member
-
Less
More
- Thank you received: 0
24 Jun 2021 19:38 #24823
by Brian
Replied by Brian on topic Back to Basics
Today I found out why the paint can't be stripped from the Easy Glider. The first coat must have had a solvent base. This had "melted/dissolved" the skin of the model. Unfortunately this had literally bonded the paint permanently to the foam structure. The effect of the first solvent based coat of paint was to leave a faintly wrinkled appearance. The previous owner of the model seems to have sprayed on a second very thick coat of paint in an attempt to hide the wrinkles. The second coat of paint strips easily using Screwfix's eco-friendly stripper. The first coat of paint responds only to scrubbing with acetone, this is not on as the foam is damaged before the paint is completely stripped. Seems a pity to abandon the model, unless anyone has a solution? Now its back to the Flair SE5A and how to tighten screws that have "impossible to get at" heads.
Please Log in or Create an account to join the conversation.
- DavidTappin
-

- Offline
- Platinum Member
-

Less
More
- Posts: 549
- Thank you received: 164
25 Jun 2021 10:16 #24826
by DavidTappin
Replied by DavidTappin on topic Back to Basics
This seemed to be a suitable location for a little joke just received from a fellow modeller based in Australia
The following user(s) said Thank You: 4Pedalsfly, Brian
Please Log in or Create an account to join the conversation.
- Brian
-
Topic Author
- New Member
-
Less
More
- Thank you received: 0
27 Jun 2021 14:49 #24835
by Brian
Replied by Brian on topic Back to Basics
Didn't have any useful thoughts about the SE5A and the loose cabane strut screws, looks as though it'll be a case of opening up the ply turtle deck to get at the screw heads. The Easy Glider has moved forward a bit and back a lot. The wrinkly undercoat does soften very slightly after leaving the stripper on overnight. Suitably encouraged I slopped on a very generous coat of stripper and left it for almost two days. I got the fuselage out this afternoon, put it on my portable bench, as I carried it out of the shed it felt a bit odd. No wonder. The generous coating of stripper had softened the glue holding the tail plane and fin. I wobbled them a bit to see what would happen. They both fell off. The glue hadn't softened, the parts had been painted before assembly and the paint had softened. The dismantled tail parts were now very easy to clean up, and I found that a Bosch Multi-Tool with a triangular sanding plate made short work of any remaining paint, without damaging the foam surfaces. Finally I cut away the elevator and the rudder as the moulded in hinges were almost falling apart. I re-cut the mating surfaces with a straight edge and a new blade in my balsa knife. The tail plane was a bit floppy and had a strange elliptical anhedral. I cured this by cutting a 1/8" slot spanwise just in front of the hinge line and gluing in a 12" length of 3mm carbon tube, the whole lot weighted down nice and flat. I'll do the same on the fin, this also had a distinct curve, so should respond to an insert. When it comes to re-hinging the elevator and rudder, I'll use R/C Canopy Glue, strong and very flexible. Easy to do using a piece of polythene sheet and masking tape to hold the surfaces, then a bead of glue on the mating edges. Leave to dry until the glue is completely transparent, then repeat on the opposite side.
Please Log in or Create an account to join the conversation.
- Brian
-
Topic Author
- New Member
-
Less
More
- Thank you received: 0
01 Jul 2021 12:53 #24849
by Brian
Replied by Brian on topic Back to Basics
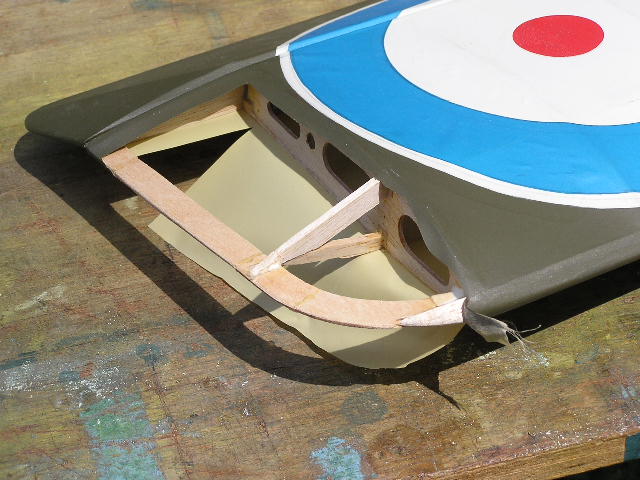
Today I couldn't join in the fun at Cashmoor, I had to stay in for an engineer to come and fix our 'phone. A simple task of installing the correct landline number that was disconnected last February. I'm not going to bore you with what happened, you'll have to wait for the book to be published. Anyway, I finally got down to getting the structure of the SE5A completed. I repaired the damaged upper wing tip, the lite-ply profile was in seven pieces. I didn't reinforce it as I did with the lower wing, I thought that if the upper wing tip hits first, that wouldn't be due to toppling over while taxying, The upper wing going in first would be something quite serious, and it would need more than a bit of reinforcing around the tip profile. One thing that makes the repair and subsequent covering a bit easier is that the decal on the upper wing is home made, and very nicely too, from Solartex. I'll be able to peel it up away from the rib area, and stick it back down again after replacing the covering. I've decided to ignore the loose cabane struts. They wobble less than 1/32" at the wing joiner, I think its quite possible that in the full size SE5A, that joint would have wobbled a bit more than 3/16". I think that's right, basing the figure on the Flair model being 1/6 scale. By the time the whole model is strapped together, I'm sure no-one will notice.

Please Log in or Create an account to join the conversation.
- Brian
-
Topic Author
- New Member
-
Less
More
- Thank you received: 0
02 Jul 2021 17:23 #24850
by Brian
Replied by Brian on topic Back to Basics
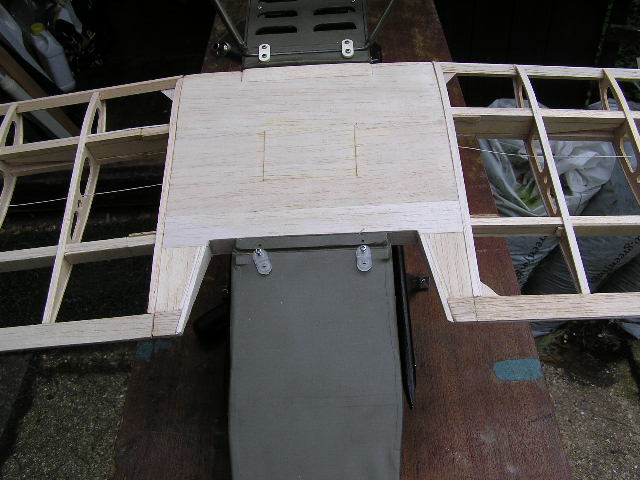
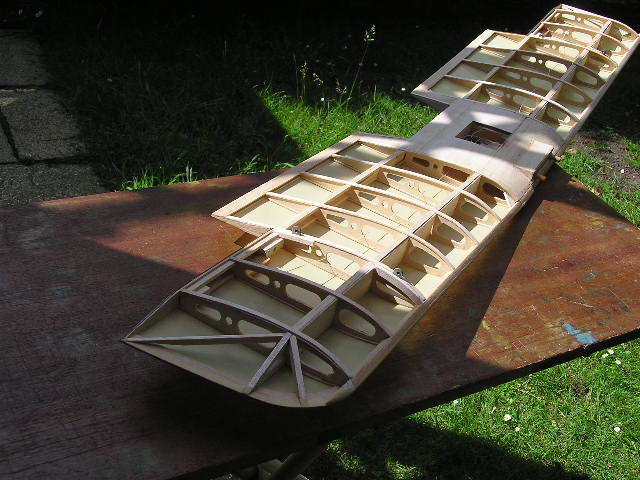
The SE5A's lower wing assembly was lightly sanded, and a coat of thin PVA glue was painted round the outer profiles ready for the Solartex. As I worked, I felt that little niggle that tells you that you've missed something. As I finished painting on the glue, I remembered what I should have done, sad 'cos I was feeling smug that I'd put in the cotton threads to pull the servo leads through the wing. Something I usually forget. Causes a severe outburst of rude words while trying to fish a small lead weight on a thread, through a set of holes that were there before the covering went on, but always move just to make things difficult. Anyway, what I should have done was trial fit the rebuilt centre section to the fuselage before adding the wings. Fortunately the rebuild was accurate. Two pix to prove it. Now I'm going to sit and feel smug again as the PVA dries. Unless there's something else I forgot.

Please Log in or Create an account to join the conversation.
- Simon Osborne
-
- New Member
-
Less
More
- Thank you received: 0
02 Jul 2021 19:07 #24851
by Simon Osborne
Replied by Simon Osborne on topic Back to Basics
Have to say Brian, I admire your skill, optimism and sense of humour in adversity!!
Please Log in or Create an account to join the conversation.
- Brian
-
Topic Author
- New Member
-
Less
More
- Thank you received: 0
03 Jul 2021 17:23 #24853
by Brian
Replied by Brian on topic Back to Basics
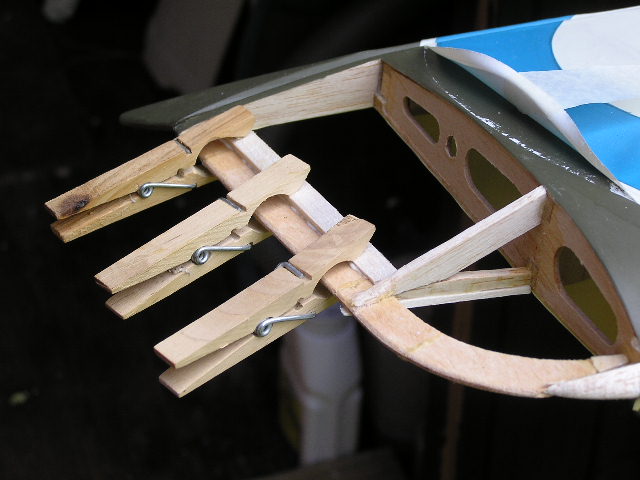
This morning I covered the underside of the lower wing, it went pretty well, no snags for a change. Couldn't cover the topside, there was a snag after all. I'd completely forgotten to add the covering supports in the area of the interplane strut mounting plates. Cut and glued the four pieces, then had a go at the repaired upper wing tip. The home made Solartex decal was a bit harder to lift as it had been sealed round the edge, however it yielded to a newly sharpened balsa knife blade. Unfortunately I was a bit heavy handed and the liteply tip profile cracked along the original damage line. Cured that with a piece of balsa rebated to fit the tip thickness. Doing this doubles the glued area and helps prevent the reinforcement from getting too close to the covering. The strange looking clothes pegs are made from standard pegs opened out with a Permagrit rasp, they can grip things that a normal peg couldn't due to the lack of clearance. Don't know how much they cost now, mine were £1 for a pack of 100.
Please Log in or Create an account to join the conversation.
- Brian
-
Topic Author
- New Member
-
Less
More
- Thank you received: 0
03 Jul 2021 17:32 #24854
by Brian
Replied by Brian on topic Back to Basics
Don't know whether anyone noticed the improved appearance of my building board? It was looking its age, well it is over thirty years old, and I felt a bit ashamed of the state of it. A light sanding to remove the glue blobs and most of the accumulated paint, dusted it off and slopped on a coat of water based acrylic floor varnish. Now I have a "Shabby Chic" board, much nicer.
Please Log in or Create an account to join the conversation.
- kevinross
-

- Offline
- Platinum Member
-
Less
More
- Posts: 1023
- Thank you received: 583
03 Jul 2021 20:02 #24856
by kevinross
Replied by kevinross on topic Back to Basics
i must apologise Brian - i didn't notice your shabby chic building board 
Please Log in or Create an account to join the conversation.
Moderators: DaveBright
Time to create page: 0.488 seconds
©
2009 - 2026
WMAC PCF Design