- Posts: 1044
- Thank you received: 414

Back to Basics
- Brian
-
 Topic Author
- Offline
- Platinum Member
-

Less
More
2 years 11 months ago #26116
by Brian
Replied by Brian on topic Back to Basics
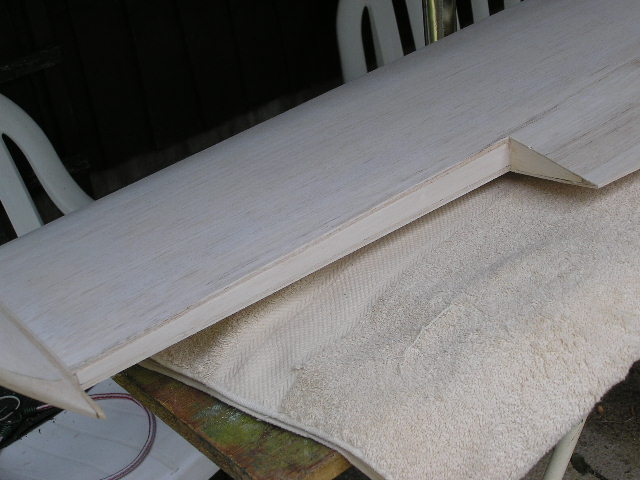
The second aileron cut away from the wing rather more cleanly than the first one. I used a slightly different method, holding the saw against the angled face of the aileron, rather that square with the rear spar. Unfortunately I made up for the better finish by missing the cut marks for the aileron horn by 2mm, a small patch of 1/16" sheet put things to rights. Finished the day by fitting hard balsa spars into the wing to give mounting areas for the sewn aileron hinges. Now its drizzling again and the wind has picked up a bit, no chance of further building today.
The following user(s) said Thank You: 4Pedalsfly, Phil Ford
Please Log in or Create an account to join the conversation.
- Phil Ford
-

- Offline
- Administrator
-

Less
More
- Posts: 3163
- Thank you received: 903
2 years 11 months ago #26119
by Phil Ford
Replied by Phil Ford on topic Back to Basics
It is handy working with balsa when a slight cock-up happens, sticking in a bit of scrap balsa in to cover it up. ")
Please Log in or Create an account to join the conversation.
- Brian
-
Topic Author
- Offline
- Platinum Member
-
Less
More
- Posts: 1044
- Thank you received: 414
2 years 11 months ago - 2 years 11 months ago #26122
by Brian
Replied by Brian on topic Back to Basics
Its really no drama at all to patch a model before the covering's on. During the wing skinning I went indoors to get some more coffee, I needed to stay awake for the whole afternoon. During my brief visit to the kitchen, a freak gust blew all the loose balsa around the garden, and the wing into the Pyracantha bush, commonly called Firethorn. A bad tempered plant with branches covered in short twigs which are in turn covered in very sharp spikes. One wing was peppered by the thorns, and one enterprising twig had found a weak spot between two ribs and poked a neat hole. Now filled by a small rectangular patch. The rest of the damage will be made good with lightweight Polyfilla tinted with instant coffee granules. Looks good, smells good too.
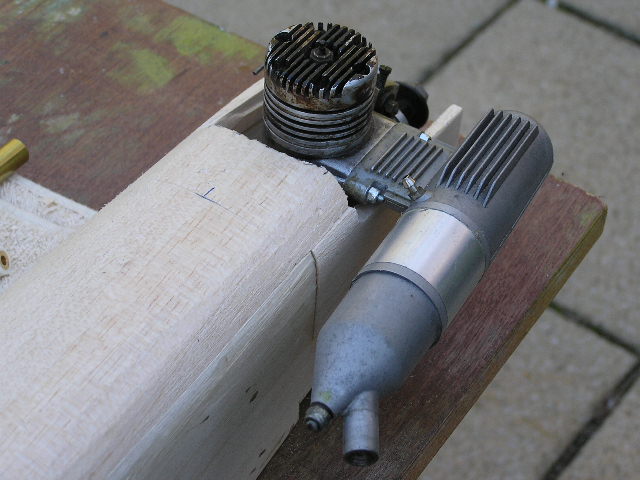
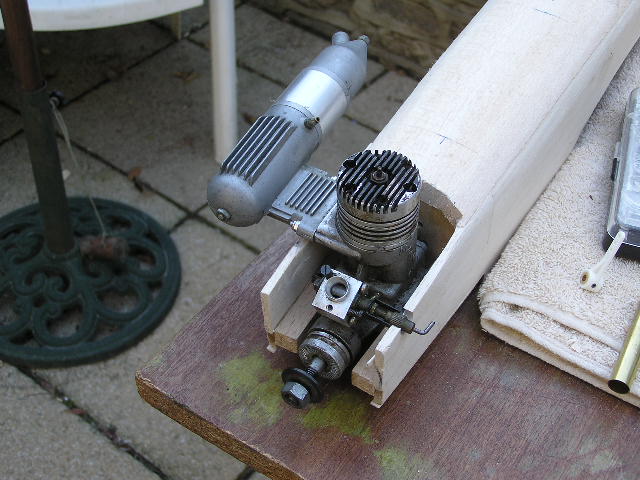
Today I have been dithering about how to fit a silencer/muffler to the Merco .61. In its heyday, the Merco sported a big black dustbin silencer, rather rare now. Rummaging through my engine bits I came across a silencer that looked like an OS but had no markings at all. The hole pitch in the silencer was within 0.1mm of the mounting hole pitch in the Merco, hooray! Unfortunately the holes in both items are tapped holes, boo! After a bit of Internet searching, I came across a Merco .61 at SMC (less silencer), and an outfit called "mecoa.com", an American based company that do some Merco spares, unfortunately a silencer wasn't one of them. Now comes the decision, it might be possible to get some studding to fit the Merco, but I doubt it since most of the suppliers are almost entirely Metric in the smaller sizes. The Merco casting seems to be quite robust, and would probably survive having the holes re-tapped slightly oversize (M3.5 X .6), as long as its done gently. The new studs would be fitted with Loctite. The silencer holes could be drilled out to 3.6 mm. Dia, and cutting a couple of slots where the section of the casting changes, would enable the silencer to be fitted to the new studs with nuts and washers. Fiddly but possible. I'll probably be awake half the night worrying about it.
Today I have been dithering about how to fit a silencer/muffler to the Merco .61. In its heyday, the Merco sported a big black dustbin silencer, rather rare now. Rummaging through my engine bits I came across a silencer that looked like an OS but had no markings at all. The hole pitch in the silencer was within 0.1mm of the mounting hole pitch in the Merco, hooray! Unfortunately the holes in both items are tapped holes, boo! After a bit of Internet searching, I came across a Merco .61 at SMC (less silencer), and an outfit called "mecoa.com", an American based company that do some Merco spares, unfortunately a silencer wasn't one of them. Now comes the decision, it might be possible to get some studding to fit the Merco, but I doubt it since most of the suppliers are almost entirely Metric in the smaller sizes. The Merco casting seems to be quite robust, and would probably survive having the holes re-tapped slightly oversize (M3.5 X .6), as long as its done gently. The new studs would be fitted with Loctite. The silencer holes could be drilled out to 3.6 mm. Dia, and cutting a couple of slots where the section of the casting changes, would enable the silencer to be fitted to the new studs with nuts and washers. Fiddly but possible. I'll probably be awake half the night worrying about it.
Last edit: 2 years 11 months ago by Brian. Reason: Clarified drilled hole size.
Please Log in or Create an account to join the conversation.
- Brian
-
Topic Author
- Offline
- Platinum Member
-
Less
More
- Posts: 1044
- Thank you received: 414
2 years 11 months ago #26131
by Brian
Replied by Brian on topic Back to Basics
Oily hands day today, modified the "lookalike" OS silencer by drilling out the M3 tapped holes to 3.1mm Dia., filed clearance slots for the 3mm nyloc nuts. Increased the depth of the holes in the engine exhaust stub 2.2mm Dia X an extra 7mm deep. Re-tapped the holes in the exhaust stack 3.0mm X 0.5. Cut and dry fitted two lengths of M3 studding. Slid the silencer over the studs and fiddled the nuts on to the stud ends. Took it all apart, cleaned up the Merco and the studs, refitted them with Loctite. Reassembled the silencer fitted the nyloc nuts, bit short of room, but they tightened one flat at a time. It'll all have to come apart again as I completely forgot that the mating faces of the silencer and the engine's exhaust stack must be flat and probably will need a gasket. Little bit of woodwork to clear the needle valve and silencer.Fitted an extra former to take the nosewheel mounting. Last minute decision to make it a steering nosewheel.
Please Log in or Create an account to join the conversation.
- Phil Ford
-
- Offline
- Administrator
-
Less
More
- Posts: 3163
- Thank you received: 903
2 years 11 months ago - 2 years 11 months ago #26132
by Phil Ford
Replied by Phil Ford on topic Back to Basics
If only you had asked. You could have popped over and had a rumage in the cupboard. I have loads of mufflers for two/four strokes that may have fitted. Well, at least you had something to do to keep idle hands occupied. ")
Last edit: 2 years 11 months ago by Phil Ford.
Please Log in or Create an account to join the conversation.
- Brian
-
Topic Author
- Offline
- Platinum Member
-
Less
More
- Posts: 1044
- Thank you received: 414
2 years 11 months ago #26134
by Brian
Replied by Brian on topic Back to Basics
Thanks for the offer of a "rummage in the cupboard" Phil, perhaps next time. Its a bit odd that I have a silencer with no matching engine, every engine I've sold over the past years has had a silencer with it. This one reminds me of the type that was supplied with the Irvine 53. Whatever its origin, its doing the biz now.
Please Log in or Create an account to join the conversation.
Moderators: DaveBright
Time to create page: 0.556 seconds
Latest Posts
- No posts to display.
©
2009 - 2025
WMAC PCF Design