- Thank you received: 0

Back to Basics
- Brian
-
 Topic Author
- New Member
-

Less
More
15 Oct 2021 20:11 #25297
by Brian
Replied by Brian on topic Back to Basics
Thanks Phil, the unsecured connectors have made a lot more work to repair the SE5A. Unfortunate that they were buried in the fuselage, and couldn't be seen unless the servos and battery were removed. With a bit of luck, the SE5A will fly again, it took me a long time to dismantle the wreckage, but with the "bits" cleaned up and stowed in a cardboard box, the rest of the model looks repairable. The engine survived without any damage ,and the damage to the wings is minor, needing only a bit of tweaking and a spot or two of glue. The cabane struts took a bashing and were completely out of shape, fortunately they were torn from their mountings without damaging the fuselage. They have now been invited to assume their original shape with the assistance of a vice and a plastic faced mallet. The front end of the engine cowling was damaged beyond repair so a new "front end" will be needed. A couple of formers yielded to the impact of the "arrival", but will be repaired easily with thin ply doublers. .
Please Log in or Create an account to join the conversation.
- 4Pedalsfly
-

- Offline
- Platinum Member
-

Less
More
- Posts: 800
- Thank you received: 202
16 Oct 2021 10:48 #25301
by 4Pedalsfly
Replied by 4Pedalsfly on topic Back to Basics
Hi Brian - Just doing a bit of catching up - so sorry to read about your SE5A's " incident" on Thursday.
Hopefully you can get enthused sometime to repair her.
I too have some horror stories of
pre-owned models that looked o.k until closer inspection.
Badly soldered battery connections wrapped in insulation tape etc.
Catch up soon.
Regards
Colin.
Hopefully you can get enthused sometime to repair her.
I too have some horror stories of
pre-owned models that looked o.k until closer inspection.
Badly soldered battery connections wrapped in insulation tape etc.
Catch up soon.
Regards
Colin.
The following user(s) said Thank You: Brian
Please Log in or Create an account to join the conversation.
- Brian
-
Topic Author
- New Member
-
Less
More
- Thank you received: 0
22 Oct 2021 09:33 #25321
by Brian
Replied by Brian on topic Back to Basics
Needing something fairly easy to do as it was raining, I printed the plans of Moonglow on 21 sheets of A4. Not strictly needed as I already have a one piece plan for the model. My printed version will be cut up as needed to fit on to my building board. Trimming and taping the "tiles" took a while, but the end result was worth the effort. All I have to do now is persuade the Boss that I really do need a small building board indoors, and no, I really won't make a mess....honest. New formers and a bulkhead for the SE5A all marked out and ready to be cut. To fit the new parts to the rather oily fuselage, I'll use IPA to get the worst of the oil off, then heat and lots of dry kitchen paper to absorb as much oil as possible. The new parts will be fitted using a two pack acrylic based glue from DeLuxe Materials. Smells very strong, but sticks like the proverbial to a blanket.
Please Log in or Create an account to join the conversation.
- Brian
-
Topic Author
- New Member
-
Less
More
- Thank you received: 0
13 Nov 2021 12:21 #25360
by Brian
Replied by Brian on topic Back to Basics
The SE5A has been cleaned up, de-oiled and is ready to have the replacement formers etc fitted, however it'll have to wait a while. I made the mistake of checking the laser cut parts for Moonglow VI, the sight of all that pristine balsa was too much to resist. I convinced myself that it would be "alright" to ease a few parts away from the parent sheet, and see how they fitted. It took a few moments to check, and without really meaning to, I glued up the four pieces that make up two sides for the fuselage. Next day, suitably encouraged by the lack of any complaints from the Boss, I riffled through the contents of my balsa strip box. I knew I had some triangle section as well as a generous piece of beech for the engine bearers. The triangle turned out to be oversize, and the beech was 3/4" X 5/8". I didn't want to wait to have new stuff delivered, so I decided to saw the stock I had to the required sizes. After a false start caused by a damaged bandsaw blade, I finally ended up with four lengths of triangle balsa and a pair of 1/2" X 1/2" beech bearers. Seemed a good idea to cut the formers etc for the SE5A as the bandsaw was set up. I started to cut, then promptly realised that what I had assumed was 1/8" ply was in fact 3mm Lite Ply. Still, no harm done, and marking out accurately is always quite a satisfying job.
Please Log in or Create an account to join the conversation.
- Brian
-
Topic Author
- New Member
-
Less
More
- Thank you received: 0
15 Nov 2021 12:20 #25362
by Brian
Replied by Brian on topic Back to Basics
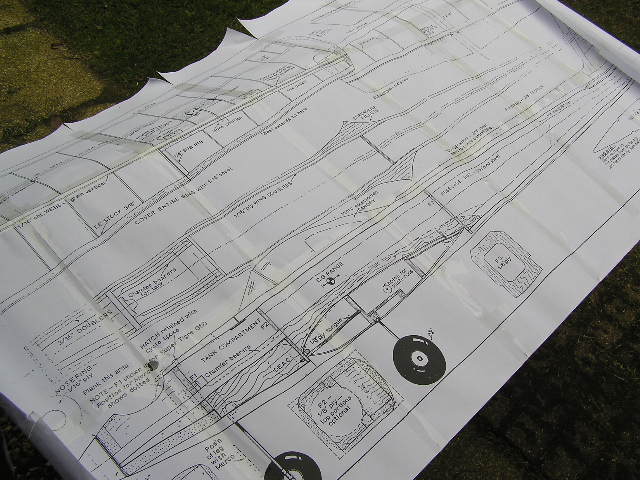
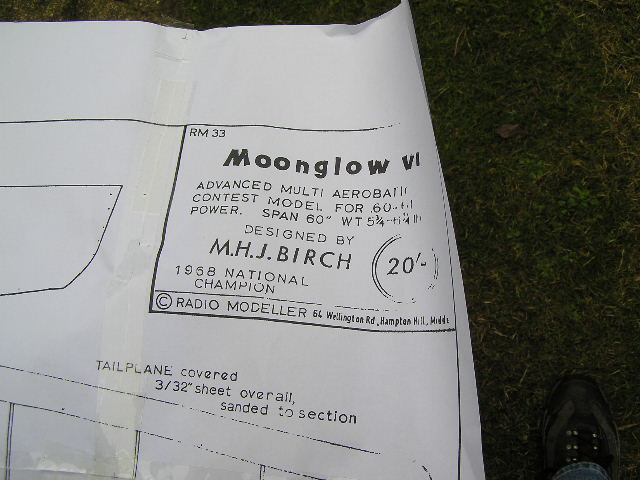
The fuselage sides, doublers, triangle section and engine bearers are all glued. Tail plane seating cut. Slight hiccup...I forgot to chamfer the top edges of the bearers where they pass through the tank bay. Could have been worse, very awkward if I'd glued in the formers. I've tried to find out as much as I can about Moonglow on the Internet. Some useful hints about dihedral and length of nose wheel leg, best position for C of G etc. Apart from that there isn't much at all, and even less about the later models (Capricorn and International) that were designed by Mike Birch. Both these models were kitted and were available from either RipMax or Mick Reeves. Sad that there's so little information available. Looking at the attached photos, isn't it amazing what you could get for a quid back in 1968?

Please Log in or Create an account to join the conversation.
- Phil Ford
-

- Offline
- Moderator
-

Less
More
- Posts: 3156
- Thank you received: 903
15 Nov 2021 12:38 - 15 Nov 2021 12:39 #25363
by Phil Ford
40 Mars Bars or 9 packs of fags or 6 pints of beer at least.:lol:
Replied by Phil Ford on topic Back to Basics
isn't it amazing what you could get for a quid back in 1968?
40 Mars Bars or 9 packs of fags or 6 pints of beer at least.:lol:
Last edit: 15 Nov 2021 12:39 by Phil Ford.
Please Log in or Create an account to join the conversation.
- Brian
-
Topic Author
- New Member
-
Less
More
- Thank you received: 0
21 Nov 2021 08:55 #25387
by Brian
Replied by Brian on topic Back to Basics
Building Moonglow's fuselage wasn't as easy as I thought. The formers aren't quite the same as the original of 1968, and having the luxury of laser cut ones, I didn't check them. The design has a slight taper to the fuselage in the area of the wing seating, this means that the formers are definitely not "square" to the fuselage sides. I ended up with a distinctly banana shaped fuselage that took several hours to dismantle by gently sawing at the glue joints until they gave way. With the errant former former rectified, I'll re-build the fuselage in a jig. If I hadn't been so lazy in not bothering to dig it out of the back of the shed, I'd have been a bit further advanced in the build .At least I managed to cut a chamfer on the engine bearers, and an 10 oz tank sits in quite nicely and leaves enough room for the throttle wire.
I don't know how thirsty a Merco .61 is, just hope that a tankful will be enough to fly a "Clubman" schedule.
I don't know how thirsty a Merco .61 is, just hope that a tankful will be enough to fly a "Clubman" schedule.
Please Log in or Create an account to join the conversation.
- kevinross
-
- Offline
- Platinum Member
-
Less
More
- Posts: 1023
- Thank you received: 583
21 Nov 2021 09:47 #25388
by kevinross
Replied by kevinross on topic Back to Basics
:lol: very inconsiderate of you not to photo your mistake and post in the appropriate section Brian :lol: :lol:
Please Log in or Create an account to join the conversation.
- Brian
-
Topic Author
- New Member
-
Less
More
- Thank you received: 0
21 Nov 2021 10:53 #25389
by Brian
Replied by Brian on topic Back to Basics
Too ashamed Kevin.
At least it made you laugh.
Quite a lot !
Nice to know that my efforts aren't wasted.
Anyway I don't suppose that'll be the only clanger I'll make.
I'll take a picture of the next one and I won't cheat with "soft focus".
At least it made you laugh.
Quite a lot !
Nice to know that my efforts aren't wasted.
Anyway I don't suppose that'll be the only clanger I'll make.
I'll take a picture of the next one and I won't cheat with "soft focus".
Please Log in or Create an account to join the conversation.
- Brian
-
Topic Author
- New Member
-
Less
More
- Thank you received: 0
02 Dec 2021 10:06 - 02 Dec 2021 10:07 #25420
by Brian
Replied by Brian on topic Back to Basics
Building a banana shaped fuselage was only the first of two simple mistakes. Fortunately, between preparing to refit the formers, I had another look at the plan. Unfortunately its printed in a very pale grey and is difficult to read. Fortunately the OuterZone PDF A4 prints I had made were good and black, so although the plan dates back to the '60s, its easier to read the notes etc. That's when I found that the front bulkhead (firewall) is further forward when installing a Merco .61. The original design was for a Super Tigre, and is about an inch further back.
Unfortunately the kit cutters didn't allow for this, and the fuselage sides ended short I had to add a couple of pieces of 3/16" balsa to the sides to provide support for the re-positioned firewall.
Naturally I couldn't wait to see if the engine fitted......of course it did! The fuel/ pressure tubes line up and so does the throttle wire.
Last edit: 02 Dec 2021 10:07 by Brian. Reason: Grammar
Please Log in or Create an account to join the conversation.
Moderators: DaveBright
Time to create page: 0.367 seconds
Latest Posts
- No posts to display.
©
2009 - 2026
WMAC PCF Design