- Posts: 1044
- Thank you received: 414
3D Printing
- Brian
-
 Topic Author
- Offline
- Platinum Member
-

Less
More
5 years 7 months ago #21556
by Brian
Replied by Brian on topic 3D Printing
First I must master the art of accurately gluing the parts together Phil, if this afternoon's fiasco was anything to go by, well all I can say is that I think it'll be sometime late Summer, perhaps. I'm waiting for some 6mm carbon tube to reinforce the rear fuselage, so that bit is definitely on hold. But being keen to see how it went together, I glued up the first two sections of the fuselage. I couldn't believe how easily it went together, just a hint of a glue line and the two parts perfectly aligned. So as not to make any silly mistakes, I watched the build video for the canopy, it showed the two parts being lined up using a piece of aluminium angle section. Feeling a bit competent, I applied the glue as per instructions, I aligned the canopy parts as per instructions. Applied a little pressure, and had a perfect bond. So far so good. When I tried to fit the canopy to the fuselage, the whole scene changed. The canopy wouldn't fit properly, trying to slide it into position was hopeless. There it sat with a gap of around 2mm all round the edge. I should explain that the canopy has a pretty neat method of holding it in place. It has two locating "pegs" at an angle and close to the joint between the fuselage parts. The "pegs" locate in two holes in the rim of the cockpit area, the canopy is slid down and back which should leave it fitting closely to the cockpit rim and neatly up against the wing root. The video looked so easy that I couldn't figure out why it hadn't worked.Looking at the joint with a magnifier, the reason became clear, the front part of the canopy has a tiny bit of the locating "pegs", and if these aren't perfectly aligned with the "pegs" on the rear canopy, the whole thing won't go far enough to seat properly. Fortunately I had some de-bonder, so I spent a jolly hour or so, slopping the stuff on and trying to get the joint apart. Eventually it let go, and after cleaning the parts, I assembled them on to the fuselage. The two parts fitted perfectly, no gaps anywhere. I tack glued the canopy halves, making sure that there wasn't a chance of the glue getting anywhere near the fuselage. Now the canopy could be taken of and re-fitted quite easily. I re-glued it and then set about getting the white bloom that had appeared after using the debonder. Unfortunately it wouldn't come off, I tried alcohol, no effect, acetone just made it worse. Tonight the printer will be retracing its steps as it prints another couple of canopy parts. Fortunately for me. all I have to do is push the "go" button.
Please Log in or Create an account to join the conversation.
- Phil Ford
-

- Offline
- Administrator
-

Less
More
- Posts: 3163
- Thank you received: 903
5 years 7 months ago #21558
by Phil Ford
Replied by Phil Ford on topic 3D Printing
If Airfix made larger scale aircraft you could have avoided all this stress. All that would be needed is a tube of plastic cement and some Humbrol paint....:lol:
Please Log in or Create an account to join the conversation.
- Brian
-
 Topic Author
- Offline
- Platinum Member
-

Less
More
- Posts: 1044
- Thank you received: 414
5 years 7 months ago #21559
by Brian
Replied by Brian on topic 3D Printing
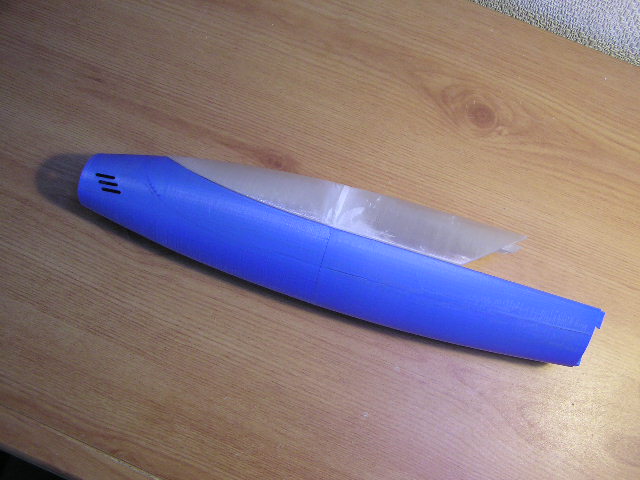
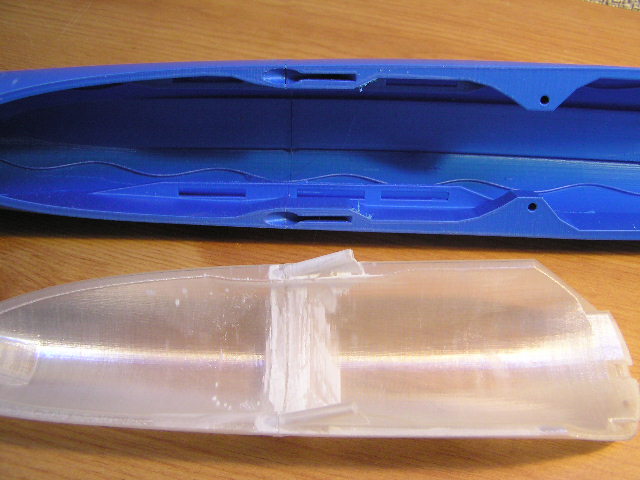
Here's the messed up canopy, and I've spoiled the fuselage by trying to "improve" the finish. Two things came to mind, first was to cut off the "pips" from the front part of the canopy, that should prevent any misalignment and ensure easy fitting/removal. Second was to stop trying to get a clear canopy and paint the foggy one black.
Your reference to Airfix took me back to the 1950s Phil. I can't remember who discovered that you can "fly" an Airfix model in water, but "fly" them we most certainly did. The Saunders-Roe apprentices residential centre was situated in the old Naval College at Osborne, Isle of Wight. The grounds housed various test facilities as well as the mock up department. The test tank used for trials on ditching various aircraft was situated just behind our dormitory, a huge tank of water which was somehow prevented from turning green and smelly, was where we gathered from time to time to "fly" our latest plastic creations. My vampire went quite well, but I never did manage to trim the Meteor. I think the craze came to an end when we couldn't get any more volunteers to climb into the tank to retrieve the models. I can still remember my Vampire's first go, I hadn't got the CG quite right, and it stalled early in the "flight" and continued to stall and recover until it hit the bottom of the tank. Fortunately, for some reason I can't remember, there was always a plentiful supply of grey Plasticene. Not enough and the models stalled, too much and they "flew" to the bottom quite quickly. I don't suppose we'd have messed around like that if we'd had iphones, earbuds, blue tooth and wi-fi. Etc.
Your reference to Airfix took me back to the 1950s Phil. I can't remember who discovered that you can "fly" an Airfix model in water, but "fly" them we most certainly did. The Saunders-Roe apprentices residential centre was situated in the old Naval College at Osborne, Isle of Wight. The grounds housed various test facilities as well as the mock up department. The test tank used for trials on ditching various aircraft was situated just behind our dormitory, a huge tank of water which was somehow prevented from turning green and smelly, was where we gathered from time to time to "fly" our latest plastic creations. My vampire went quite well, but I never did manage to trim the Meteor. I think the craze came to an end when we couldn't get any more volunteers to climb into the tank to retrieve the models. I can still remember my Vampire's first go, I hadn't got the CG quite right, and it stalled early in the "flight" and continued to stall and recover until it hit the bottom of the tank. Fortunately, for some reason I can't remember, there was always a plentiful supply of grey Plasticene. Not enough and the models stalled, too much and they "flew" to the bottom quite quickly. I don't suppose we'd have messed around like that if we'd had iphones, earbuds, blue tooth and wi-fi. Etc.
Please Log in or Create an account to join the conversation.
- Phil Ford
-

- Offline
- Administrator
-

Less
More
- Posts: 3163
- Thank you received: 903
5 years 7 months ago - 5 years 7 months ago #21560
by Phil Ford
Replied by Phil Ford on topic 3D Printing
That's an ingenious cockpit fixing. Slide in and lock. Shame you fiddled with it. Don't worry Brian you are not the only one out there that decides to fiddle with something and make it worse. There are many in the club and at Boeing, names withheld, who can attest to this fact. :whistle:
Last edit: 5 years 7 months ago by Phil Ford.
Please Log in or Create an account to join the conversation.
- Brian
-
 Topic Author
- Offline
- Platinum Member
-

Less
More
- Posts: 1044
- Thank you received: 414
5 years 7 months ago #21568
by Brian
Replied by Brian on topic 3D Printing
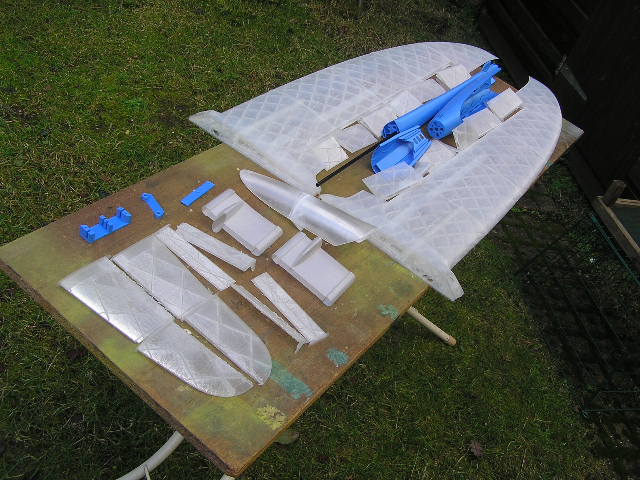
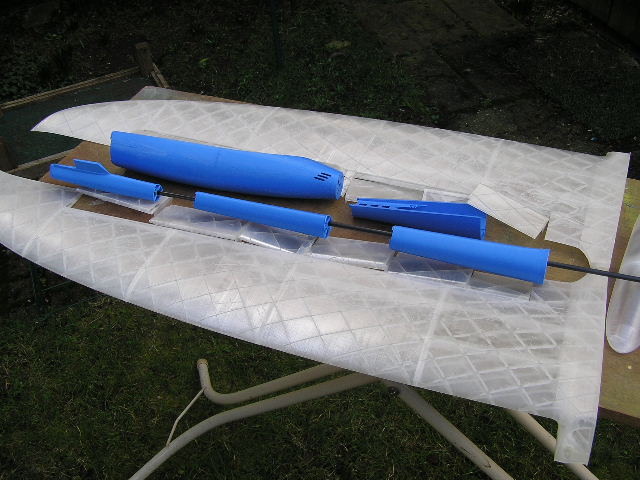
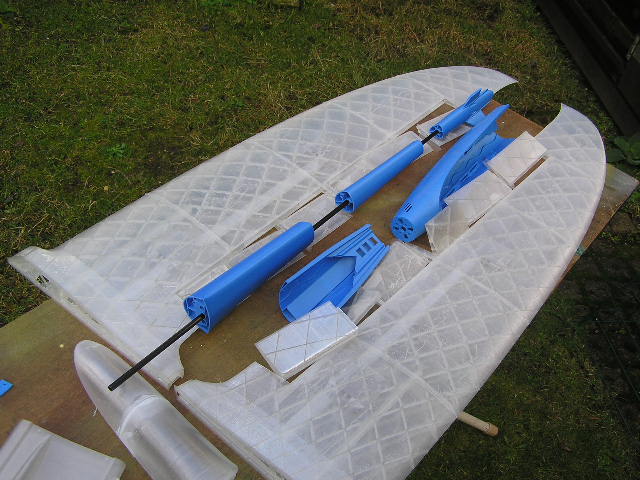
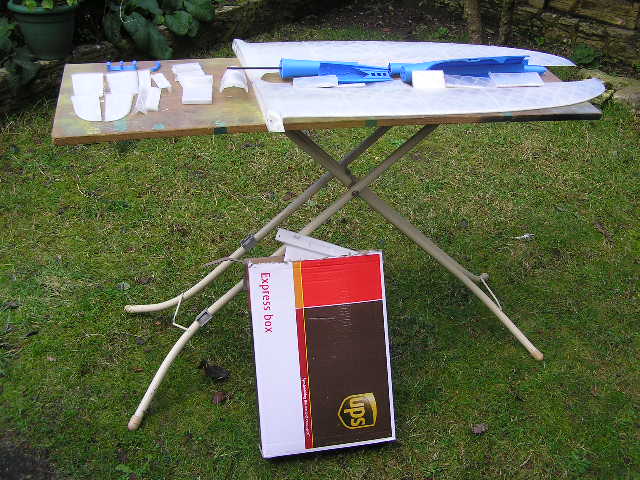
The printing process is finished for a while, I managed to contain my excitement for hours at a time while the model parts grew on the build plate. It seemed a shame to leave the printer idle as I glued up some of the parts, so I printed some more stuff as I invited the various wing sections to line up and get stuck. The various photos of the assembled wing and the assorted bits of flap, aileron, elevator etc. are scattered all around. So far everything fits together with the minimum of fuss or adjustment. The rear fuselage assembles accurately on the 6mm carbon tube, which hasn't been trimmed to length yet. The photo of the loaded building board and mystery box on the ground, shows the next stage in building the Joker. The box contains all the parts for a second "proper" Joker. I found that PLA filaments from different manufacturers have different characteristics while being printed, so the boxed Joker is made from filament by the same manufacturer. The fit of the parts is even more accurate, and as a bonus needed a lot less "inviting" to assemble
Please Log in or Create an account to join the conversation.
- Phil Ford
-

- Offline
- Administrator
-

Less
More
- Posts: 3163
- Thank you received: 903
5 years 7 months ago - 5 years 7 months ago #21569
by Phil Ford
Replied by Phil Ford on topic 3D Printing
At last something resembling a plane. :lol: Looks a nice job Brian. I am looking forward to seeing it at Cashmoor shortly.
Just let you know the wing plates holes line up perfectly with the Phoenix's screw holes. Just had to run a 3.2 mm drill through to clean out the screw holes. Thanks. All I need now is some slope weather that does not include rain.
I don't suppose the Joker can be made ballistic using 35mm 1750kv motor, 7x4 prop and 4 cells?
Last edit: 5 years 7 months ago by Phil Ford.
Please Log in or Create an account to join the conversation.
Moderators: DaveBright
Time to create page: 0.348 seconds
Latest Posts
-
-

- Pitts Special 120FS
- In WimborneMac Members / For Sale - Exchange - Wanted
- by superadmin
- 1 week 6 days ago
-
©
2009 - 2025
WMAC PCF Design

