- Thank you received: 0

Back to Basics
- Brian
-
 Topic Author
- New Member
-

Less
More
04 Jul 2021 12:10 #24860
by Brian
Replied by Brian on topic Back to Basics
You should know better than that Phil, old toilet doors are likely to have either a heart or crescent shaped "vent" cut in the top (above eye level). I'll have you know the "Board" was bought from a place like B+Q at Christchurch, I think it was called Texas. Its a left over bit of mahogany veneered chipboard that was in the "odd bin" area. It was about half a crown, so obviously a good quality item.
Please Log in or Create an account to join the conversation.
- Brian
-
Topic Author
- New Member
-
Less
More
- Thank you received: 0
04 Jul 2021 12:31 #24861
by Brian
Replied by Brian on topic Back to Basics
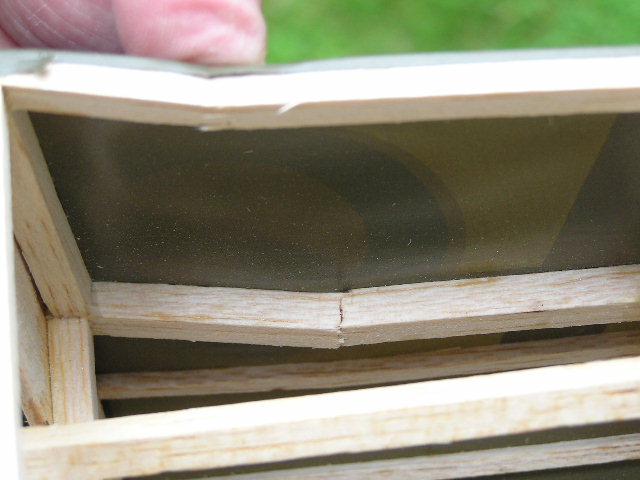
Nice calm morning today, I thought I'd be able to get the upper surfaces of the SE5A's wing covered. Didn't realise how long it would take to do the fiddly bits around the cut out in the trailing edge and the extra fiddlies around the front fairing and dowel area. While trimming the overlaps, I turned the wing upside down and promptly realised that I should have covered the underside with an olive drab strip the same width as the fuselage. While sitting with a cup of coffee, for some reason I wondered if the underside of the fuselage should be natural linen to match the wings. Seemed like a good idea, only some trimming to get the olive off and just one panel to get the rear end of the fuselage re-covered. Now I thought I'd had a good look at the fuselage, found the loose cabane struts, bent U/C and missing engine mounting bolt. The extra I found when, in a fit of completely misplaced enthusiasm, I cut away the covering from the underside of the fuselage, and found that what I had thought was merely a dent in the lower longeron, was in fact a crack. Even worse, the upper longeron had an even bigger crack in it. This afternoon I'm going to find a quiet place to sit and have a good sulk. No, in fact what I propose to do is.... I don't want to have to either patch or re-cover the fuselage side, the plan is to use a micro-saw and cut a slot diagonally along the length of the longerons, then add lots of aliphatic glue and insert 4mm X 0.5mm carbon fibre strips into the saw cuts.
Fiddly but a whole lot like fun.
Fiddly but a whole lot like fun.
Please Log in or Create an account to join the conversation.
- Phil Ford
-

- Offline
- Moderator
-

Less
More
- Posts: 3156
- Thank you received: 903
04 Jul 2021 13:24 - 04 Jul 2021 13:25 #24862
by Phil Ford
2 un 6. :ohmy: Crikey! Old chap they must have seen you coming and thought, "We will jack the price up by 6 pennies and he will probably think he has a bargain".
Of course they did not know that you would get 50 years+ of use from it. :lol: A Win Win all round.
Replied by Phil Ford on topic Back to Basics
Brian Jackson wrote: I think it was called Texas. Its a left over bit of mahogany veneered chipboard that was in the "odd bin" area. It was about half a crown, so obviously a good quality item.
2 un 6. :ohmy: Crikey! Old chap they must have seen you coming and thought, "We will jack the price up by 6 pennies and he will probably think he has a bargain".
Of course they did not know that you would get 50 years+ of use from it. :lol: A Win Win all round.
Last edit: 04 Jul 2021 13:25 by Phil Ford.
The following user(s) said Thank You: Brian
Please Log in or Create an account to join the conversation.
- Brian
-
Topic Author
- New Member
-
Less
More
- Thank you received: 0
04 Jul 2021 17:33 #24863
by Brian
Replied by Brian on topic Back to Basics
The longeron repair using a carbon strip was easier than I thought, slight downer when a splinter of balsa broke out of the side of the slot, I didn't see where it went, so couldn't glue it back. The longeron in the central position was repaired by gluing on another piece of 1/4" square. The lower longeron was crushed a bit at the impact point, I sanded a piece of scrap balsa to match the damaged area, left it slightly proud, to be sanded back to profile when the glue has dried.
Please Log in or Create an account to join the conversation.
- Brian
-
Topic Author
- New Member
-
Less
More
- Thank you received: 0
05 Jul 2021 16:59 #24866
by Brian
Replied by Brian on topic Back to Basics
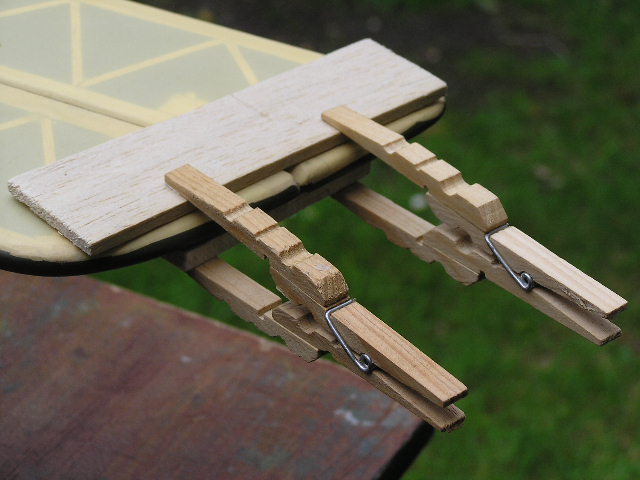
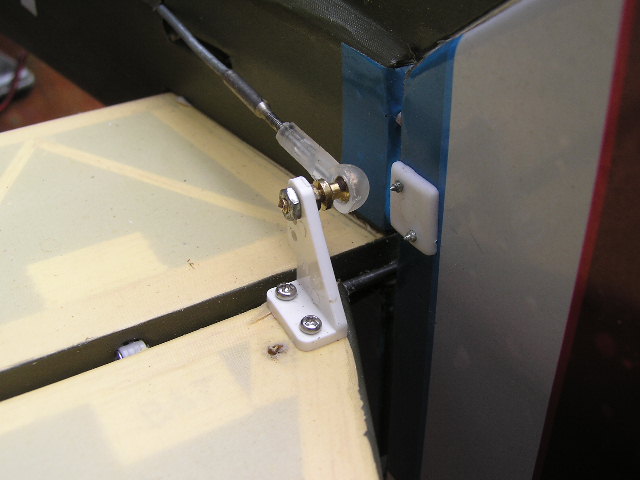
Today I took advantage of the opened up fuselage, and re-fixed the rudder and elevator horns. The original elevator horn was at a slight angle and the movement didn't seem to be quite right as elevator movement was being restricted by misalignment of the clevis and elevator horn. I drilled new fixing holes for the horn and fitted a ball joint. This was an improvement and elevator travel is now "full and free". No problem with the rudder, just an easy replacement of the damaged horn. Finished up by setting rudder and elevator to approximately neutral using a servo tester. I'll go over the setting again when the model's complete and the radio is fitted. The funny looking pegs holding the elevator level were made to clamp an awkward piece of ply when building a cowling for my Hannibal.
Please Log in or Create an account to join the conversation.
- 4Pedalsfly
-

- Offline
- Platinum Member
-

Less
More
- Posts: 800
- Thank you received: 202
06 Jul 2021 16:02 #24868
by 4Pedalsfly
Replied by 4Pedalsfly on topic Back to Basics
Brian - Slightly off topic but relevent to all your work getting the SE 5 airworthy.
July edition of R.C.M & E contains an article
describing the resurrection of many really old models bought
for a few quid at swap meets etc.
Being a pensioner I glanced through it at
W.H.Smiths - Castle Point while
waiting for Mrs A.
Regards
Colin
July edition of R.C.M & E contains an article
describing the resurrection of many really old models bought
for a few quid at swap meets etc.
Being a pensioner I glanced through it at
W.H.Smiths - Castle Point while
waiting for Mrs A.
Regards
Colin
Please Log in or Create an account to join the conversation.
- Brian
-
Topic Author
- New Member
-
Less
More
- Thank you received: 0
06 Jul 2021 17:02 #24869
by Brian
Replied by Brian on topic Back to Basics
A couple of things spring to mind Colin. 1) Did Pat know you were waiting for "Mrs A"? 2) At last we know who turns pristine magazines into well thumbed relics. I liked the article in RCM+E, made me feel that I wasn't entirely alone in my mad "refurbish everything" hobby.
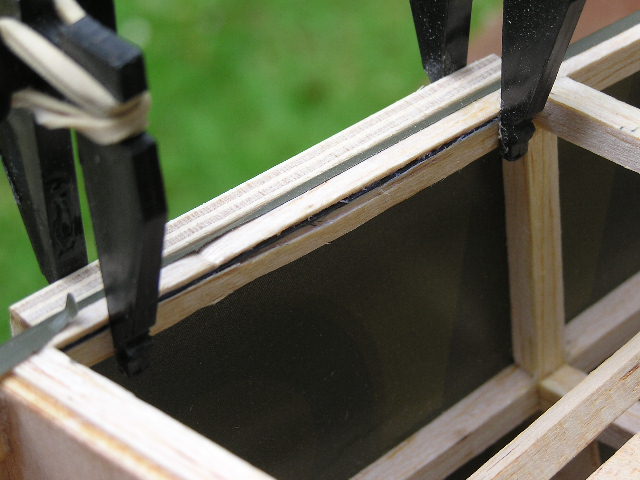
Unfortunately the SE5A has come to a halt again. The uncovered underside of the fuselage allowed me to sort out what was making the pushrods twitch when the rudder or the elevators were at full movement, tweaking the badly bent wires gave twitch free movement. Delving into the depths of the rear fuselage I found it had been repaired, as a bonus I noticed three unglued spacers too. this didn't show on the outside so I assume the fuselage has been re-covered. I thought it might be a good idea to see how the model lined up after the repairs. With the model supported on its undercarriage and a block under the rear fuselage I strapped a piece of straight balsa to the cabane struts and sighted the model from the tail. The fin a isn't square to the tail plane and the tail plane isn't square to the fuselage and it has a definite tilt when sighted against the balsa "straight edge" on the cabane struts. Then I measured the distance from centre front of the fuselage to the tips of the tail plane, unfortunately there's over half an inch difference between the two measurements. I'll have to get the SLEC building jig assembled tomorrow, looks as though there's going to be some serious dismantling and re-building before the covering goes back on to the underside of the fuselage.
Unfortunately the SE5A has come to a halt again. The uncovered underside of the fuselage allowed me to sort out what was making the pushrods twitch when the rudder or the elevators were at full movement, tweaking the badly bent wires gave twitch free movement. Delving into the depths of the rear fuselage I found it had been repaired, as a bonus I noticed three unglued spacers too. this didn't show on the outside so I assume the fuselage has been re-covered. I thought it might be a good idea to see how the model lined up after the repairs. With the model supported on its undercarriage and a block under the rear fuselage I strapped a piece of straight balsa to the cabane struts and sighted the model from the tail. The fin a isn't square to the tail plane and the tail plane isn't square to the fuselage and it has a definite tilt when sighted against the balsa "straight edge" on the cabane struts. Then I measured the distance from centre front of the fuselage to the tips of the tail plane, unfortunately there's over half an inch difference between the two measurements. I'll have to get the SLEC building jig assembled tomorrow, looks as though there's going to be some serious dismantling and re-building before the covering goes back on to the underside of the fuselage.
Please Log in or Create an account to join the conversation.
- Brian
-
Topic Author
- New Member
-
Less
More
- Thank you received: 0
09 Jul 2021 09:57 #24880
by Brian
Replied by Brian on topic Back to Basics
Yesterday I had a frustrating day, partly waiting for a couple of engineers to fix our TV and 'phone, partly wanting to go and fly something, and being a bit fed up with trying to get the paint off the Multiplex Easy Glider. I've tried paint stripper, this only begins to soften the paint, and if left on too long, affects the surface of the foam making the individual "rice krispies" effect stand out. After the upsets with the "high tech" gear indoors, I thought a little therapy needing minor skills and nothing else would cheer me up a bit. I'd run out of paint stripper, that made working on the glider out of the question. Or did it? Just to see if it would work, I had a go at sanding the foam, and it worked, slow but not as slow at two coats of stripper and endless scraping. I'm using a detail sander that uses triangular sanding pads, it took around an hour to sand the upper surface of one wing. This didn't involve removing any paint, it was simply to sand the pimply effect left by the action of the stripper. This morning I tried to sand off the paint, this was very slow indeed, and rather noisy. To damp out the noise I put an old sheet, folded to fit under the wing. This made things a lot quieter, and as a bonus, the paint sanded off a lot quicker. I think it must be due to the fact that the unsupported wing was tending to vibrate under the sanding pad, the sheet prevented the vibration, this in turn improved the effect of the sanding pad, which has a very quick but very small action. This morning's sanding session had both wings sanded and ready for finishing in under an hour.
The SE5A will not be having its tail plane shifted, it is just too much work, and I don't suppose there'll be all that much deterioration in flying performance due to the slightly "off" rigging. It is, after all, only a beat up old biplane that will, with luck, take to the air again.
The SE5A will not be having its tail plane shifted, it is just too much work, and I don't suppose there'll be all that much deterioration in flying performance due to the slightly "off" rigging. It is, after all, only a beat up old biplane that will, with luck, take to the air again.
Please Log in or Create an account to join the conversation.
- Brian
-
Topic Author
- New Member
-
Less
More
- Thank you received: 0
10 Jul 2021 21:58 #24891
by Brian
Replied by Brian on topic Back to Basics
The Multiplex Easy Glider is now completely stripped, not a trace of paint anywhere, well perhaps an odd spot here and there. Unfortunately the surface of the foam isn't as smooth as it was when the model was moulded. All the surfaces are smooth after being sanded with 240 grit paper, but smooth and fluffy. I think that a "fluffy" model wouldn't fly as well as a smooth one. In the days when all my models were either free flight or control line, I remembered using thinned clear dope with talcum powder mixed in as a primer/filler undercoat. Hoping to get the same result using different ingredients, I thinned one part of PVA with four parts of water, added 50% by volume of talcum powder, stirred it up and slopped on a coat to the "fuzzy" foam fuselage. I was surprised at just how long the coat of home made primer/surfacer took to dry. It looks promising, the first light sanding had everything looking smooth and no sign of "fluffy" at all. Perhaps the second coat will be all that's needed to restore the glider to its original state. No photos, can't really show what "fluffy" moulded polyolefin looks like.
Please Log in or Create an account to join the conversation.
- Phil Ford
-
- Offline
- Moderator
-
Less
More
- Posts: 3156
- Thank you received: 903
11 Jul 2021 11:05 #24892
by Phil Ford
Replied by Phil Ford on topic Back to Basics
I don't know why you worry about holes or cracks in the fuselage Brian. Key Lime Air managed to safely fly and land and only lost a couple of suitcases. The Guy holding the phone is telling his boss, " Hi Guv, you having a nice day, how and I?, Just fine. We had a little problem this morning. Yes Yes a minor one. We got a hole in the fuselage. No sweat though. I know a Guy in the UK, Bournemouth in fact, Yeh, that's the place, beaches and ice cream, lots of old people live there. Yeh! Well this Brian can fix it no problem. PVA and Cusson's. :lol:

The following user(s) said Thank You: Brian
Please Log in or Create an account to join the conversation.
Moderators: DaveBright
Time to create page: 0.454 seconds
Latest Posts
- No posts to display.
©
2009 - 2026
WMAC PCF Design