
The Fuselage
First task is to make a bellcrank for the all moving tailplane. This is from 2mm G10 (yellow) with 1.5mm G10 (black) laminated to create a thick 'bearing' for the pivot. I've used much thicker piano wire than shown on the plan with a view to reducing that waggy tail that is so common on AMT's (All Moving Tail Once the crank is made a 1/16 ply box is constructed to house it all.
You'll remember from earlier in article that the tailplane had been cut from foam? Last night I skinned them with 1/32 balsa using Gorilla glue like I did for the wings. Today was time to face the leading edge with 1/4 balsa and the trailing edge with 1/16 x 1/16 spruce. The tips have a core of 1/16 ply and 1/8 balsa.
And I've made a start on the pockets for the tubes in the tail. A chunk of foam/balsa was cut out. The base is then lined with 3/32 at the front and 1/8 at the rear which seems to place the tubes about central in the slot. The sides are faced with 1/32 and scraps hold these sides in place while the glue dries.


The fuselage is a simple affair. A more modern design would use a lot less wood for lightness and to reduce costs. However, this model is going to be flown heavy in strong winds and using 1/2 inch blocks of balsa as designed will make it very strong.
The fuselage has just three formers, one in the nose, one in front of the wing and one behind the wing. The fuselage is built inverted over the plan. Fuselage sides have 1/8 x 3/8 spruce stringers along their upper surface and 3/8 triangular section balsa along the bottom surface.
The plan calls for a closed loop for the rudder control. But I'm not a fan of closed look and will be using a carbon rod in a PTFE tube. Holes were pre-drilled in the formers but I wanted another support along the tail boom. The trouble is that the elevator pushrod also has to move freely in that space so I could not put another former in there. It's also very tight and adding a support after sheeting was not going to be possible. So I've made a thick support of 1/2 inch balsa faced with 1/16 ply. A 3mm hole is drilled through and then a 5mm hole is part-drilled through the block. When the carbon rod and PTFE tube is passed through the two formers it naturally lines up with the 5mm guide hole to pass through the 3mm hole at the other side of the balsa block.


The all moving tail has ended up being rock solid. I don't know if it's due to using over-sized piano wire or if it's because I've developed better skills in the 10 years since the last AMT I did. Either way I'm happy. I used my pin boards to line up the AMT box vertically while I glued the tubes into the elevator halves lying flat on the boards. I was just hoping that it would work...and using 5-minute epoxy you don't have long to get it right. Fortunately the tail ended up perfect and it lines up with the wing to within a fraction of a degree.
Lots of fiddly jobs doe over the last couple of days. The wing bolts and dowels are done. I opted to use rivnuts in the end because their extra height meant I couple still use short bolts and have the mounting plate lower in the fuselage where it had something substantial to bond to...the spruce longeron.
And apart from a final sanding, it's all complete!


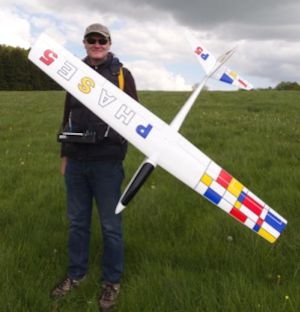
Finishing the Phase 5
The advantage of an impromptu day off work means you can get a lot done so got the Phase 5 covered. The covering is waiting for some stickers to liven it up a little.


Maiden Flight Report
May 13th 2018 and a possible day for the maiden so after visiting a few slopes it was back to Win Green for the evening hoping that the wind would have picked up and swung NNW. It was stronger but still NW. I had a 15 minute flight with the Phase 5 and then drove east about 15 minutes to another slope. Another true NW slope and here I was able to fly for a further 45 minutes until sunset, when it was getting cold.

