Back to Basics

  • Brian
  • Topic Author
  • Away
  • Platinum Member
  • Platinum Member
More
2 years 10 months ago #24799 by Brian
Replied by Brian on topic Back to Basics
I'll stick with the old set-up Colin, I think it'll be OK with a 2s LiPo. Not sure how the motor is held in, most of the assembly looks as though its held together with hot glue. Fitting a brushless motor would mean fixing a mount in the nose, which is quite narrow, not sure if it'll be big enough to take one. I'm going to see if I can fly it first, that'll be the time to make a decision, anyway it might go well enough on the old rig anyway, after all it is a glider so the motor will probably be adequate to haul it up far enough to catch the odd thermal.
The following user(s) said Thank You: 4Pedalsfly

Please Log in or Create an account to join the conversation.

  • Brian
  • Topic Author
  • Away
  • Platinum Member
  • Platinum Member
More
2 years 10 months ago #24806 by Brian
Replied by Brian on topic Back to Basics
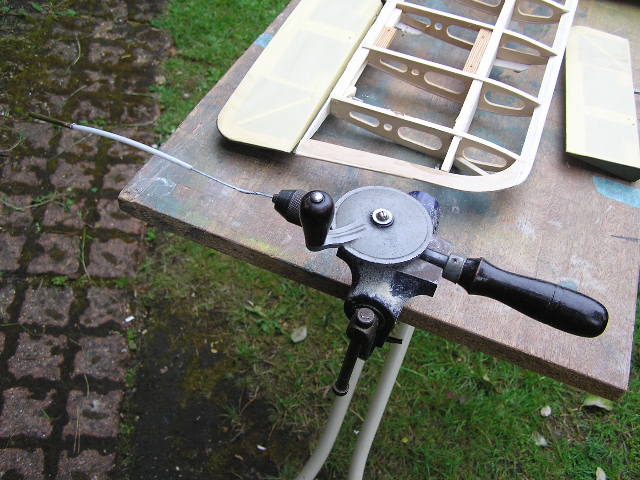
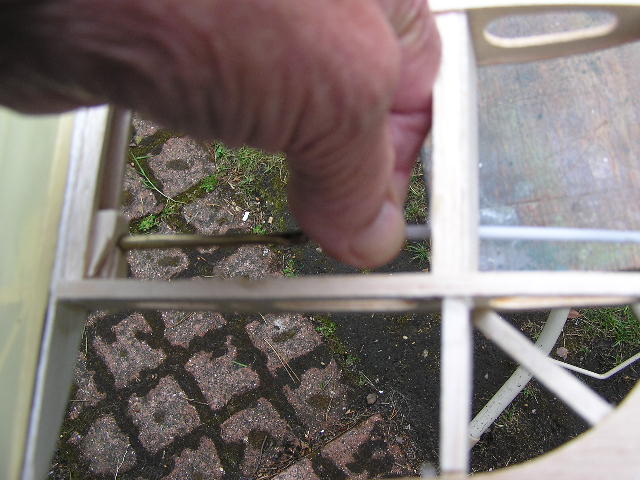
A final check on the fit of the new spar inserts and with the wings set up on the dihedral blocks, I glued up the wings and centre section and left it to dry overnight. The weather made it more than overnight, at least everything turned out alright. Well almost. I'd left the ailerons in place as the covering on them was OK. I should have known better. Pulling the wing assembly into alignment had an unexpected effect on the wing to aileron clearance. The ailerons now touched the adjacent ribs quite firmly. The hinges are the pin type, no way to dismantle them. I wondered if I could slide a piece of brass tube over the protruding pin bit and perhaps be able to wiggle it through the epoxy holding it in. The tube was filed to a fairly sharp edge, and I cut a couple of shallow slots to make a crude drill bit. All I managed to achieve was a sore finger and a few crumbs of cured epoxy resin. Looked as though the only way to get the ailerons off would be to cut through the hinges, awkward due to the metal hinge pin. I wondered about ways of using the tube "drill". I soldered the tube to a piece of Bowden cable, then soldered the other end of the cable to prevent fraying. I slid on a small washer, cut the PTFE outer to slightly shorter than the cable. Hoping it would work, I held the Bowden cable in a small hand drill, pushed the tube over the exposed hinge and pushing as hard as I could on the PTFE tube and turning the drill, I began to drill away the epoxy round the hinge pin. First snag, The end bit I was holding got too hot, the cure was a drop of oil on the washer. Pushing hard on the tube and turning the handle, five minutes was all it took to release the hinge. I'll be able to insert some new balsa around the hinge area, then re-drill the hinge mounting holes about 1/32" further outboard.
Attachments:
The following user(s) said Thank You: 4Pedalsfly

Please Log in or Create an account to join the conversation.

More
2 years 10 months ago #24807 by kevinross
Replied by kevinross on topic Back to Basics
Great inginuity Brian when tools are limited. If i understand your process correctly you've used bowden cable to provide a flexible drive to drill out the hinge. You could have used 20 ish gauge piano wire soldered into the end of the brass cutting tube which would have provided a much stronger flex drive shaft. Ive used that method with up to 36" piano wire drive wire to drill rear fuselage formers for pull pull wire.
The following user(s) said Thank You: Brian

Please Log in or Create an account to join the conversation.

  • Brian
  • Topic Author
  • Away
  • Platinum Member
  • Platinum Member
More
2 years 10 months ago #24808 by Brian
Replied by Brian on topic Back to Basics
I see what you mean Kevin, but I had to go the "flexi" route because of the depth of the main spar. I've used "tube on a wire" for threading snakes and "pull-pull" wires, saves a lot of problems with lining things up.

Please Log in or Create an account to join the conversation.

  • Brian
  • Topic Author
  • Away
  • Platinum Member
  • Platinum Member
More
2 years 10 months ago #24813 by Brian
Replied by Brian on topic Back to Basics
The structure of the lower wing now more or less finished, I felt like a change from fixing wings, so I had a look at the SE5A's fuselage. First problem I found was that the fixings for the cabane struts were rather loose. Small problem to fix, big problem with how to fix. All it needs is to have four screws tightened. There is no way the screws can be accessed with an assembled fuselage, must have a long look at the plan to see if I can find a way round the problem. Further examination of the fuselage assembly showed up a problem with the elevators. The wire joiner didn't seem to be attached to both elevators, I didn't want to re-build and re-cover the elevators, and looking at the plan, I saw that the design of the elevators and the method of joining them wasn't the best way to do it. I cut an access slot into the elevators at the point where the wire joiner was situated. The elevators were aligned and clamped in position. I made balsa inserts to fill the access slots, knocked up some slow cure epoxy resin, dripped it into the access slots and pushed in the pre-cut inserts. This morning I was pleased to find that my patch repair had worked.
The following user(s) said Thank You: Phil Ford

Please Log in or Create an account to join the conversation.

More
2 years 10 months ago #24815 by 4Pedalsfly
Replied by 4Pedalsfly on topic Back to Basics
Brian - Neat solution to elevator problem, await to hear how you solve cabane strut issue.
Regards
Colin.

Please Log in or Create an account to join the conversation.

Moderators: DaveBright
Time to create page: 0.388 seconds