- Posts: 1044
- Thank you received: 414

Back to Basics
- Brian
-
 Topic Author
- Offline
- Platinum Member
-

Less
More
4 years 5 months ago #24597
by Brian
Replied by Brian on topic Back to Basics
I didn't "Panic" Simon, mainly due to the fact that I was rigid with fear.
The Kadet has been wiped down, tank drained, engine's had a squirt of "after run" and the Rx battery is charged. Surprisingly little mess from the OS FS .40, just a light spatter of oil on the LE of the right wing and a misting of oil on the right tail plane LE.
The Panic has dried out quite nicely, hopefully the application of a coat of knotting will work. The back end of the fuselage and the tail unit were lightly oil soaked, but I gave it the knotting treatment anyway. Today I covered the rudder and elevator without anything unpleasant happening. One good thing about covering a Panic, more or less anything goes. I've lots of leftover bits of covering material from models long gone, the Panic is the ideal way to use them up. Funny thing is, although a model might look gaudy on the ground, when its in the air, most of the time it appears as a dark shape, and sometimes that "dark shape" can be confusing, especially when you think its turning left when in fact its turning right and flying away from you. That was when I found it would be a "good thing" to have plenty of height.
The following user(s) said Thank You: 4Pedalsfly
Please Log in or Create an account to join the conversation.
- Brian
-
Topic Author
- Offline
- Platinum Member
-
Less
More
- Posts: 1044
- Thank you received: 414
4 years 4 months ago - 4 years 4 months ago #24678
by Brian
Replied by Brian on topic Back to Basics
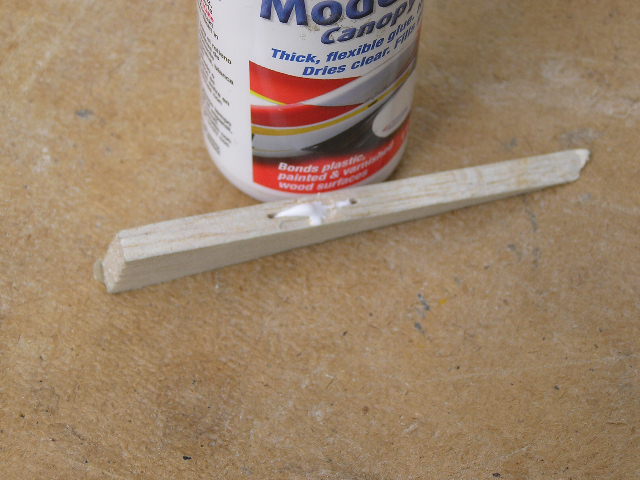
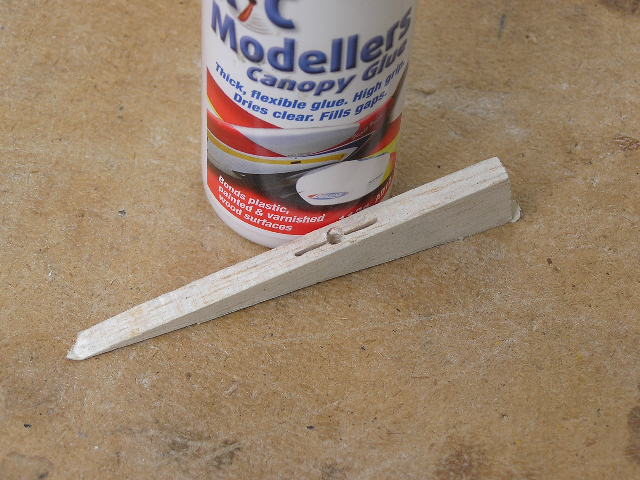
I finished re-hinging the rudder and elevator on the Panic, then I thought it might be useful if I showed the way I did it. This goes back a few years to the days of Channel 4 models. I went in to get some Pacer hinge glue, water based, easy to use and easy to clean up. Tiny bottle. Very expensive. John in Channel 4 told me that Pacer had discontinued it. I wondered why as it had become quite popular in a short time. I e-mailed Pacer thinking they probably wouldn't bother answering such a trivial question. Several days later I received a reply from Pacer's tech department. The reason they didn't make the glue was due to the fact that canny American modellers had found that Pacer Canopy glue did the same job at a fraction of the price. My hinging method is to drill a 2.0mm to 2.5mm hole in the centre of where the slot is to be made, the hole is only drilled half the depth of the hinge. Make the hinge slot, centring the jig on the hole. Clean out the slot as usual. Using R/C modeller's Glue from DeLuxe Materials, squeeze the glue into the slot via the drilled hole. This is not my idea, it was a suggestion from the people at Pacer.
I've never had a hinge fall out.......yet!
I've never had a hinge fall out.......yet!
Last edit: 4 years 4 months ago by Brian.
The following user(s) said Thank You: 4Pedalsfly
Please Log in or Create an account to join the conversation.
- Brian
-
Topic Author
- Offline
- Platinum Member
-
Less
More
- Posts: 1044
- Thank you received: 414
4 years 4 months ago #24679
by Brian
Replied by Brian on topic Back to Basics
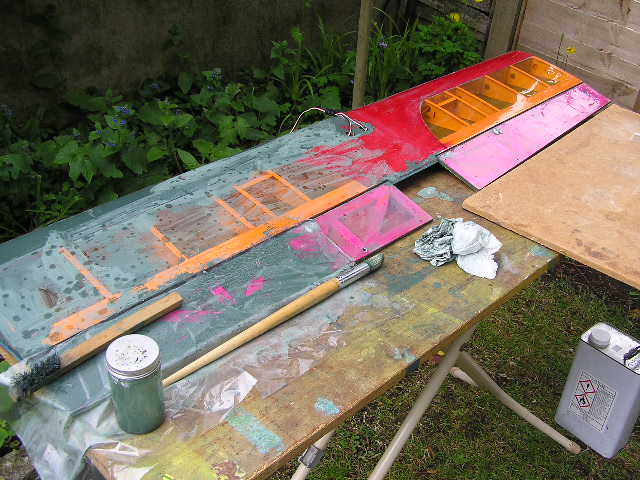
The fuselage of the Panic is almost ready to go. The de-oiling seems to have worked so far. The covering was no problem, and for extra protection I've slopped fuel proofer over it. The Panic had an "interesting" colour scheme when I collected it last year, olive drab top and light grey undersides. I re-covered the undersides of both wings during vital repairs that were needed. Now I've used up most of my scrap covering material, I don't want to break open a new roll as there are other models in the queue and I don't want to risk running short. I wondered if the drab paint could be stripped, it wasn't oil proof and was coming off in patches on the exhaust side of the model. I tested a spot with acetone and a toothbrush, bit fiddly but it came off alright and left the covering undamaged. My method is to slop acetone over the area to be stripped, then cover the area with the polythene backing from Solarfilm.
Leave it for ten minutes or so, the paint comes off quite easily with gentle scrubbing and a final wipe over with an acetone dampened wad of kitchen paper. All done in my open air workshop. One bonus I didn't expect was the local squirrels don't like the smell of acetone and kept well out of the way.
Leave it for ten minutes or so, the paint comes off quite easily with gentle scrubbing and a final wipe over with an acetone dampened wad of kitchen paper. All done in my open air workshop. One bonus I didn't expect was the local squirrels don't like the smell of acetone and kept well out of the way.
The following user(s) said Thank You: 4Pedalsfly
Please Log in or Create an account to join the conversation.
- Brian
-
Topic Author
- Offline
- Platinum Member
-
Less
More
- Posts: 1044
- Thank you received: 414
4 years 4 months ago #24693
by Brian
Replied by Brian on topic Back to Basics
I had intended to fly today, however Virgin Media decided I'd be better off without a 'phone and better than that without a mobile as well. Finally they promised an engineer would call, I got a text message late this afternoon. They're coming tomorrow. I needed to keep myself busy, however stripping the olive drab off the Panic's upper wing didn't appeal, even though the result on the lower wing looks quite nice.
In desperation to get something totally absorbing I started tinkering with a tiny electric model I was given when helping clear Peter Wallis' models a couple of weeks a go. Its a small model which I thought might be a "Das Mini Stik". The airframe looked fairly sound, apart from a wonky tail unit and signs of an undercarriage being torn off. I made an undercart mounting from 6mm ply and a couple of small blocks made from leftover beech engine bearer. A vertical hole was drilled through each block and the ply mounting, then the whole assembly was grafted to the fuselage. I bent up two undercarriage legs from 3mm wire, I'd completely forgotten how easy modern wire bends compared with the genuine "Piano Wire" of long ago. The legs were secured with wide slotted saddle clamps, I had three, fortunate as I broke one while fitting it. A couple of lightweight wheels finished the job. The wonky tail took a while to persuade it to leave the fuselage. Peeling off the covering from the fuselage showed signs of damage, I cut the old glue away and re-established a flat surface ready for gluing. I removed the push rods from the elevator and rudder, these weren't adjustable as they had a "Z" bend at one end and a right angled bend at the other. I cut off each end folded one end of the wire back on itself and soldered it into a 2mm standard clevis. At the servo end I'll use connectors attached to the servo arms.
Didn't turn out to be a bad day really, but I'd rather have had a working 'phone and gone to Cashmoor.
The following user(s) said Thank You: 4Pedalsfly, kevinross
Please Log in or Create an account to join the conversation.
- 4Pedalsfly
-

- Offline
- Platinum Member
-
Less
More
- Posts: 803
- Thank you received: 202
4 years 4 months ago #24694
by 4Pedalsfly
Replied by 4Pedalsfly on topic Back to Basics
Brian - You missed a good day yesterday, plenty of action & no
major incidents.
The "new" model looks good fun,
look forward to seeing it fly.
I was bending up some " Z bends" from old wire stock - a real white knuckle job for 2 mm dia.
Colin
major incidents.
The "new" model looks good fun,
look forward to seeing it fly.
I was bending up some " Z bends" from old wire stock - a real white knuckle job for 2 mm dia.
Colin
Please Log in or Create an account to join the conversation.
- Brian
-
Topic Author
- Offline
- Platinum Member
-
Less
More
- Posts: 1044
- Thank you received: 414
4 years 4 months ago #24740
by Brian
Replied by Brian on topic Back to Basics
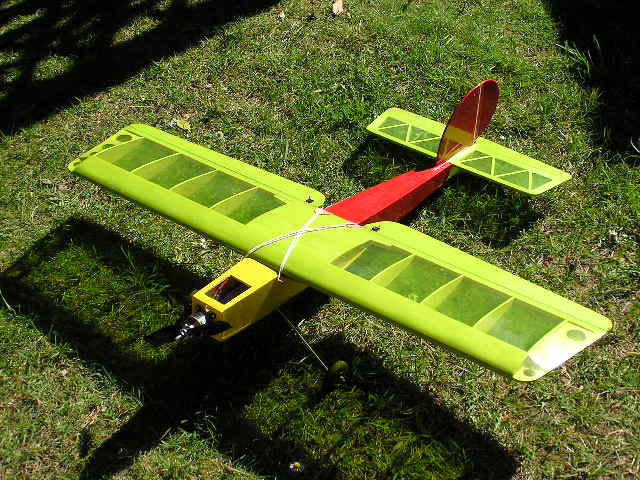
Das Mini Stik has been tested on the back lawn. Successful taxi trials avoiding the pole of the clothes drier were made, final touch was the obligatory OP number. Since the excitement of the Virgin Media engineer's visit, he didn't call as he couldn't get me on the 'phone that Virgin Media disconnected last March. I wonder what qualifications are needed to be a Virgin Media engineer?
Far more exciting has been the assembly of the, smelling faintly of acetone, Panic. Looking suitably horrible with a dreadful patchwork of original and new covering, it was time to check the controls. Seemed OK, so I filled the tank, gave the engine a couple of priming flicks, attached the glow driver, and I was quite surprised when the SC .52 four stroke fired and ran straight away. Ran the engine for the whole tankful, first to get things back to normal after the Winter/Spring layoff, second to irritate my neighbour, who has an exceedingly smelly two stroke lawn mower which he tends to use when he spots our kitchen window open. The stink and smoke take ages to go away.
The next part of this article is probably going to be a bit longer than those on Das Mini Stik and the Panic, but not so long I hope as the long build of the Sig Kadet.
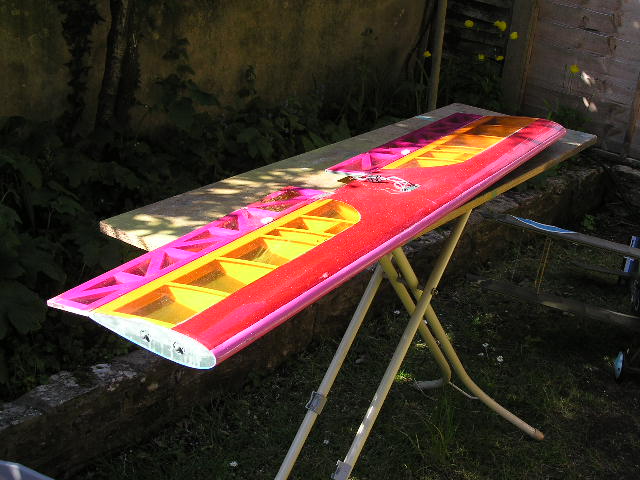
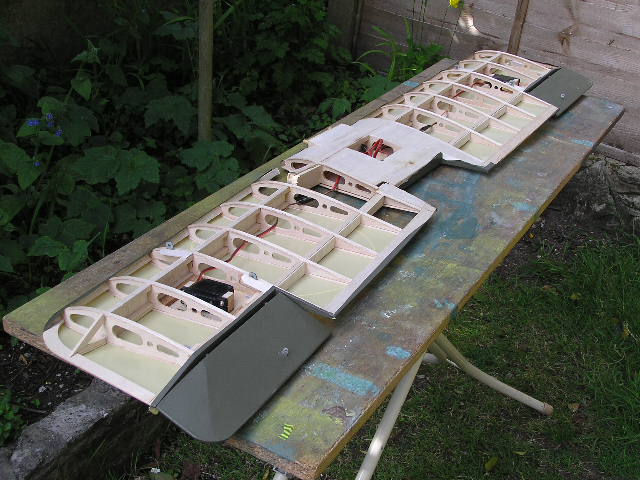
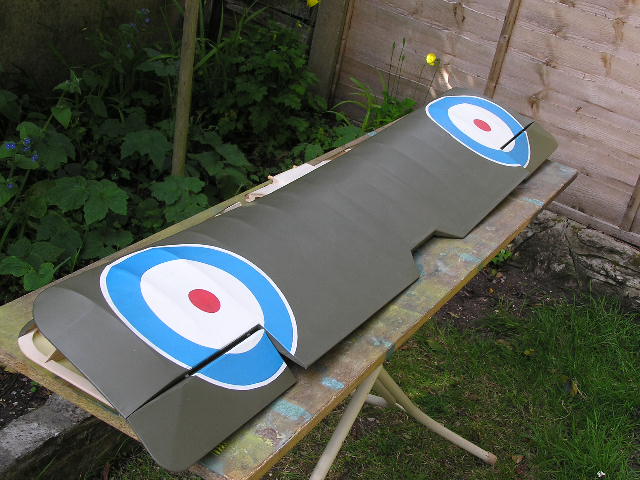
I have this Flair SE5A that I got from the Peter Wallis "tidy up". It had a lower wing broken at the root and three damaged wing tips. Didn't seem like a lot of work. Today I found just how much damage there really is. The lower wings are both broken at the dihedral joint as is one upper wing. To add to the problem, the screws that hold the cabane struts to the fuselage have come loose, and the only way to get to them is to open up the top of the fuselage.
While trying to think of the least destructive way to get at the screws, I thought it would be nice to be able to get the tool I was instructed to get from the stores when I was a young apprentice doing small jobs for a skilled fitter. We worked on pressure cabins for the Vickers Valiant. I knew that apprentices had to take a lot of leg pulls, and I felt pretty smug when I knew about the "box of sparks", "a tin of 2BA tapped holes", "a long weight", and stuff like that. But I fell for it, I was sent to get a "5/16" Ferret", apparently it was to be used to rescue a bolt or something that had fallen into the door frame structure. The lightening holes in the frame were too small for even my (at the time) small hands. I had to wait nearly a quarter of an hour before a grinning storeman told me they didn't have one and were never likely to either. Fortunately things went back to normal in less than a week, but a week is a long time when you're sixteen.
The photos show the lower wing with no upper covering, both have broken spars at the dihedral join. The upper wing looks OK, but the right wing is being held on by the covering. The engine is a nice looking Saito FA.50.
Far more exciting has been the assembly of the, smelling faintly of acetone, Panic. Looking suitably horrible with a dreadful patchwork of original and new covering, it was time to check the controls. Seemed OK, so I filled the tank, gave the engine a couple of priming flicks, attached the glow driver, and I was quite surprised when the SC .52 four stroke fired and ran straight away. Ran the engine for the whole tankful, first to get things back to normal after the Winter/Spring layoff, second to irritate my neighbour, who has an exceedingly smelly two stroke lawn mower which he tends to use when he spots our kitchen window open. The stink and smoke take ages to go away.
The next part of this article is probably going to be a bit longer than those on Das Mini Stik and the Panic, but not so long I hope as the long build of the Sig Kadet.
I have this Flair SE5A that I got from the Peter Wallis "tidy up". It had a lower wing broken at the root and three damaged wing tips. Didn't seem like a lot of work. Today I found just how much damage there really is. The lower wings are both broken at the dihedral joint as is one upper wing. To add to the problem, the screws that hold the cabane struts to the fuselage have come loose, and the only way to get to them is to open up the top of the fuselage.
While trying to think of the least destructive way to get at the screws, I thought it would be nice to be able to get the tool I was instructed to get from the stores when I was a young apprentice doing small jobs for a skilled fitter. We worked on pressure cabins for the Vickers Valiant. I knew that apprentices had to take a lot of leg pulls, and I felt pretty smug when I knew about the "box of sparks", "a tin of 2BA tapped holes", "a long weight", and stuff like that. But I fell for it, I was sent to get a "5/16" Ferret", apparently it was to be used to rescue a bolt or something that had fallen into the door frame structure. The lightening holes in the frame were too small for even my (at the time) small hands. I had to wait nearly a quarter of an hour before a grinning storeman told me they didn't have one and were never likely to either. Fortunately things went back to normal in less than a week, but a week is a long time when you're sixteen.
The photos show the lower wing with no upper covering, both have broken spars at the dihedral join. The upper wing looks OK, but the right wing is being held on by the covering. The engine is a nice looking Saito FA.50.
The following user(s) said Thank You: 4Pedalsfly
Please Log in or Create an account to join the conversation.
Moderators: DaveBright
Time to create page: 0.311 seconds
Latest Posts
-
-
- Various Gliders from Dave Ambrose ex W.M.A.C Membe...
- In WimborneMac Members / For Sale - Exchange - Wanted
- by 4Pedalsfly
- 1 week 1 day ago
-
-
-

- Ray Ivey's Models
- In WimborneMac Members / For Sale - Exchange - Wanted
- by Phil Ford
- 2 weeks 7 hours ago
-
©
2009 - 2025
WMAC PCF Design