- Posts: 1045
- Thank you received: 415

3D Printing
- Brian
-
 Topic Author
- Offline
- Platinum Member
-

Less
More
3 years 3 months ago #26019
by Brian
Replied by Brian on topic 3D Printing
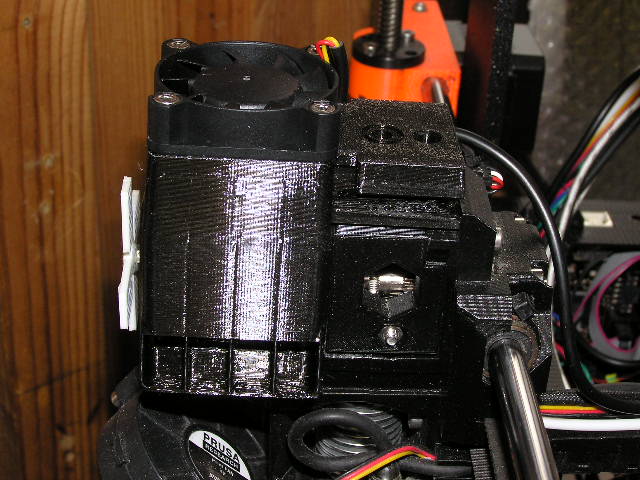
The recent heatwave has brought a whole new bunch of problems. The extruder motor, it sits right above the "Hot Bit" of the extruder, became overheated, what happened was that the filament was softened by the high temperature, instead of sliding neatly down the guide tube, it wrapped itself around the drive gears, and tucked itself into any space it could find. I had to dismantle the extruder in order to clear the jam. This had a "knock on" effect as rebuilding the extruder meant that the Z axis had to be recalibrated. This took a couple of hours, fortunately the printer carried on working after the rebuild, and the current print of a Piper Cub J3 with floats was resumed. I managed to keep the printer working, by putting a fan salvaged from an old power supply, close to the extruder. This kept things working, and no jams happened. I checked the Prusa website for extruder motor cooling mods, and found one! The mod is a cowl that fits over the motor, takes a 40mm fan, and costs less than £20 including postage. Should get the bits before the weekend.
Please Log in or Create an account to join the conversation.
- Phil Ford
-

- Offline
- Administrator
-

Less
More
- Posts: 3170
- Thank you received: 903
3 years 3 months ago #26020
by Phil Ford
Replied by Phil Ford on topic 3D Printing
Brian, you could have used an edf to blow over the extruder. :lol: EDFs have other further uses like assisting with getting a charcoal BBQ going quicker. If you had been a Scale Day you would've see a live demonstration. ")
The following user(s) said Thank You: Brian, MBorrett
Please Log in or Create an account to join the conversation.
- Brian
-
Topic Author
- Offline
- Platinum Member
-
Less
More
- Posts: 1045
- Thank you received: 415
3 years 2 months ago #26040
by Brian
Replied by Brian on topic 3D Printing
Recently I had the 3DPrintLabs "Joker" up for sale. There wasn't much interest shown and today I removed all the hardware. Good thing that the model didn't sell. While holding the fuselage quite gently as I took out the elevator and rudder servos, the front of the fuselage started to crack. Further squeezing along the fuselage produced more cracks. The material used for the 3D print was a "bargain" from China. The wings and tail, which were printed from a different filament produced in the EU, were as strong as the day they were printed. Fortunately that was the only model I printed "on the cheap". Now its all in the rubbish bin, including the original spool of filament. Could have caused a very unpleasant incident if it had broken up in the air. I've printed a couple of models during my "layoff" from flying, and now before I begin to assemble them, I'm going to print some critical parts and test them for strength.
The following user(s) said Thank You: 4Pedalsfly, Phil Ford
Please Log in or Create an account to join the conversation.
- Brian
-
Topic Author
- Offline
- Platinum Member
-
Less
More
- Posts: 1045
- Thank you received: 415
3 years 2 months ago #26042
by Brian
Replied by Brian on topic 3D Printing
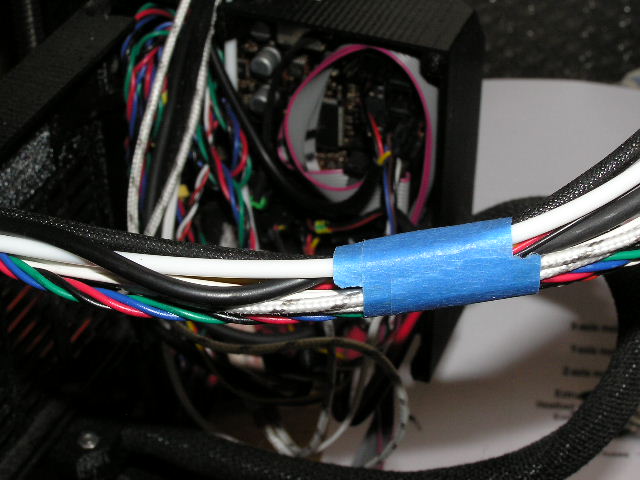
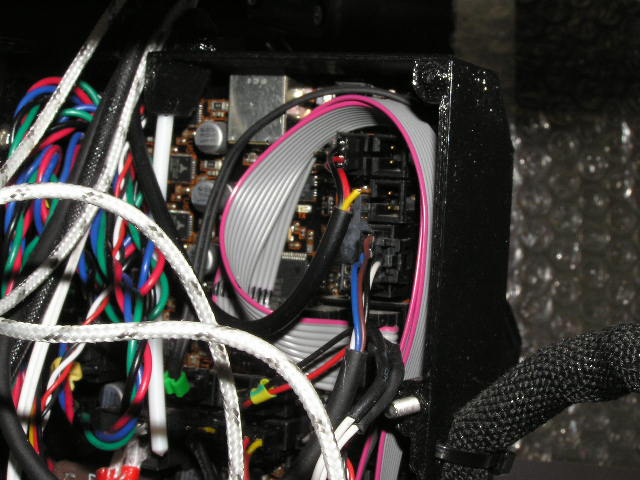
My bits to modify my printer arrived earlier in the week, I'm pleased to report that they were in a smallish padded envelope, not a bit like Colin's monster box. The downloaded (and free) STL files were sliced and copied to the SD card, the printer did its stuff and within a couple of hours I had a shiny new fan shroud ready to fit. It was a couple of days before I could slot in the hours needed to open up the printer's control box and wire in the leads for the new fan. Its a bit disconcerting when the control box door swings open and all the wires make a bid for freedom. Fortunately nothing fell off and nothing broke or got hopelessly entangled in something else. Fortunately the lead for the new fan was the correct length, and with small modification to the connector, plugged in to the main board without any fuss at all. The most awkward job was taming the bunch of assorted wires that connect the extruder head to the control board. I cheated a bit and used some masking tape as a temporary hold until the flexible sleeve could be refitted. The whole job including recalibrating the printer took around five hours. No chocolate biscuits came to any harm during this time, only because I forgot that the Boss had popped them in the fridge during the recent hot spell.
I've done a couple of "push/pull/squeeze/twist tests on a couple of newly printed parts. So far nothing has succumbed to the abuse. I wonder if its an age related fault that affected the Joker's fuselage, that and being in unfriendly environment. In a shed with no insulation, temperatures do tend to be at each end of the scale, and everything is more or less permanently damp. Although the flying surfaces were all OK. I think it must be the poor quality of the filament that caused the failures.
I've done a couple of "push/pull/squeeze/twist tests on a couple of newly printed parts. So far nothing has succumbed to the abuse. I wonder if its an age related fault that affected the Joker's fuselage, that and being in unfriendly environment. In a shed with no insulation, temperatures do tend to be at each end of the scale, and everything is more or less permanently damp. Although the flying surfaces were all OK. I think it must be the poor quality of the filament that caused the failures.
The following user(s) said Thank You: 4Pedalsfly, Phil Ford
Please Log in or Create an account to join the conversation.
- Brian
-
Topic Author
- Offline
- Platinum Member
-
Less
More
- Posts: 1045
- Thank you received: 415
3 years 2 months ago #26049
by Brian
Replied by Brian on topic 3D Printing
I'm getting a fair amount of exercise these days. My computer is upstairs in the spare room, the printer is in the shed at the bottom of the garden, consequently, there's a good deal of trotting back and forth as well as a considerable amount of stair climbing. I suppose its "all good for something or other". Today I've done a lot of stair climbing as I tried to get a program for a wing section to print out. Finally I gave up and sent an email to the designer. I was surprised and delighted to get a response within three hours. Unfortunately the suggested fix didn't do the biz, so I did a spot of intense looking, commonly known as " Research", but only because it looks "posh". The problem I had was caused by a slicer programme. Fortunately, changing to a different slicer programme fixed the problem I was having. Funny thing this 3D printing biz, its all very " suck it and see ". At least it isn't boring!
The following user(s) said Thank You: 4Pedalsfly, Phil Ford
Please Log in or Create an account to join the conversation.
- Brian
-
Topic Author
- Offline
- Platinum Member
-
Less
More
- Posts: 1045
- Thank you received: 415
3 years 2 months ago #26061
by Brian
Replied by Brian on topic 3D Printing
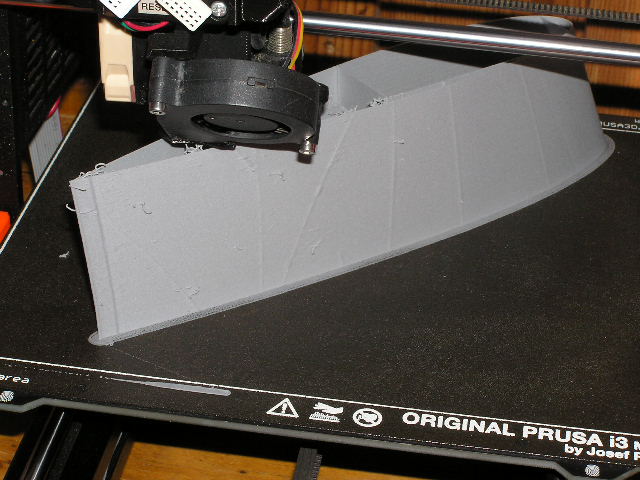
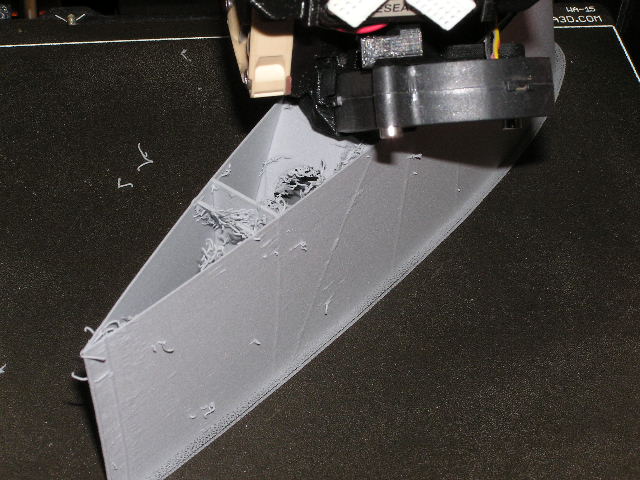
When I started 3D printing back in 2019, my first major project was an Eclipson BlackWing 160. This model printed out cleanly and the parts fitted quite nicely. This was done in October 2019. I didn't pick up the model again until April 2020, unfortunately none of the parts fitted and were quite warped by being stored in a damp cold shed over the winter. Recently I looked at the BlackWing again, and wondered if it could be printed with lightweight PLA. I emailed the designer and asked the question, I didn't expect an answer, but I got one twenty minutes later. With reservations it was possible. Now here I am, after 40+ hours of experimental printing, watching the first (apparently) successful part of the BlackWing being printed. After so many previous prints had failed due to poor finish or excessive "zits" on the outer surface, I emailed the designer again. The reply was almost instant, a setting which I didn't know about needed to be adjusted. The default setting value was 0.067, the new value, which seems to be working, is 0.0. Strange how tiny increments can have such an effect on the appearance of the finished item. Its a bit like having a model that is difficult to fly, turned into a pussycat by just one click of one trim switch. I'm keeping my fingers crossed that the present set-up will work for the rest of the parts. One unfortunate aspect of using LW-PLA is that it continues to expand during moves from one part of the print to another, this makes "retracting" the filament between non-printing moves, ineffective. The wing section being printed has a fairly clean interior at the leading edge, but looks like a relic from a shipwreck at the trailing edge where there are lots of stops and starts due to the assortment of internal stiffeners.
The following user(s) said Thank You: Phil Ford
Please Log in or Create an account to join the conversation.
Moderators: DaveBright
Time to create page: 0.282 seconds
Latest Posts
-
-
- Ray Ivey's Models
- In WimborneMac Members / For Sale - Exchange - Wanted
- by Brian
- 5 days 13 hours ago
-
-
-

- Various Gliders from Dave Ambrose ex W.M.A.C Membe...
- In WimborneMac Members / For Sale - Exchange - Wanted
- by 4Pedalsfly
- 2 weeks 19 hours ago
-
©
2009 - 2025
WMAC PCF Design