- Posts: 1044
- Thank you received: 414

Back to Basics
- Brian
-
 Topic Author
- Offline
- Platinum Member
-

Less
More
5 years 3 months ago #22662
by Brian
Replied by Brian on topic Back to Basics
Not much done today, funny how the "fiddly bits" take so much longer to sort out. I started the morning with fitting the aileron servos, that was a whole lot of fun as I hadn't made provision for accessing the screws that prevent the servos from falling off. By the time I'd found a suitable piece of 1/4" diameter brass tube, dressed the end so that it would cut through a 1/16" thick rib, and made four access holes for a screwdriver, then it was lunchtime. I must have been concentrating very hard as I'd no idea that I'd spent a few hours scratching about. Returning to the shed after lunch, I spotted something fluttering on the path. It was a very very small Blue Tit chick. The afternoon was spent in feeding it and hoping the parents would come and take over. Unfortunately they didn't, and now the chick is tucked up in a sandwich box lined with a wad of kitchen paper and carefully stowed in our tool shed. The RSPB website says to leave them alone, they don't advise on how to cope with seeing something young and fragile and needing help.
Please Log in or Create an account to join the conversation.
- Brian
-
Topic Author
- Offline
- Platinum Member
-
Less
More
- Posts: 1044
- Thank you received: 414
5 years 3 months ago #22697
by Brian
Replied by Brian on topic Back to Basics
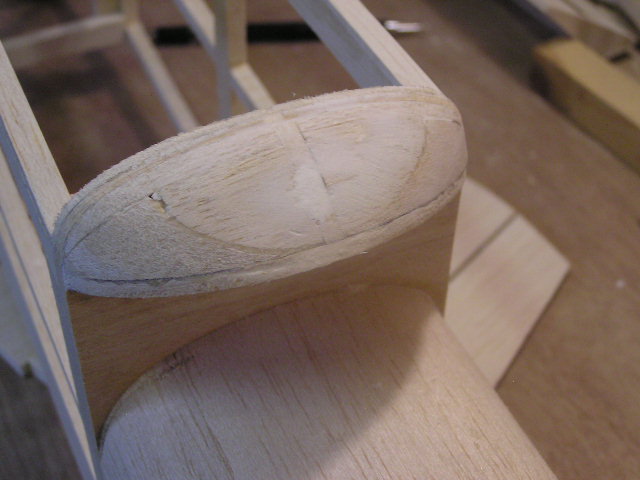
Things have drifted a bit over the past few days. Since the episode of the chick that didn't fall out of its nest, it was tweaked out by a magpie, which came back and took the rest of the brood. Perhaps I ought to knock up some sort of scarecrow? Its been far too hot to work in the shed, so I spent a bit of time trying to find out why the shed door is difficult to lock and persists in swinging shut. Now I wish I hadn't been so inquisitive. The shed is sinking into the ground. The underpinning is a timber frame supported on twelve "legs" made from two inch square softwood, these were soaked in preservative before the whole thing was beaten with a large mallet until it was level. The shed is no longer level, and the once flat floor has a distinct bulge upwards in the middle. I thought of an assoetment of complicated ways of getting it levelled, but the answer is amazingly simple. All I need to do is empty the shed, dismantle it, heave out the original base, and replace it. So apart from fretting about that, I drilled a few 1/8" holes for pin hinges in the fin/rudder, and dry fitted the hinges. Some years ago, I used a Pacer glue for hinge fitting, then it went off the market. The glue was water based and came in a small plastic bottle, something like 1/2 oz (American of course). I emailed Pacer and was surprised by their reply. They'd taken the hinge glue off the shelves because canny(stingy) modellers had found that Pacer canopy glue was a lot cheaper and did the job just as well. I did some tests and found that the balsa gave way long before the glue joint parted. Since then I've used Deluxe R/C Modellers Glue......works a treat and cleans up with water, also works very well on tail feathers for ARTF models, no more smears of epoxy on the pristine Oriental covering. The Kadet has now got a wing locating dowel at the LE, the front fairing, having been sawn off to allow the wing dowel hole to be drilled, has been refitted to the top of the front former. Glued some balsa sheet where the wing meets the former, needs a bit more sanding to profile and a bit of filler here and there.

The following user(s) said Thank You: 4Pedalsfly
Please Log in or Create an account to join the conversation.
- Brian
-
Topic Author
- Offline
- Platinum Member
-
Less
More
- Posts: 1044
- Thank you received: 414
5 years 3 months ago - 5 years 3 months ago #22757
by Brian
Replied by Brian on topic Back to Basics
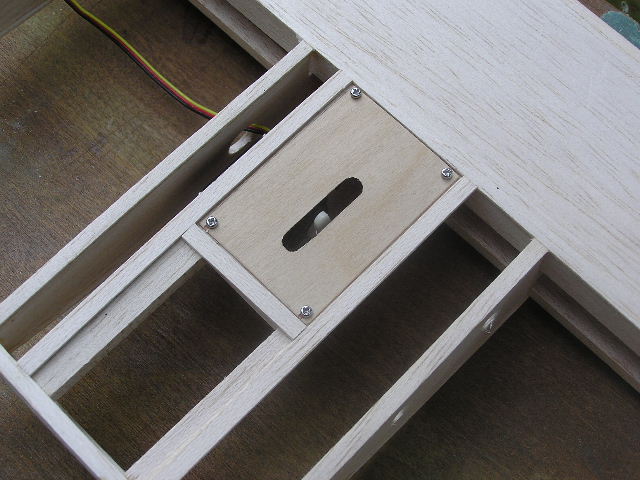
Lately I've spent too much time worrying about my "sinking" shed, so today, to take my mind off that as well as trying to avoid thinking about, and envying, the happy fliers at Cashmoor today, I tried to pick up where I'd ended up with the Kadet. Fortunately I'd fitted the servos, unfortunately I didn't have any servo covers so I cut some from thin ply. The covers are held with 4 X 2 mm screws, by the usual method of drilling the holes and putting in a drop of cyano. and leaving to cure before fitting the screws. The bodged fairing on the wing had been filled, seemed to sand down alright and fits tightly against the front former. I'd built the tail plane using mainly 1/4" balsa stock, so I was a bit concerned to find that it should have been 3/16" stock and the whole thing should have been sheeted over. Not fancying either a rebuild or an overly thick tail plane, I decided to add a bit of strength by slotting in a 1/4" square length of spruce. Naturally I'd forgotten just how much of it I'd used on a previous project, rummaging produced just one piece, not full length, but just long enough for a tail plane spar after trimming off about 1/2". A little time with a razor saw and the spar was fitted, made me glad that I'd managed to stay awake during the lectures on coarse carpentry at night school.

Last edit: 5 years 3 months ago by Brian.
The following user(s) said Thank You: 4Pedalsfly, kevinross
Please Log in or Create an account to join the conversation.
- Brian
-
Topic Author
- Offline
- Platinum Member
-
Less
More
- Posts: 1044
- Thank you received: 414
5 years 2 months ago #22782
by Brian
Replied by Brian on topic Back to Basics
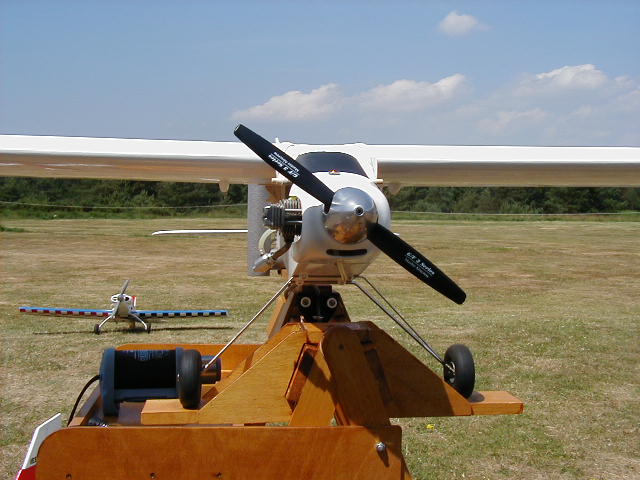
A few weeks ago I mentioned something about dihedral and a Wot4. This morning I found this shot of my plan built Wot4. The plan came from someone I found on the eBay site. Unlike the original, the model had a built up wing, unlike the original it had 1" dihedral and about one and a half degrees of washout at the tips. Powered by a modest OS FS 48, it would loop after a long dive, it would roll (sort of) as long as it was started with plenty of height. Flying in wind over 10 mph could be interesting. It would have made a decent trainer with a bit more power. Stalling was a non-event and the model never dropped a wing. However, I never managed to get it to spin. The structure was extremely light as I'd used balsa that was bought for free flight rubber models. It came to a sad end on a day when something seemed to be targeting Spektrum DSM2 receivers. I don't think DSMX had been available at the time. On the day I lost the model, two gliders and a Magnattila went in as well. I'm still working on the SIG Kadet, but I forgot to take the camera down to the shed, then it started to rain, so I gave up for the day.
Looking through some old files trying to find a decent shot of the Wot4 made me remember that I built two that Winter, the second one was electric, can't remember the setup but it was a 4s battery (mounting details on Chris Foss' website) The motor was equivalent to a .46 two stroke. On full throws it was far too much fun for me to handle, but with modest rates and 20% expo. It was very well behaved indeed. I swapped it for a 1/4 scale Piper Cub. Bad move!
Looking through some old files trying to find a decent shot of the Wot4 made me remember that I built two that Winter, the second one was electric, can't remember the setup but it was a 4s battery (mounting details on Chris Foss' website) The motor was equivalent to a .46 two stroke. On full throws it was far too much fun for me to handle, but with modest rates and 20% expo. It was very well behaved indeed. I swapped it for a 1/4 scale Piper Cub. Bad move!

The following user(s) said Thank You: 4Pedalsfly
Please Log in or Create an account to join the conversation.
- Brian
-
Topic Author
- Offline
- Platinum Member
-
Less
More
- Posts: 1044
- Thank you received: 414
5 years 2 months ago #22872
by Brian
Replied by Brian on topic Back to Basics
I'm in a time warp, it doesn't seem as though so much time has passed since I last posted on the topic. Not a lot has been going on, apart from wasted hours looking for bits that HK advertise until you go to buy them, then they are "backorder". However its not all doom and gloom, thank goodness for home based suppliers, it took me a couple of days spending an hour or so looking for bits and pieces, but at last I've had confirmation that everything I bought is now on its way. I made a mistake last year when I sold practically every flyable model, I should have kept at least one, and I sold all my engines too, apart from the OS FS .52 which is going to power the Kadet, and a couple of pristine MDS .17s which nobody wants. Today I've been tinkering with an OS FS .70 Surpass, bought on eBay as a known "non-runner". The photo of the engine showed it had a big dent in one pushrod tube, and the profile of the pushrod could be seen at the bottom of the dent. The seller suggested a price and asked for offers, I made one, and almost had my arm torn off by the enthusiastic response. There were two problems with the engine, the dented pushrod cover was a doddle to fix with a small hammer and a short length of silver steel, what took a bit of time was the seized exhaust rocker arm (not mentioned in the eBay description). This finally succumbed to a warm up from my butane torch and a good wiggling with a pair of pliers and a generous slurp of oil. The OS .70 now has the obligatory "suck-squeeze-bang!-blow" sequence, in fact the compression is so good its almost impossible to turn over without a prop fitted. I haven't been ignoring the Kadet, from time to time I've been sanding it with 400 paper ready for the first coat of sanding sealer. I don't know if Solarfilm/tex was invented when the Kadet first hit the market, perhaps I ought to do a bit of searching. I was considering a tissue/dope finish, with doped on contrasting tissue trims. I've a big piece of SIG Koverall, which is a bit fiddly to seal with dope, and I've an even bigger piece of "Polyspan" which looks like old fashioned rag tissue, but is a good deal stronger, might go for it as its easier to dope with a brush.
The following user(s) said Thank You: 4Pedalsfly, DaveBright
Please Log in or Create an account to join the conversation.
- Brian
-
Topic Author
- Offline
- Platinum Member
-
Less
More
- Posts: 1044
- Thank you received: 414
5 years 2 months ago #22920
by Brian
Replied by Brian on topic Back to Basics
I've either wasted a good deal of time, or perhaps I've spent some useful time in trying to find a hinge for the Kadet's ailerons. The covering material will be Polyspan, and as this is translucent, I don't want the hinges to stand out. I wondered if the best method for the hinges would be similar to stitched Solartex hinges. For those unfamiliar with this type of hinge, they are made by placing two strips of adhesive backed covering material with the adhesive sides contacting each other. The strip is then machine stitched along the centre line, when opened up ready to iron on, the hinge section will look like an "X". The Polyspan hinges will be made using the same method. As there's no adhesive on the Polyspan, I've marked the hinge centre lines with a waterproof marker pen, the hinges are then cut to size and taped to a piece of Teflon baking sheet. They are coated with PVA adhesive thinned 50/50 with water and left to dry. They must be absolutely dry as the adhesive will act like a contact adhesive under the pressure of sewing the hinge line. One shot shows the hinges after marking and cutting, and in the process of being transferred to the Teflon sheet, the other shot is what the hinges look like after a soaking in thinned PVA. I've tried various brands of PVA over the years and the best one I've found is by Evo Stik, mainly used for building and flooring.


The following user(s) said Thank You: 4Pedalsfly
Please Log in or Create an account to join the conversation.
Moderators: DaveBright
Time to create page: 0.448 seconds
Latest Posts
-
-

- Pitts Special 120FS
- In WimborneMac Members / For Sale - Exchange - Wanted
- by superadmin
- 1 week 1 day ago
-
©
2009 - 2025
WMAC PCF Design