- Thank you received: 0

Back to Basics
- Brian
-
 Topic Author
- New Member
-

Less
More
22 Aug 2022 16:53 #26116
by Brian
Replied by Brian on topic Back to Basics
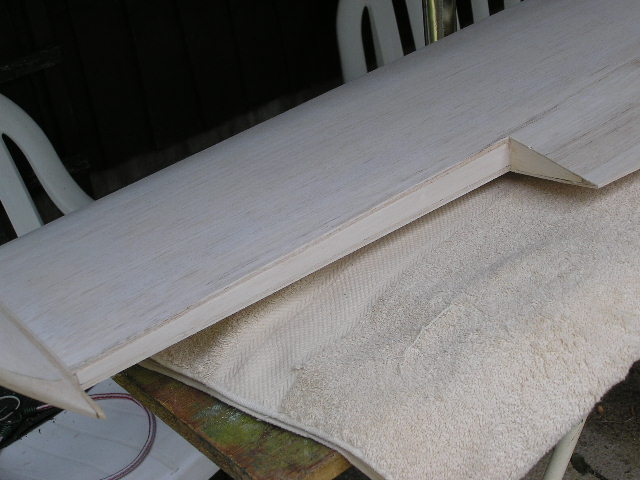
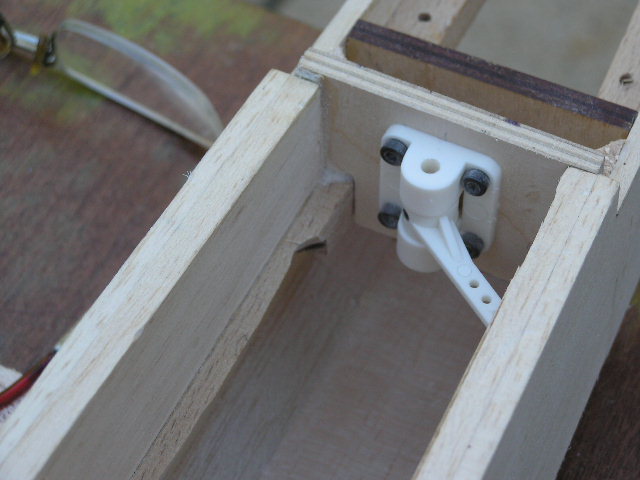
The second aileron cut away from the wing rather more cleanly than the first one. I used a slightly different method, holding the saw against the angled face of the aileron, rather that square with the rear spar. Unfortunately I made up for the better finish by missing the cut marks for the aileron horn by 2mm, a small patch of 1/16" sheet put things to rights. Finished the day by fitting hard balsa spars into the wing to give mounting areas for the sewn aileron hinges. Now its drizzling again and the wind has picked up a bit, no chance of further building today.
Please Log in or Create an account to join the conversation.
- Phil Ford
-

- Offline
- Moderator
-

Less
More
- Posts: 3156
- Thank you received: 903
23 Aug 2022 09:40 #26119
by Phil Ford
Replied by Phil Ford on topic Back to Basics
It is handy working with balsa when a slight cock-up happens, sticking in a bit of scrap balsa in to cover it up. ")
Please Log in or Create an account to join the conversation.
- Brian
-
Topic Author
- New Member
-
Less
More
- Thank you received: 0
23 Aug 2022 19:12 - 23 Aug 2022 19:15 #26122
by Brian
Replied by Brian on topic Back to Basics
Its really no drama at all to patch a model before the covering's on. During the wing skinning I went indoors to get some more coffee, I needed to stay awake for the whole afternoon. During my brief visit to the kitchen, a freak gust blew all the loose balsa around the garden, and the wing into the Pyracantha bush, commonly called Firethorn. A bad tempered plant with branches covered in short twigs which are in turn covered in very sharp spikes. One wing was peppered by the thorns, and one enterprising twig had found a weak spot between two ribs and poked a neat hole. Now filled by a small rectangular patch. The rest of the damage will be made good with lightweight Polyfilla tinted with instant coffee granules. Looks good, smells good too.
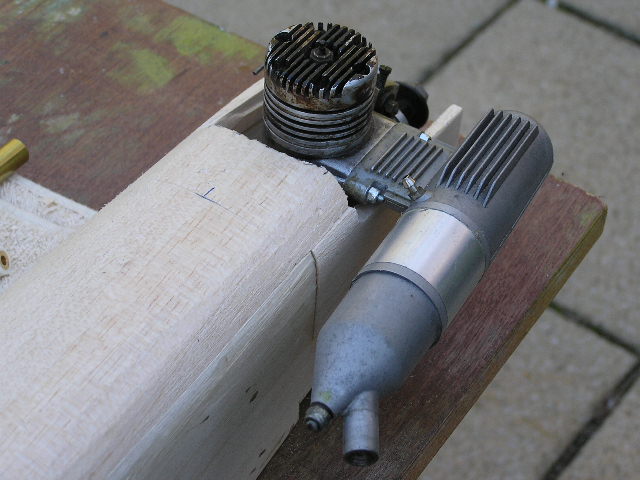
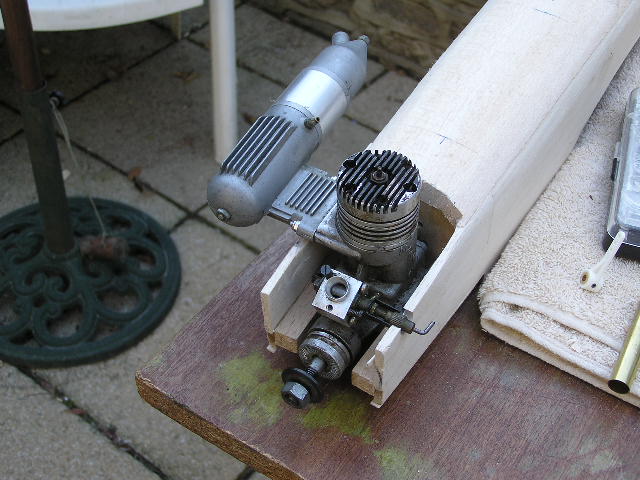
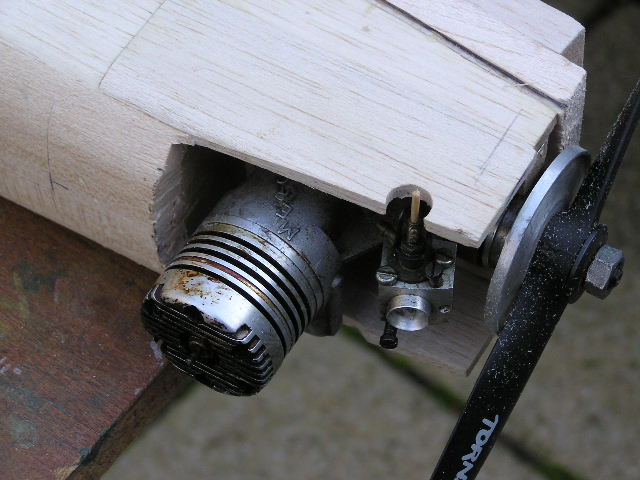
Today I have been dithering about how to fit a silencer/muffler to the Merco .61. In its heyday, the Merco sported a big black dustbin silencer, rather rare now. Rummaging through my engine bits I came across a silencer that looked like an OS but had no markings at all. The hole pitch in the silencer was within 0.1mm of the mounting hole pitch in the Merco, hooray! Unfortunately the holes in both items are tapped holes, boo! After a bit of Internet searching, I came across a Merco .61 at SMC (less silencer), and an outfit called "mecoa.com", an American based company that do some Merco spares, unfortunately a silencer wasn't one of them. Now comes the decision, it might be possible to get some studding to fit the Merco, but I doubt it since most of the suppliers are almost entirely Metric in the smaller sizes. The Merco casting seems to be quite robust, and would probably survive having the holes re-tapped slightly oversize (M3.5 X .6), as long as its done gently. The new studs would be fitted with Loctite. The silencer holes could be drilled out to 3.6 mm. Dia, and cutting a couple of slots where the section of the casting changes, would enable the silencer to be fitted to the new studs with nuts and washers. Fiddly but possible. I'll probably be awake half the night worrying about it.
Today I have been dithering about how to fit a silencer/muffler to the Merco .61. In its heyday, the Merco sported a big black dustbin silencer, rather rare now. Rummaging through my engine bits I came across a silencer that looked like an OS but had no markings at all. The hole pitch in the silencer was within 0.1mm of the mounting hole pitch in the Merco, hooray! Unfortunately the holes in both items are tapped holes, boo! After a bit of Internet searching, I came across a Merco .61 at SMC (less silencer), and an outfit called "mecoa.com", an American based company that do some Merco spares, unfortunately a silencer wasn't one of them. Now comes the decision, it might be possible to get some studding to fit the Merco, but I doubt it since most of the suppliers are almost entirely Metric in the smaller sizes. The Merco casting seems to be quite robust, and would probably survive having the holes re-tapped slightly oversize (M3.5 X .6), as long as its done gently. The new studs would be fitted with Loctite. The silencer holes could be drilled out to 3.6 mm. Dia, and cutting a couple of slots where the section of the casting changes, would enable the silencer to be fitted to the new studs with nuts and washers. Fiddly but possible. I'll probably be awake half the night worrying about it.
Last edit: 23 Aug 2022 19:15 by Brian. Reason: Clarified drilled hole size.
Please Log in or Create an account to join the conversation.
- Brian
-
Topic Author
- New Member
-
Less
More
- Thank you received: 0
24 Aug 2022 18:52 #26131
by Brian
Replied by Brian on topic Back to Basics
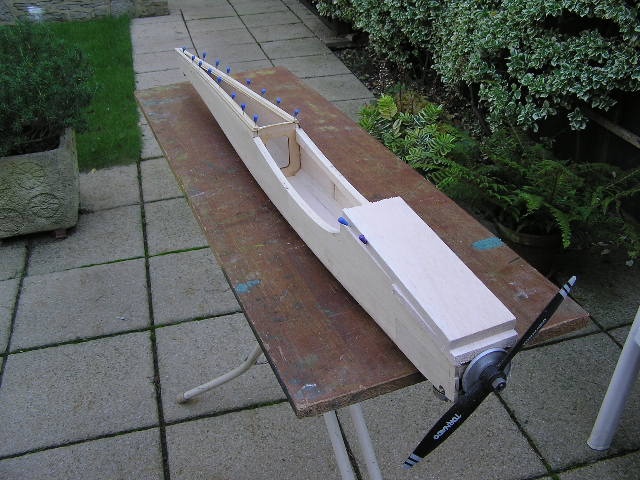
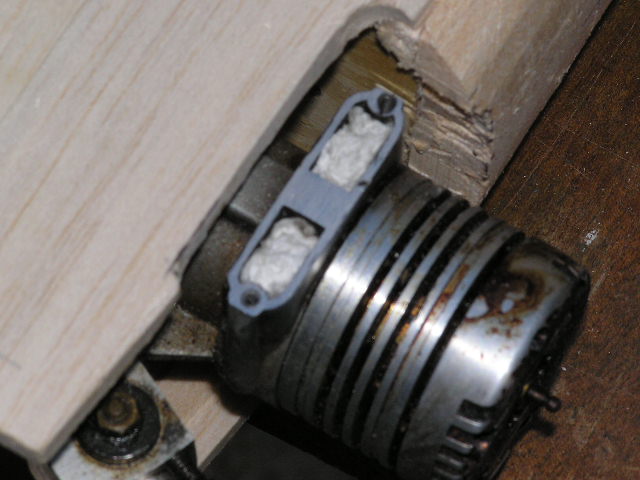
Oily hands day today, modified the "lookalike" OS silencer by drilling out the M3 tapped holes to 3.1mm Dia., filed clearance slots for the 3mm nyloc nuts. Increased the depth of the holes in the engine exhaust stub 2.2mm Dia X an extra 7mm deep. Re-tapped the holes in the exhaust stack 3.0mm X 0.5. Cut and dry fitted two lengths of M3 studding. Slid the silencer over the studs and fiddled the nuts on to the stud ends. Took it all apart, cleaned up the Merco and the studs, refitted them with Loctite. Reassembled the silencer fitted the nyloc nuts, bit short of room, but they tightened one flat at a time. It'll all have to come apart again as I completely forgot that the mating faces of the silencer and the engine's exhaust stack must be flat and probably will need a gasket. Little bit of woodwork to clear the needle valve and silencer.Fitted an extra former to take the nosewheel mounting. Last minute decision to make it a steering nosewheel.
Please Log in or Create an account to join the conversation.
- Phil Ford
-
- Offline
- Moderator
-
Less
More
- Posts: 3156
- Thank you received: 903
25 Aug 2022 10:15 - 25 Aug 2022 10:16 #26132
by Phil Ford
Replied by Phil Ford on topic Back to Basics
If only you had asked. You could have popped over and had a rumage in the cupboard. I have loads of mufflers for two/four strokes that may have fitted. Well, at least you had something to do to keep idle hands occupied. ")
Last edit: 25 Aug 2022 10:16 by Phil Ford.
Please Log in or Create an account to join the conversation.
- Brian
-
Topic Author
- New Member
-
Less
More
- Thank you received: 0
25 Aug 2022 19:20 #26134
by Brian
Replied by Brian on topic Back to Basics
Thanks for the offer of a "rummage in the cupboard" Phil, perhaps next time. Its a bit odd that I have a silencer with no matching engine, every engine I've sold over the past years has had a silencer with it. This one reminds me of the type that was supplied with the Irvine 53. Whatever its origin, its doing the biz now.
Please Log in or Create an account to join the conversation.
- Brian
-
Topic Author
- New Member
-
Less
More
- Thank you received: 0
12 Sep 2022 17:41 #26183
by Brian
Replied by Brian on topic Back to Basics
Its been a while since I've been able to get back to the building board, however, my thrift and diligence have been rewarded, and with the accrued cash I invested in some balsa block and thick sheet.
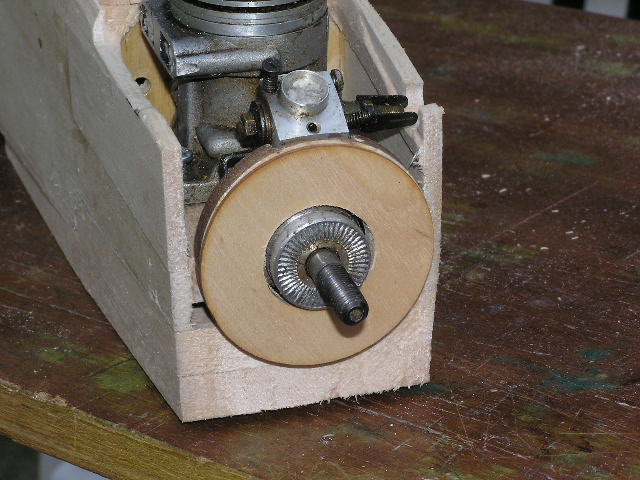
Now I can get on with the satisfying business of hiding the Merco behind a wall of balsa, then carving away until the engine sees daylight again. Its quite rewarding to do, especially when standing ankle deep in balsa shavings at the end of the job.
I have yet to do a bit of work on the exhaust/muffler joint. The exhaust stub on the engine is a bit of a challenge, I think it'll work out alright using a small toolmaker's clamp with two strips of brass held by double sided tape, one strip on the upper face of each clamp jaw. Lightly clamping this little lot to the exhaust stub and with a bit of nudging, it should be possible to dress the face of the stub using the brass strip as guides for the file. I did consider using a gasket, but these are fragile and tend to "blow" if the mating faces aren't completely flat. It'll be a case of gently inviting the slightly uneven surface back to straight and true, doing the same on the muffler stub and re-assembly with a thin film of Loctite. Sounds complicated, but isn't really. Pictures later from the bench
Meanwhile, balsa blocks beckon, I'm off to fill the gaping hole at the front of the fuselage.
I should mention that the Merco has all its ports suitably sealed with kitchen paper held in with BluTack, and there's a toothpick in the needle valve hole. All to be left in place until after the exhaust stub's done and the engine given a bit of a tidy-up with Fairy Power Spray. No, they don't sponsor me, but its the best stuff for removing baked on gunge that I've ever used.
Please Log in or Create an account to join the conversation.
- Brian
-
Topic Author
- New Member
-
Less
More
- Thank you received: 0
17 Sep 2022 18:22 #26195
by Brian
Replied by Brian on topic Back to Basics
The exhaust stub on the Merco is as flat as I can get it, there's a small "ding" that I'm going to leave, not worth doing a lot of filing just to remove a mark that's only about 1/32" wide.
!/2" sheet was cut and fitted to the front of the fuselage. The rear of the fuselage is being filled out with wide 1/8" thick strips. No point in gluing on a piece of 1/2" sheet when most of it will be carved away. This saves using expensive sheet as well as keeping the build of the rear fuselage quite light but stiff. The front pieces are only tack glued as they'll have to come off to allow the steerable nose leg to be fitted. Before re-assembling the pieces, I need to cut an access hatch to enable the nose wheel steering arm to be adjusted. I'll use hatch catches even though they aren't specified in the original design. I'm not a fan of bicycle spoke retainers.
!/2" sheet was cut and fitted to the front of the fuselage. The rear of the fuselage is being filled out with wide 1/8" thick strips. No point in gluing on a piece of 1/2" sheet when most of it will be carved away. This saves using expensive sheet as well as keeping the build of the rear fuselage quite light but stiff. The front pieces are only tack glued as they'll have to come off to allow the steerable nose leg to be fitted. Before re-assembling the pieces, I need to cut an access hatch to enable the nose wheel steering arm to be adjusted. I'll use hatch catches even though they aren't specified in the original design. I'm not a fan of bicycle spoke retainers.
Please Log in or Create an account to join the conversation.
- Brian
-
Topic Author
- New Member
-
Less
More
- Thank you received: 0
21 Sep 2022 17:47 #26202
by Brian
Replied by Brian on topic Back to Basics
I used an old spinner backplate to help line up the cut marks for the front of the fuselage, that was a few days ago. This afternoon I trimmed up the laser cut bits for the front of the fuselage, and glued them together. Did a second check on the marked out lines, removed the engine, and boldly cut off the front of the fuselage. Should have remembered the old saying "measure twice...cut once". For some reason I'd marked the cut lines from the wrong side of the spinner backplate. The cut is about 1/8" too far back, overall I don't think it'll matter, and I could add another liteply ring to the front of the existing one if the gap is too obvious. The next job will be to ease the engine out and fit some balsa infill. I'm looking forward to the final carving, very therapeutic.
Please Log in or Create an account to join the conversation.
- Brian
-
Topic Author
- New Member
-
Less
More
- Thank you received: 0
19 Dec 2022 19:29 - 23 Dec 2022 09:18 #26375
by Brian
Replied by Brian on topic Back to Basics
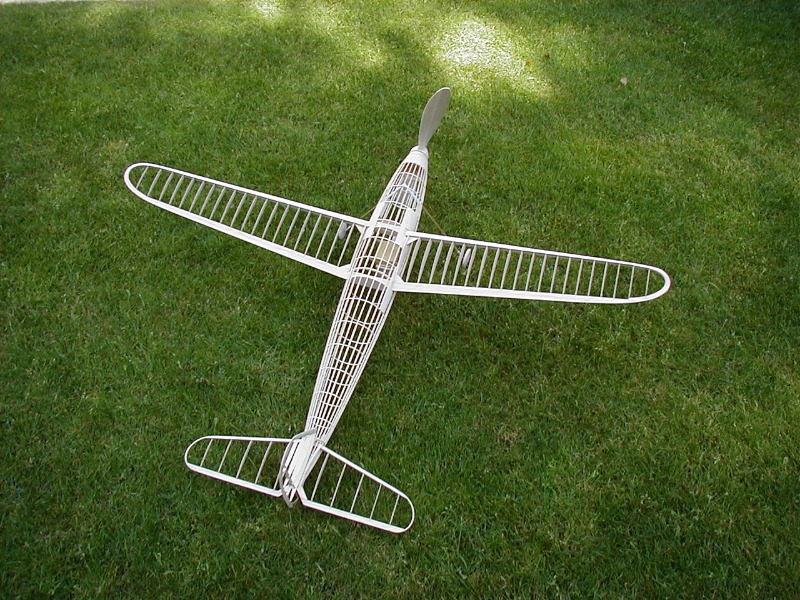
The year end is getting close, I thought it would be a good time to tidy things up a bit. The recent "Ice Age" rendered the shed untenable, that left my desk as a candidate for tidying. Unfortunately, I'm easily distracted when I've got something to do that I'm not really keen on doing. Under the junk I found a CD ROM, no info. on it, and it wasn't in a protective case. I loaded it into the computer and browsed the contents. The camera dated the contents back to 2000-2011. The attached pictures are of my last free flight rubber model, it is Bob Copland's 1948 Wakefield. It was built from the original plan, a very stained and fragile piece of paper which was salvaged from an old friend's loft. At the time of the build I was actively flying my own design models in the P-30 class, and I was beginning to find that retrieving models at Beaulieu was getting more difficult each season.
Reluctantly, I gave up flying the small and challenging P-30s, and made the decision to make one last FF rubber model. The Copland was a model I had wanted to build since I saw the picture of one published in The Aeromodeller a short time after WW2, it was of course far beyond my skills with single edged razor blade and folded piece of sandpaper! The circular section fuselage formers were made from four laminations of 1/8" X 1/32" balsa strip wound round a card former. The laminations were glued with thinned PVA. The card formers had a 1/2" square hole cut in the centre, these were threaded on to a 1/2" square "stick". I fabricated the stick using a method I'd learned while attempting to make split cane fishing rods. It was made from four pieces of 1/4" square spruce glued with slow curing epoxy. The four pieces were tightly bound with cotton thread, the upper part of the thread was formed into a loop, the lower part had a heavy lead weight attached to it. The whole thing was hung from a hook in the shed roof. This method gives a very straight and stable half inch square stick. Shaving off the cured epoxy and thread took ages! Getting this bit right and locating the stick in my SLEC building jig made the fuselage build very accurate. The rest of the model was pretty conventional and it was a real pleasure to see it taking shape. The propeller and spinner were carved from a thick piece of balsa sheet, the spinner was hollowed out to make space for the freewheeling mechanism which was made from shaped pieces of piano wire.
The wings are plugged in to ply wing boxes, the tail plane is located by a single dowel and is held in place by the fin, the fin is attached by a dress snap fastener at the L.E and a rubber band at the T.E. The U/C legs are made from bamboo and are a tight fit in the paper tubes fitted in the fuselage. Pretty economical on fixings, one dress snap and a rubber band to hold the whole model together. One view shows a piece of balsa hanging underneath the fuselage, this is the door of the box used to house the dethermaliser parachute . In practice, the parachute cords are attached to the back end of the fuselage, and the parachute is bundled into the box. The box is held closed by a small pin under tension from a small elastic band, and is released by a timer. In this case the timer was a piece of dethermaliser fuse held in a short length of aluminium tube. The fuse is lit just before launching the model, smoulders for the preset time, burns through the elastic band that holds the parachute door pin, and after the parachute has deployed, the model stops flying and comes down quite quickly and safely. The model was built to compete in the original Wakefield class set up in the late 1930s. The rules stated that the model and rubber motor should not weigh more than eight ounces, I think there was some controversy at the time due to ultra-light airframes and overweight rubber motors, and there was more fuss over the cross sectional area of the fuselage, especially when a model called "The Jaguar" competed, this model used an unconventional forward shape to the fuselage to comply with the section area rule. Nevertheless, it won, but I don't remember what year it was.


Last edit: 23 Dec 2022 09:18 by Phil Ford.
Please Log in or Create an account to join the conversation.
Moderators: DaveBright
Time to create page: 0.400 seconds
Latest Posts
- No posts to display.
©
2009 - 2026
WMAC PCF Design