- Posts: 59
- Thank you received: 18

Back to Basics
- ruggerbloke
-

- Offline
- Junior Member
-

Less
More
3 years 6 months ago #25603
by ruggerbloke
Replied by ruggerbloke on topic Back to Basics
I saw this post so thought I'd add my two pennyworth. I have used SIG Koverall (now discontinued) and also Diatex 1000 to cover numerous c\l Combat models. Both of these coverings require adhesive to be painted onto the airframe allowed to dry and then iron on. Once the bottom is done, more adhesive is applied to the airframe where no adhesive exists. Then cover the top. Once allowed to fully dry, an iron or hot air gun can be used to shrink it. At this point 50/50 dope can be applied to shrink to taste. Fuelproofer applied on top if required. I use Rustins Plastic Cote 2 pack for diesel fuel. After experimenting with adhesives, the best and cheapest option is this stuff:
www.amazon.co.uk/Impex-HT1789-Faster-Dry...ef_=pd_bap_d_rp_11_i
It is quite thick so slightly thinning with water makes applying it a bit easier.
Good luck!
It is quite thick so slightly thinning with water makes applying it a bit easier.
Good luck!
The following user(s) said Thank You: kevinross, Brian
Please Log in or Create an account to join the conversation.
- Brian
-
 Topic Author
- Offline
- Platinum Member
-

Less
More
- Posts: 1044
- Thank you received: 414
3 years 6 months ago #25605
by Brian
Replied by Brian on topic Back to Basics
While I'm held up due to non-delivery of a few things, I had another "go" at drawing a former for the Chipmunk. Still miles out! In a senior moment I downloaded a plan from AeroFred which was for an 80" version, Printed it out at 85% which seemed to work. Still no good, the sections are much too big. The design is by a chap named Nelitz, traced it back to the 70s, where I found it wasn't scale but "semi-scale" although it won the scale comp at that time. Odd that. Anyone want 24 A4 sheets of a 68" semi scale Chipmunk fuselage?
Please Log in or Create an account to join the conversation.
- Brian
-
Topic Author
- Offline
- Platinum Member
-
Less
More
- Posts: 1044
- Thank you received: 414
3 years 6 months ago #25618
by Brian
Replied by Brian on topic Back to Basics
I was thinking about the differences in the shapes of various parts of the Chipmunk. I suppose each drawing was based on an original somewhere, and it must be all too easy to draw something that appears to be two inches wide, and make it 2" wide, when in fact the part is 50.0mm. Add the scaling factor and there's the chance of a big difference between the original and the hand drawn scale version. Enough of that! To avoid pacing up and down while waiting for another delivery (which was promised to arrive yesterday) I went back to Moonglow and sorted through the rest of the laser cut parts. I was delighted to find that the balsa sheets holding the parts had generous margins and spaces between the parts. A few minutes work with the trusty old balsa stripper yielded enough strip for my immediate needs. Now I can spend an afternoon building Moonglow's fin and tail plane, from what is in essence, free balsa. The old saying "you learn something every day" is true, unfortunately since I started to weather a bit, its hard to remember what I learned yesterday. The Diatex 1000 arrived yesterday, I was amazed to find that I'd completely forgotten how big something is when its 70" wide. Missusladywoman was not the slightest bit impressed by it, and thought my enthusiasm about this covering material was quite unnecessary.
The following user(s) said Thank You: 4Pedalsfly
Please Log in or Create an account to join the conversation.
- Brian
-
Topic Author
- Offline
- Platinum Member
-
Less
More
- Posts: 1044
- Thank you received: 414
3 years 6 months ago - 3 years 6 months ago #25619
by Brian
Replied by Brian on topic Back to Basics
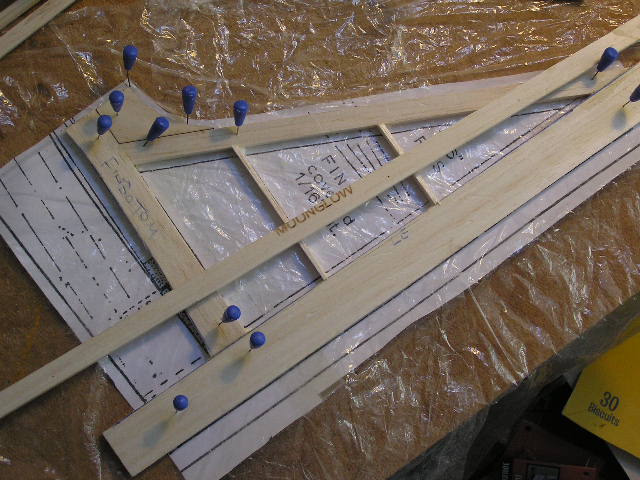
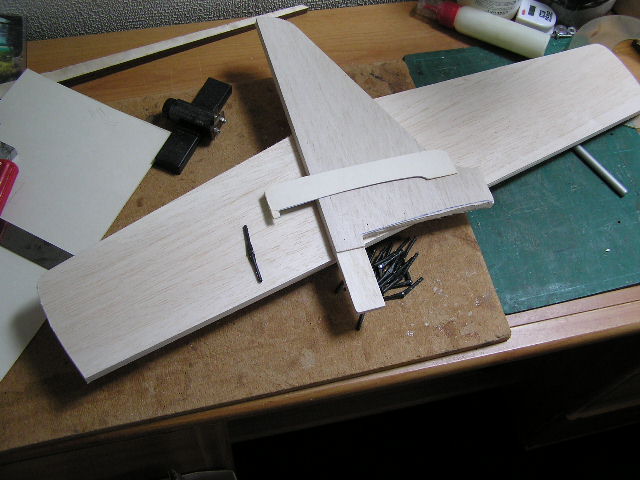
The fin made from recycled bits plus one laser cut part, which is the small fairing at the base of the leading edge. The long bit is 3/8" X 1/4", its for the TE of the tail plane. It went together much quicker than I thought.
Last edit: 3 years 6 months ago by Phil Ford. Reason: Re-insert image
Please Log in or Create an account to join the conversation.
- Brian
-
Topic Author
- Offline
- Platinum Member
-
Less
More
- Posts: 1044
- Thank you received: 414
3 years 6 months ago - 3 years 6 months ago #25624
by Brian
Replied by Brian on topic Back to Basics
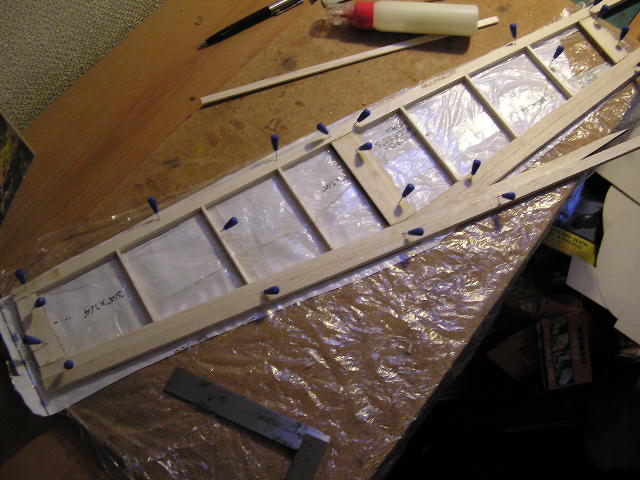
Tail plane basic structure, this will be covered with 3/32" sheet and sanded to a slim airfoil. The fin is similar but covered in 1/16" sheet.
Today I had an email from Kevin with a photo of a Stearman PT-17 fuselage being covered in what looks like Diatex. Looked as though it would be a long job as the bloke doing it was using the same size covering iron as we use on models.
That got me remembering a long time ago when I went to a farm strip at Eye in Norfolk, my chum had a Jabiru hangered there. The hangar opposite was occupied by a chap the renovated PT-17s. It was fascinating just looking at the crates of assorted parts, nearly all of which were ex US Army Air Corps or USAF. His own mount was a dark red painted PT-17 which he flew with a good deal of enthusiasm. I wish I'd had a movie camera on the day he took off and started to roll to the left as soon as the wheels came off the grass, when the wings were vertical there was only a very small gap between the wing tip and the grass. I was told that this was his standard take off and I was the only one taking any notice. I rummaged through my saved pictures to see if I could find the shot of the PT-17 on the ground with its pilot standing in front of it, but I think the photo must be from a previous camera and will be stored on a DVD somewhere.
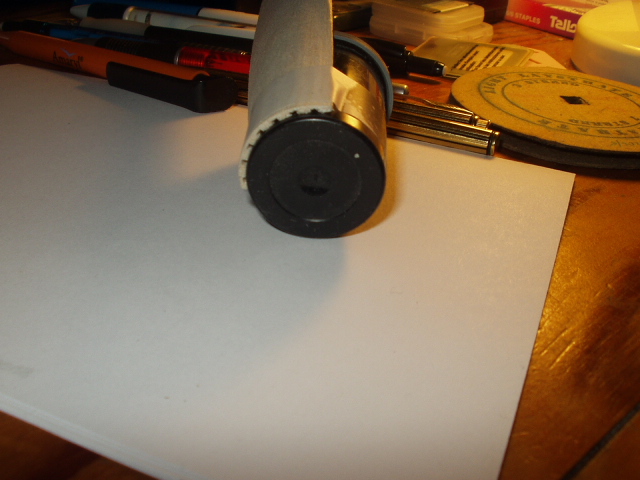
Anyway, while I was looking I found the odd looking photo of the end of a film cassette with a piece of balsa sheet taped to it. I was experimenting with the frustrating task of rolling balsa sheet. I don't know what made me think of it, perhaps I saw it somewhere. The black plastic end of the cassette looks a bit like a cog wheel, the "cogs" are grooves pressed into the balsa with a roller. I used a thick steel washer sandwiched between two pieces of wooden dowel. These were mounted on a modified paint roller frame. The washer pressed the groove the wood dowels controlled the depth of the groove. The grooves were kept straight using a hardwood straight edge. It was quite successful, the photo shows 1/8" sheet rolled round a tight curve. This was done dry, so no soaking and no waiting overnight for it to dry out.
Today I had an email from Kevin with a photo of a Stearman PT-17 fuselage being covered in what looks like Diatex. Looked as though it would be a long job as the bloke doing it was using the same size covering iron as we use on models.
That got me remembering a long time ago when I went to a farm strip at Eye in Norfolk, my chum had a Jabiru hangered there. The hangar opposite was occupied by a chap the renovated PT-17s. It was fascinating just looking at the crates of assorted parts, nearly all of which were ex US Army Air Corps or USAF. His own mount was a dark red painted PT-17 which he flew with a good deal of enthusiasm. I wish I'd had a movie camera on the day he took off and started to roll to the left as soon as the wheels came off the grass, when the wings were vertical there was only a very small gap between the wing tip and the grass. I was told that this was his standard take off and I was the only one taking any notice. I rummaged through my saved pictures to see if I could find the shot of the PT-17 on the ground with its pilot standing in front of it, but I think the photo must be from a previous camera and will be stored on a DVD somewhere.
Anyway, while I was looking I found the odd looking photo of the end of a film cassette with a piece of balsa sheet taped to it. I was experimenting with the frustrating task of rolling balsa sheet. I don't know what made me think of it, perhaps I saw it somewhere. The black plastic end of the cassette looks a bit like a cog wheel, the "cogs" are grooves pressed into the balsa with a roller. I used a thick steel washer sandwiched between two pieces of wooden dowel. These were mounted on a modified paint roller frame. The washer pressed the groove the wood dowels controlled the depth of the groove. The grooves were kept straight using a hardwood straight edge. It was quite successful, the photo shows 1/8" sheet rolled round a tight curve. This was done dry, so no soaking and no waiting overnight for it to dry out.
Last edit: 3 years 6 months ago by Phil Ford.
The following user(s) said Thank You: 4Pedalsfly, kevinross
Please Log in or Create an account to join the conversation.
- Brian
-
Topic Author
- Offline
- Platinum Member
-
Less
More
- Posts: 1044
- Thank you received: 414
3 years 6 months ago - 3 years 6 months ago #25631
by Brian
Replied by Brian on topic Back to Basics
The tail plane and fin are sheeted and the edges sanded. It's too messy for indoor sanding the sheet to a slim airfoil section, so the job will be done in the garden if the sun comes out again this week. I've decided to use Robart type pin hinges on all the control surfaces, I have enough of those but not enough of the flat style pin hinge, in fact I only have three of those and one is missing its pin. I completely forgot to order 1/8" X 1/4" hard balsa strips for the wing spars, as luck would have it, in my box of odd bits of balsa sheet I had a sheet of hard 1/8". This stripped nicely into the eight lengths required. I was relieved to find that the remaining piece of the sheet measured a tad under 1" wide, so the strips are accurate. To make sure that the strips are approximately the same stiffness, I used the old free-flight method for testing longerons for rubber models.
I put the strips side by side on the bench, just far enough to be able to hold them down with a lead weight. Fortunately the difference in height of the unsupported ends showed that the strips were about even in stiffness. Once again the scrap from the laser cut parts came in handy, the profile of the card template came directly from the piece that the fuselage was cut from. Yesterday I downloaded a colour picture of the Moonglow in the original colours of the prototype. The model is either silk or heavyweight tissue covered, I think Diatex 1000 will give the same effect. Top trim on the forward fuselage is mainly green changing to black in front of the cockpit. The wings are trimmed in green on the leading edge only.
I put the strips side by side on the bench, just far enough to be able to hold them down with a lead weight. Fortunately the difference in height of the unsupported ends showed that the strips were about even in stiffness. Once again the scrap from the laser cut parts came in handy, the profile of the card template came directly from the piece that the fuselage was cut from. Yesterday I downloaded a colour picture of the Moonglow in the original colours of the prototype. The model is either silk or heavyweight tissue covered, I think Diatex 1000 will give the same effect. Top trim on the forward fuselage is mainly green changing to black in front of the cockpit. The wings are trimmed in green on the leading edge only.
Last edit: 3 years 6 months ago by Phil Ford.
The following user(s) said Thank You: 4Pedalsfly, kevinross
Please Log in or Create an account to join the conversation.
Moderators: DaveBright
Time to create page: 0.637 seconds
Latest Posts
-
-

- Pitts Special 120FS
- In WimborneMac Members / For Sale - Exchange - Wanted
- by superadmin
- 1 week 19 hours ago
-
©
2009 - 2025
WMAC PCF Design